Introduction
This page shows the instructions on how to configure bonding for the diverse Operating Systems.
As Leaseweb VPC provides redundant uplinks to our Dedicated Servers, these instructions are tailored for that setup.
Note: The Active/Active (LACP) with DHCP is the default and preferred mode.
Our standard deployment:
- Public internet is untagged (no VLAN tag needs to be set on the interface)
- Private Networks (both L2/Isolated) and L3(Routed) are using VLAN tags.
- Each server is connected to 2 LEAF switches for its connectivity, LEAF-01 and LEAF-02
For Linux based operating systems, the procedures assume the following.
This should be confirmed by comparing the mac address and the ones associated to the interfaces.
- eno1 is connected to LEAF-01
- eno2 is connected to LEAF-02
Change the interface names according in the procedure: configuration values, file names, command arguments, etc.
You will find the mac address associated to an interface using the ip link show command for Linux based operating systems. The mac address can be found next to link/ether.
root@example:~# ip link show
1: lo: <LOOPBACK,UP,LOWER_UP> mtu 65536 qdisc noqueue state UNKNOWN mode DEFAULT group default qlen 1000
    link/loopback 00:00:00:00:00:00 brd 00:00:00:00:00:00
2: eno1: <BROADCAST,MULTICAST> mtu 1500 qdisc noop state DOWN mode DEFAULT group default qlen 1000
    link/ether ec:2a:72:22:d1:46 brd ff:ff:ff:ff:ff:ff
    altname enp4s0f0
3: eno2: <BROADCAST,MULTICAST,UP,LOWER_UP> mtu 1500 qdisc mq state UP mode DEFAULT group default qlen 1000
    link/ether b4:96:91:ef:69:e4 brd ff:ff:ff:ff:ff:ff
    altname enp51s0f0
Public Network configuration
CentOS and Redhat based Operating Systems
yum install ifenslave ethtool

vim /etc/modprobe.d/bonding.conf

alias bond0 bonding
options bonding mode=4 miimon=100 downdelay=200 updelay=200 xmit_hash_policy=layer3+4

vim /etc/sysconfig/network-scripts/ifcfg-bond0

DEVICE=bond0
IPADDR=10.0.0.0
NETMASK=255.0.0.0
GATEWAY=10.0.0.254
NM_CONTROLLED=no
BOOTPROTO=none
ONBOOT=yes
USERCTL=no

vim /etc/sysconfig/network-scripts/ifcfg-eno*

(replace * with the network interface that needs to be bonded)

DEVICE="eno*"
ONBOOT=yes
MASTER=bond0
SLAVE=yes
NETBOOT=yes
IPV6INIT=yes
BOOTPROTO=none
TYPE=Ethernet
DEFROUTE=yes
PEERDNS=yes
PEERROUTES=yes
USERCTL=no
NM_CONTROLLED=no
IPV4_FAILURE_FATAL=no
IPV6INIT=yes
IPV6_AUTOCONF=yes
IPV6_DEFROUTE=yes
IPV6_PEERDNS=yes
IPV6_PEERROUTES=yes
IPV6_FAILURE_FATAL=no

modprobe bonding mode=4 miimon=100 downdelay=200 updelay=200

reboot
Debian 8 & 9 Ubuntu 14.04 & 16.04
apt-get install ifenslave ethtool

vim /etc/modprobe.d/bonding.conf

alias bond0 bonding
options bonding mode=4 miimon=100 lacp_rate=1 xmit_hash_policy=layer3+4

echo "bonding" >> /etc/modules
echo "mii" >> /etc/modules

vim /etc/network/interfaces

allow-hotplug eth0
auto eth0 # this can also be something else
iface eth0 inet manual
bond-master bond0

auto eth1 # this can also be something else
iface eth1 inet manual
bond-master bond0

auto bond0
iface bond0 inet static
address 0.0.0.0/26 # 1 tab in front of address and all the lines below
gateway x.x.x.x.
dns-name server 62.212.64.122
bond-mode 802.3ad
bond-miimon 100
bond-lacp_rate 1
slaves none
bond-downdelay 200
bond-updelay 200

reboot
Ubuntu 18.04 & Ubuntu 20.04 (using netplan)
Ubuntu 18.04/20.04 works differently than its predecessors.
If you have connectivity to the machine, you might try the following to configure bonding:
- Check the interface names on the machine:
ip link show. - Modify the YAML file at your local machine, using any editor that supports YAML. An example file can be found below.
scpthe YAML file to the server.- Put the file in
/etc/netplan/ - Enable LACP switch side.
- Login with Remote Management.
- Backup the old config (
cp /etc/netplan/something /etc/netplan/something.bak). - Rename the new YAML file to name of the old file.
- Run the following command:
netplan apply. - Check with
ipaddrif the bond came up. - If it did not come up, try a reboot.
network:
  version: 2
  renderer: networkd
  ethernets:
    enp2s0:
      dhcp4: false
      dhcp6: false
      optional: true
    eno1:
      dhcp4: false
      dhcp6: false
      optional: true

  bonds:
    bond0:
      addresses: [ 95.211.192.1/26 ]
      gateway4: 95.211.192.62
      nameservers:
          search: [ localhost ]
          addresses:
            - "8.8.8.8"
            - "1.1.1.1"
      interfaces:
        - enp2s0
        - eno1
      parameters:
        mode: 802.3ad
        lacp-rate: fast
        mii-monitor-interval: 100
VMware ESXi
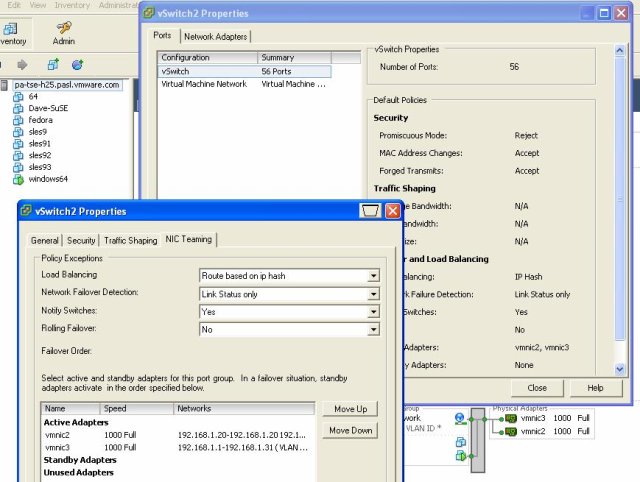
- Click the ESXi/ESX host.
- Click the Configuration tab.
- Click the Networking link.
- Click Properties.
- Click the virtual switch in the Ports tab and click Edit.
- Click the NIC Teaming tab.
- From the Load Balancing dropdown, select Route based on ip hash. However, see note below.
- Verify that there are two or more network adapters listed under Active Adapters.
Rescue mode
service networking stop

#nano /etc/modprobe.d/bonding.conf
alias bond0 bonding
options bonding mode=4 miimon=100 lacp_rate=1

echo "bonding" >> /etc/modules
echo "mii" >> /etc/modules

#nano /etc/network/interfaces

auto eth0
iface eth0 inet manual
bond-master bond0

auto eth1
iface eth1 inet manual
bond-master bond0

auto bond0
iface bond0 inet static
address **Public IP**
gateway **Public GW**
netmask 255.255.255.xxx
bond-mode 802.3ad
bond-miimon 100
bond-downdelay 200
bond-updelay 200
bond-lacp-rate 4
bond-slaves none
dns-nameservers 8.8.8.8

service network start
VPC Private Networks
Private Networking VLAN tagging configuration
While public internet connectivity relies on the untagged bond0 interface, private networks withing your Leaseweb VPC use tagged VLANs for both isolated layer 2 and routed layer 3 networks.
To connect your server to an internal network, you need to configure a tagged subinterface over your existing network VLAN ID.
You can create as many tagged bonded interfaces as needed for your multiple private networks.
Replace XXXX in the file names and configurations below with your specific VLAN ID.
DHCP configuration for Routed Layer 3 networks
If you requested a routed layer 3 network with DHCP enabled, your server will automatically receive a private IP from the DHCP pool.
Create or edit the following subinterface file:
/etc/sysconfig/network-scripts/ifcfg-bon0.XXXX

DEVICE=bond0.XXXX
BOOTPROTO=dhcp
ONBOOT=yes
VLAN=yes
Static configuration for Isolated Layer 2 or static Layer 3 networks
If you requested an isolated layer 2 network or a routed layer 3 network without DHCP, you need to statically assign your private IP address on the subinterface.
Use this configuration instead:
/etc/sysconfig/network-scripts/ifcfg-bon0.XXXX

DEVICE=bond0.XXXX
BOOTPROTO=none
ONBOOT=yes
VLAN=yes
PREFIX=24
IPADDR=10.x.x.x
Execute the following commands to apply the new VLAN configuration to your network manager:
nmcli connection reload
nmcli connection up "System bond0.XXXX"
Please note the exact configuration files, network managers and commands may vary depending on your Linux distribution or operating system version. (nmcli, systemd.networkd or netplan)
The core technical requirement across all systems is to create an 802.1Q tagged subinterface mapped to your specific VLAN ID over your existing Active/Active LACP bond.