This page describes how to reinstall your Dedicated server through the Action panel in the Customer Portal.
Reinstalling your Dedicated Server
Leaseweb delivers IaaS Dedicated servers to customers. As a customer you are able to install or re-install the Operating System for those servers in different ways. This page describes these methods.
Warning
During installation, all existing data on your server will be wiped, and cannot be recovered. If you want to save any of the data, please backup before installing.
In case you don’t have access to the server, try starting your server in rescue mode and recover your data before performing an installation.
By default all installations are done using the Leaseweb installer. This installer is capable of deploying the Operating system of your choice rapid and tuned for best performance on your Dedicated server. During the process a custom partitioning scheme can be applied for Linux & BSD distributions.
Another option is using the Leaseweb API, or installing from your own http(s) offered image over our iPXE boot environment. Please check the explanation below.
Reinstalling a Dedicated server using the Leaseweb installer
Perform the following steps to install a Dedicated or Bare Metal server:
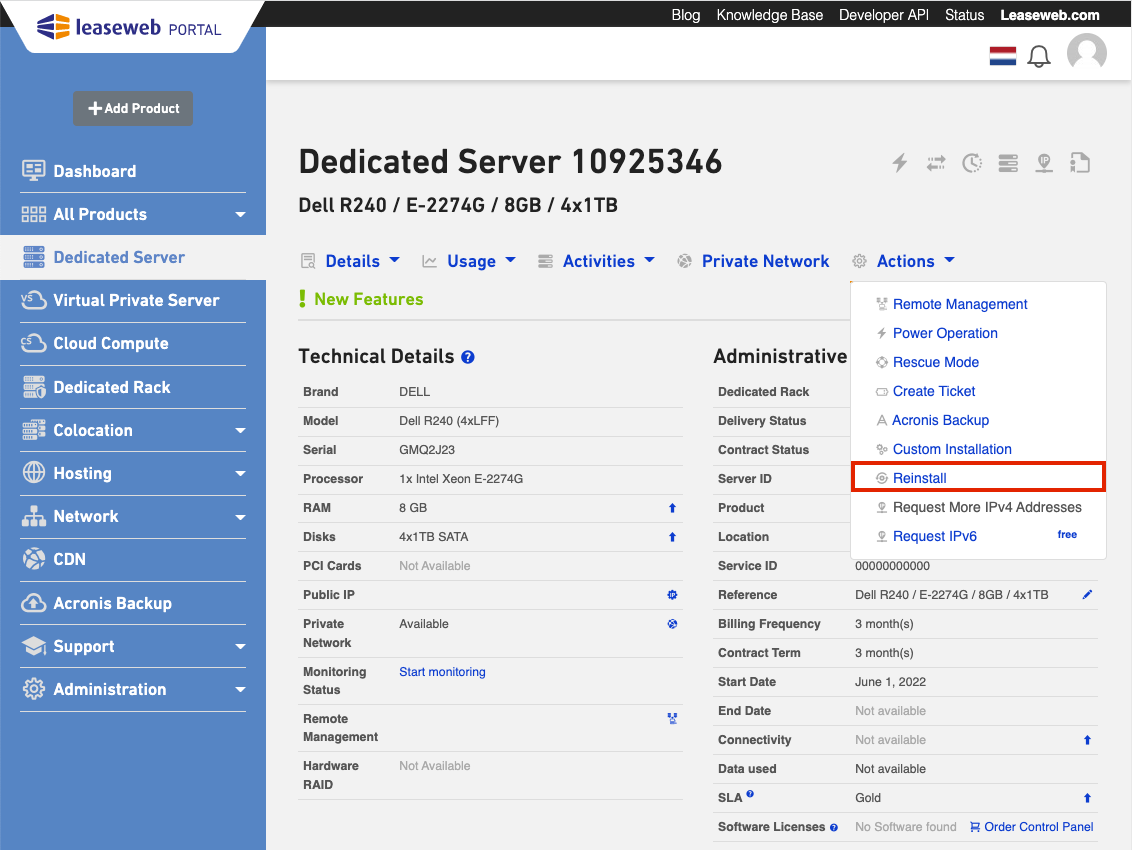
- In the menu bar select Dedicated Server.
The Dedicated Servers overview page displays. - Click the ID of the server that you want to reinstall.
The Server Details page displays.
- Under Actions menu, click Reinstall.
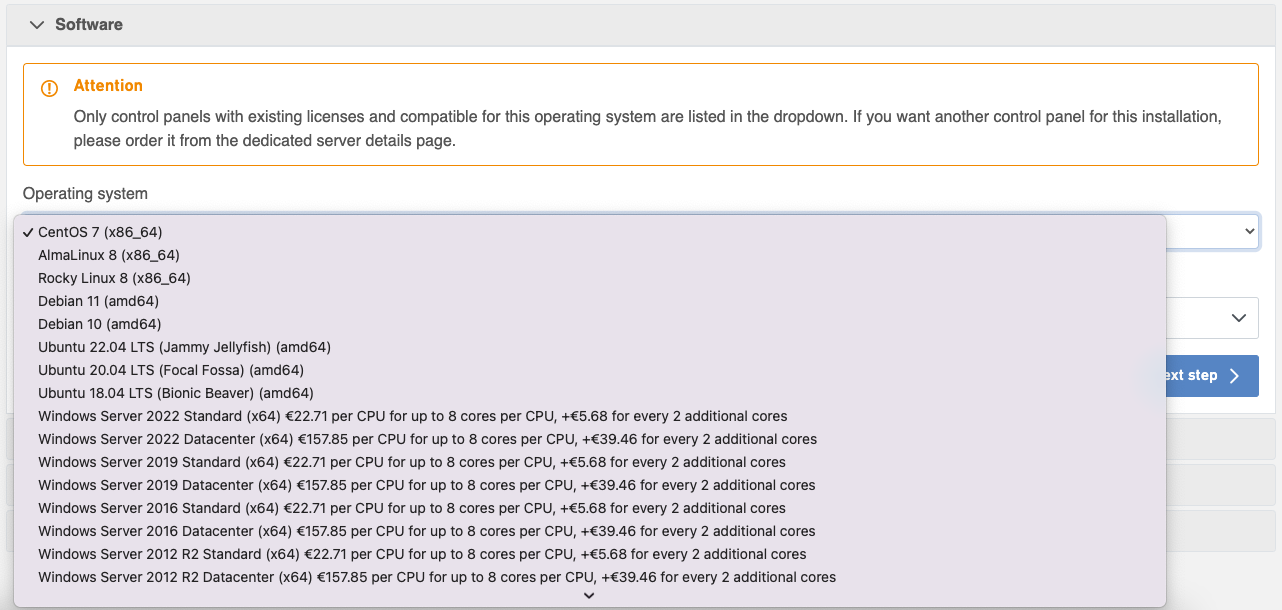
- The first step in the Installation menu is to choose the Operating System and optional Extra Software (Control Panel or Database) to install your server with:

Information
Extra Software
You can choose a Control Panel or any of the Databases supported by the operating system. Only one extra software for a (re-)install can be chosen.
Operating System Licensing
For operating systems that require a software license, the monthly cost is displayed. It will be added to your invoice automatically when the (re-)install is started.
If a reinstall is performed with a free operating system, any existing operating system licenses are automatically canceled at the end of the contract term.
Control Panels
Only the control panels that are supported by Leaseweb’s Installation System and compatible with the selected operating system will be displayed.
If your server has multiple IP addresses, the main IP address will be registered with the software vendor. You will need to use this IP address to access the control panel.
Databases
At the moment, the following Database Management Systems are available:
- MariaDB
- MongoDB
- PostgreSQL
- Redis
The DBMS supported by the selected operating system will be listed under the Databases group in Extra Software. These are unmanaged single-instance installations. The latest version available at the base OS repository will be installed.
Note: DBMS for Windows and FreeBSD installations are currently unsupported.
- To make server management more easy, there are diverse management control panels that support hosting companies in their day to day business. Leaseweb offers the following control panels:
- Plesk Onyx (previously known as Parallels Plesk) – https://www.plesk.com/
- cPanel – https://cpanel.com/
- Installations of the cPanel control panel can take quite some time. If you can login to your server, please make sure the cPanel installation is finished before making any changes to your server.
For the behaviour of the default installation, please refer to cPanel documentation.
- Installations of the cPanel control panel can take quite some time. If you can login to your server, please make sure the cPanel installation is finished before making any changes to your server.
- Using these panels have license fees included. If you reinstall a server that initially did not have a licensed panel, you will have to purchase the license first.
- For more information about control panels, please refer to Control Panels.
- If you have selected a DBMS to be installed along with your operating system, you will be asked to provide some configuration options, such as a database name, a username and a password for the database access, and the network interface type to bind the database to. When the dedicated server is part of a Private Network, either internal or public network interface type can be selected. Please note that you should have adequate firewall rules in place if you choose to bind the database to the public network interface.

- Select an operating system from the drop-down list, and click the Next step button.
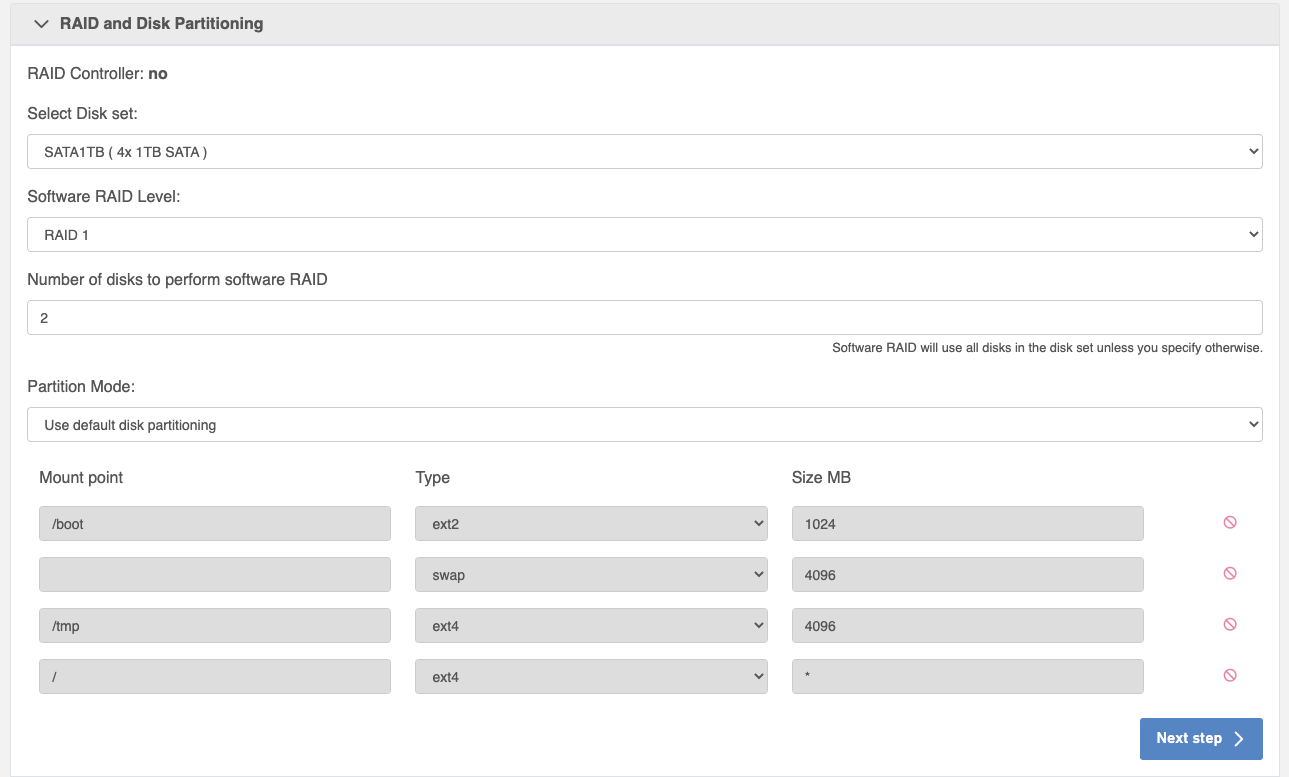
The RAID and Disk Partitioning settings page is displayed.
Information
When installing on NVME drives, please ensure the server is operating in UEFI boot mode before installing OS to an NVMe drive.
| Field Name | Description |
|---|---|
| Select Disk Set | Select the desired Disk set for installing the OS. |
| RAID Level | Select the desired RAID level to configure on the selected Disk set. |
| Number of disks to perform RAID | Select the desired amount of drives to be used with above-mentioned RAID level. Defaults to all available drives in a Disk set if the field is left unspecified. |
| Mount point | Select the mount point. |
| Type | Select the partition type and filesystem. Note that not all partition types may be supported by all operating systems. |
| Size MiB | Enter the size of each partition. Note: We recommend that you insert * to assign the remaining amount of space to the last partition. This is to ensure that all available space is assigned. Currently, this is only supported for the last partition. |
Information
About RAID
Installing your server with Software RAID feature is an effective way to enable data redundancy and/or performance improvements on servers that are not equipped with a Hardware RAID option.
The following RAID levels are supported for software RAID:
| OS | Software RAID level |
|---|---|
| AlmaLinux | 0, 1, 5, 10 |
| Debian | 0, 1, 5, 10 |
| Ubuntu | 0, 1, 5, 10 |
| Rocky Linux | 0, 1, 5, 10 |
| FreeBSD | None |
| Microsoft Windows Server | None |
Note
- RAID is applied on the specified Disk set during installation (SATA1TB, SSD512GB, etc.) Please ensure that subsequent disks after the first disk are at least equal in capacity, or the installation will fail.
- Contrary to other RAID levels, RAID 0 provides increased capacity and performance, but reduced redundancy and uptime!
For servers with a Hardware RAID controller, the Hardware RAID level can be set from this screen, instead of Software RAID:
Single Drive Array
Choosing this option for server with Hardware RAID controller will configure each drive with RAID 0, essentially exposing all drives to the Operating System. Equivalent to pass-through mode, while still utilizing Hardware RAID controller caching.
Custom partitioning
- If the total size of the partitions exceeds the hard disk size, or if you select options that are incompatible with the operating system, the (re-)installation will fail. If you are unsure about customized partition layout, we recommend that you select Default Partitioning to avoid any errors.
- Additional disks can be partitioned after the installation has finished.
- In the Settings page, optionally a hostname, timezone, SSH keys and postinstall scripts can be specified.

- Additionally, you can opt out of the email that is sent to notify you when the reinstall has finished, and the power cycle that is used to start the installation.
- In the SSH keys field, enter one or more SSH public keys exactly as you would add it to
/root/.ssh/authorized_keysfile. - In the Post-installation Script field you can put any script, it is written to an executable text file and executed as root after installation. Supported scripting languages depend on the operating system chosen.
- With Linux / FreeBSD, postinstall scripts must start with a
#!“shebang” line. Script logs will go to/var/log/lsw-postinstall.txt - On Windows, the postinstall script is executed with Powershell, as Administrator.
- In the Callback URL field, an additional callback URL can be added which is called with a plain HTTP POST when the installation has finished.
- The POST data includes the installation job information in
jsonformat. - Note: if you uncheck the power cycle box, you will have to restart your server manually for the reinstall to start. The reinstallation remains valid for 9 hours, before it is automatically expired if the server is not restarted.
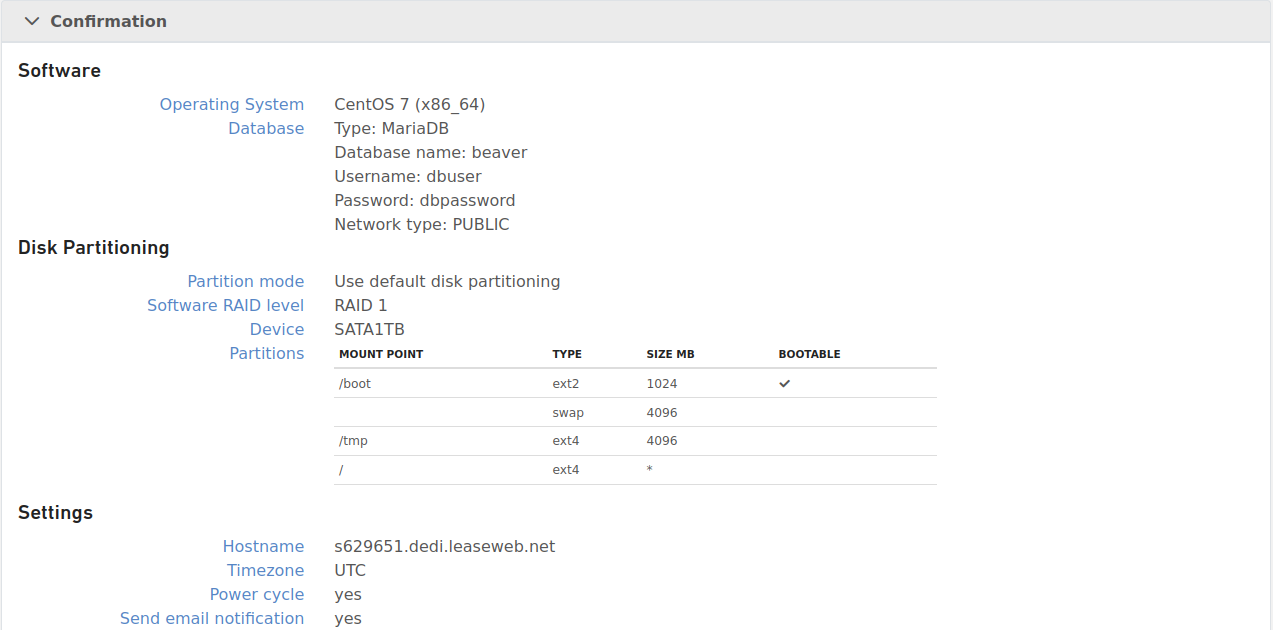
- The Confirmation page is displayed.

- The reinstall of your server with the selected operating system starts when you press the Install button.
- In case you’ve selected Windows or a control panel, an additional message is shown to inform you about the cost.
- You will be assigned initial generated passwords that will display after (re-)installation is complete.
- We recommend that you change your passwords often and also right after the installation. To view the password, on the server details page, under Details > Credentials, click View Password.

- See also Managing Dedicated Server credentials
Operating systems supported by the Leaseweb installer
At Leaseweb we try to support a wide range of operating systems. Our installers always use the latest stable version and we offer all currently maintained versions till the last day of support. We support the open source community in multiple ways, one of them offering them free hosting of their software via our mirrors (Cheat Sheet).
| Distribution | Information | Licence |
|---|---|---|
| AlmaLinux | https://almalinux.org/ | Open Source |
| Rocky Linux | https://rockylinux.org/ | Open Source |
| Debian | http://www.debian.org/ | Open Source |
| FreeBSD | https://www.freebsd.org/ | Open Source |
| Ubuntu | http://www.ubuntu.com/ | Open Source |
| Proxmox | https://www.proxmox.com/ | Open Source |
| Microsoft Windows Server | http://www.microsoft.com/ | Microsoft paid licensing model |
Installation of a Dedicated Server using your own iPXE server
- Open Source boot firmware iPXE for installing your server (Linux or Windows). On ipxe.org you can find a lot of examples and information how this works.
- On the Leaseweb developer page you can find the instructions for usage of the api-calls /bareMetals/{bareMetalId}/leases and /bareMetals/{bareMetalId}/leases/{macAddress} needed for this operation.
- Automated provisioning platforms like FOREMAN can deliver a good framework to provide the needed automation.