This section of the article explains how to manage your mailboxes from the Customer Portal and explains the most frequently asked questions for our Mail hosting platform. All these features are only available if you have a Web Hosting pack or an Email pack with Leaseweb.
How to configure Leaseweb Mail
SPF Records per entity, please use them accordingly.
- For NL: v=spf1 include:mh-spf.leaseweb.com ~all
- For US: v=spf1 include:mh-spf.leaseweb.us ~all
- For DE: v=spf1 include:mh-spf.leaseweb.de ~all
- For CA: v=spf1 include:mh-spf.leaseweb.ca ~all
- For UK: v=spf1 include:mh-spf.leaseweb.uk ~all
- For SG: v=spf1 include:mh-spf.leaseweb.sg ~all
If you are looking for information on how to configure your email client, please refer to the Configuring Email Settings article.
Email client services for NL customers
| Hostname | Services | IPv6 |
|---|---|---|
| mail.leaseweb.com | POP3, POP3s, IMAP, IMAPs | ✅ |
| smtp.leaseweb.com | SMTP (ports 25 and 587), SMTPs | ✅ |
| webmail.leaseweb.com | HTTP, HTTPS (webmail) | ✅ |
For US customers
| Hostname | Services | IPv6 |
|---|---|---|
| mail.leaseweb.us | POP3, POP3s, IMAP, IMAPs | ✅ |
| smtp.leaseweb.us | SMTP (ports 25 and 587), SMTPs | ✅ |
| webmail.leaseweb.us | HTTP, HTTPS (webmail) | ✅ |
For DE customers
| Hostname | Services | IPv6 |
|---|---|---|
| mail.leaseweb.de | POP3, POP3s, IMAP, IMAPs | ✅ |
| smtp.leaseweb.de | SMTP (ports 25 and 587), SMTPs | ✅ |
| webmail.leaseweb.de | HTTP, HTTPS (webmail) | ✅ |
For CA customers
| Hostname | Services | IPv6 |
|---|---|---|
| mail.leaseweb.ca | POP3, POP3s, IMAP, IMAPs | ✅ |
| smtp.leaseweb.ca | SMTP (ports 25 and 587), SMTPs | ✅ |
| webmail.leaseweb.ca | HTTP, HTTPS (webmail) | ✅ |
For UK customers
| Hostname | Services | IPv6 |
|---|---|---|
| mail.leaseweb.uk | POP3, POP3s, IMAP, IMAPs | ✅ |
| smtp.leaseweb.uk | SMTP (ports 25 and 587), SMTPs | ✅ |
| webmail.leaseweb.uk | HTTP, HTTPS (webmail) | ✅ |
For SG customers
| Hostname | Services | IPv6 |
|---|---|---|
| mail.leaseweb.sg | POP3, POP3s, IMAP, IMAPs | ✅ |
| smtp.leaseweb.sg | SMTP (ports 25 and 587), SMTPs | ✅ |
| webmail.leaseweb.sg | HTTP, HTTPS (webmail) | ✅ |
Information
All smtp.leaseweb.xx requires authentication.
Mail servers (for MX records)
| Hostname | Remarks | IPv6 |
|---|---|---|
| mailfilter1.leaseweb.com | virus & spam filter | ✅ |
| mailfilter2.leaseweb.com | virus & spam filter | ✅ |
| mailfilter3.leaseweb.com | virus & spam filter | ✅ |
For US customers
| Hostname | Remarks | IPv6 |
|---|---|---|
| mailfilter01.leaseweb.us | virus & spam filter | ✅ |
| mailfilter02.leaseweb.us | virus & spam filter | ✅ |
For DE customers
| Hostname | Remarks | IPv6 |
|---|---|---|
| mailfilter01.leaseweb.de | virus & spam filter | ✅ |
For CA customers
| Hostname | Remarks | IPv6 |
|---|---|---|
| mailfilter01.leaseweb.ca | virus & spam filter | ✅ |
For UK customers
| Hostname | Remarks | IPv6 |
|---|---|---|
| mailfilter01.leaseweb.uk | virus & spam filter | ✅ |
For SG customers
| Hostname | Remarks | IPv6 |
|---|---|---|
| mailfilter01.leaseweb.sg | virus & spam filter | ✅ |
Viewing your mailboxes, email aliases, and autoresponders
From the Customer Portal, you can view and manage your mailbox, email aliases, and autoresponders. You can also add a new email account and email aliases. All these features are only available if you have a Web Hosting pack or an email pack with Leaseweb.
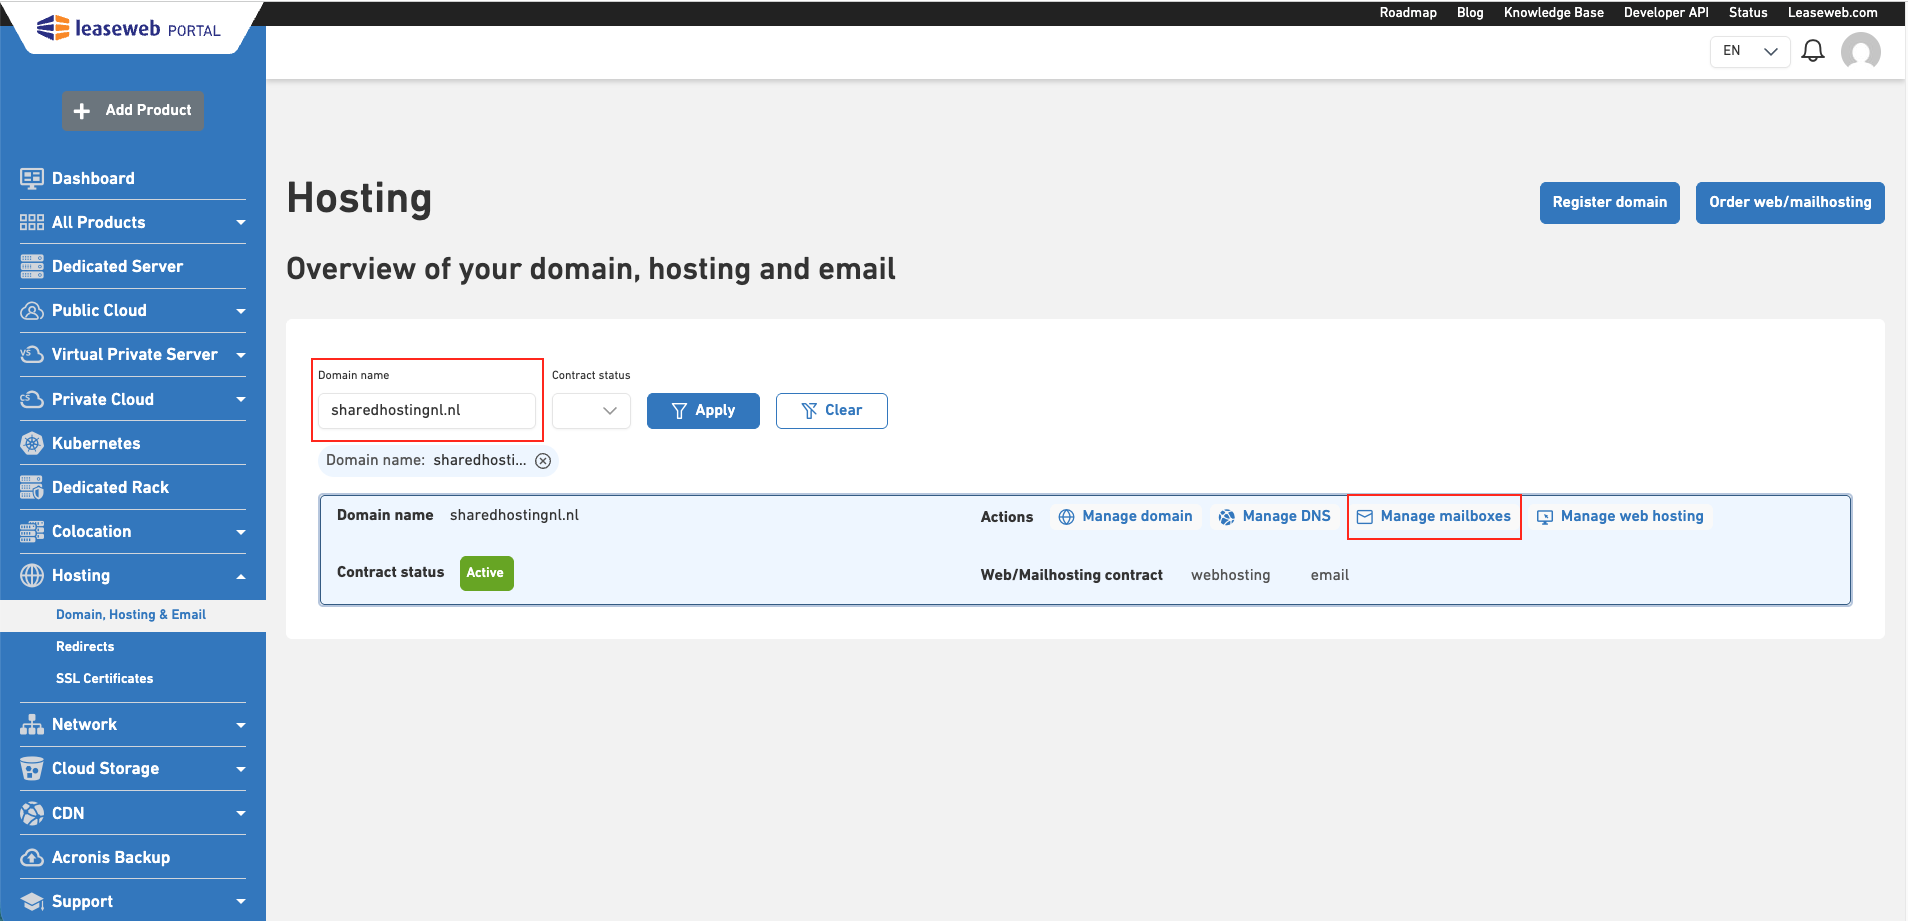
- In the Customer Portal left panel, under Hosting, select Domain, Hosting & Email.

- From the Hosting Overview page, search for the domain you want to manage and then click the Mailboxes link under the Actions column.
Managing a mailbox
You can view, edit, and delete your mailbox.
Creating a mailbox
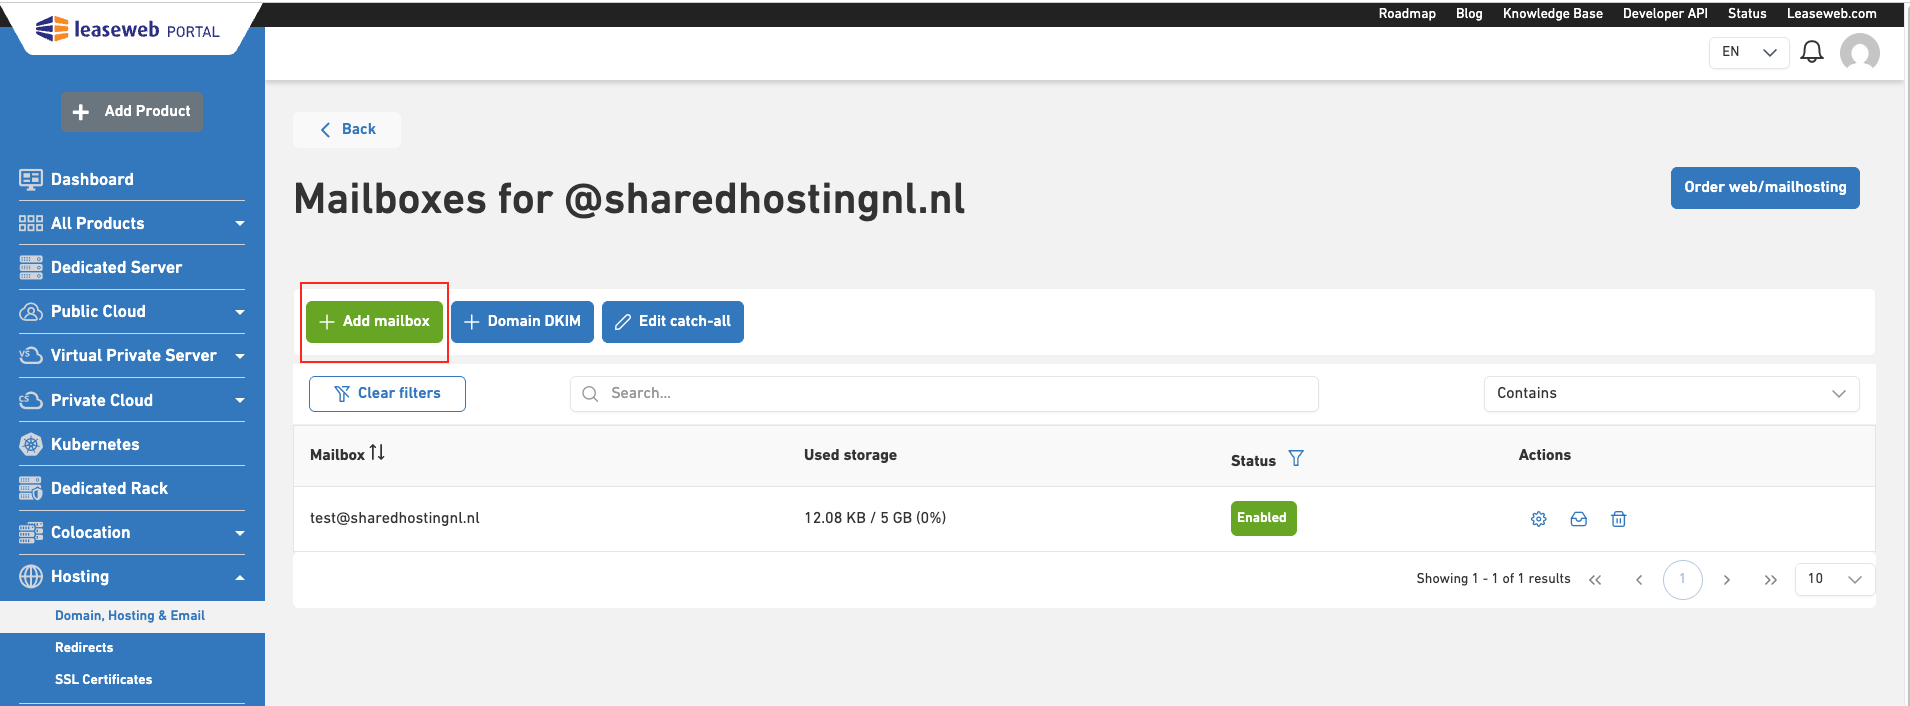
- From the Domain Overview page, click the Manage Mailboxes link under the Actions column for the domain you want to manage mailboxes.

- A list of mailboxes associated with that domain will be listed.
- On the Mailbox List page, click Add mailbox button to create a new mailbox.
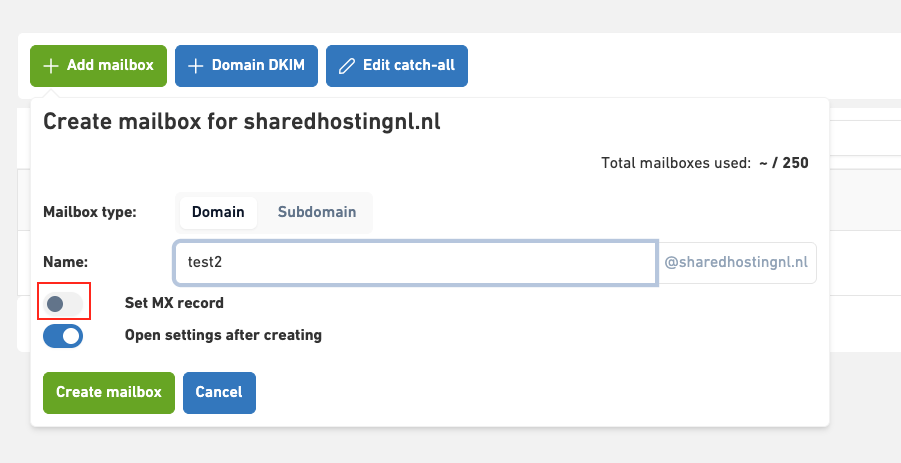
- In the pop-up, select the Domain to Create mailbox for the main domain. Also, you can set the MX-record for the domain by toggling the button only when DNS records are managed by Leaseweb.
- After you click Create mailbox, new mailbox is created, and you can set the password and other mailbox settings in the settings page.
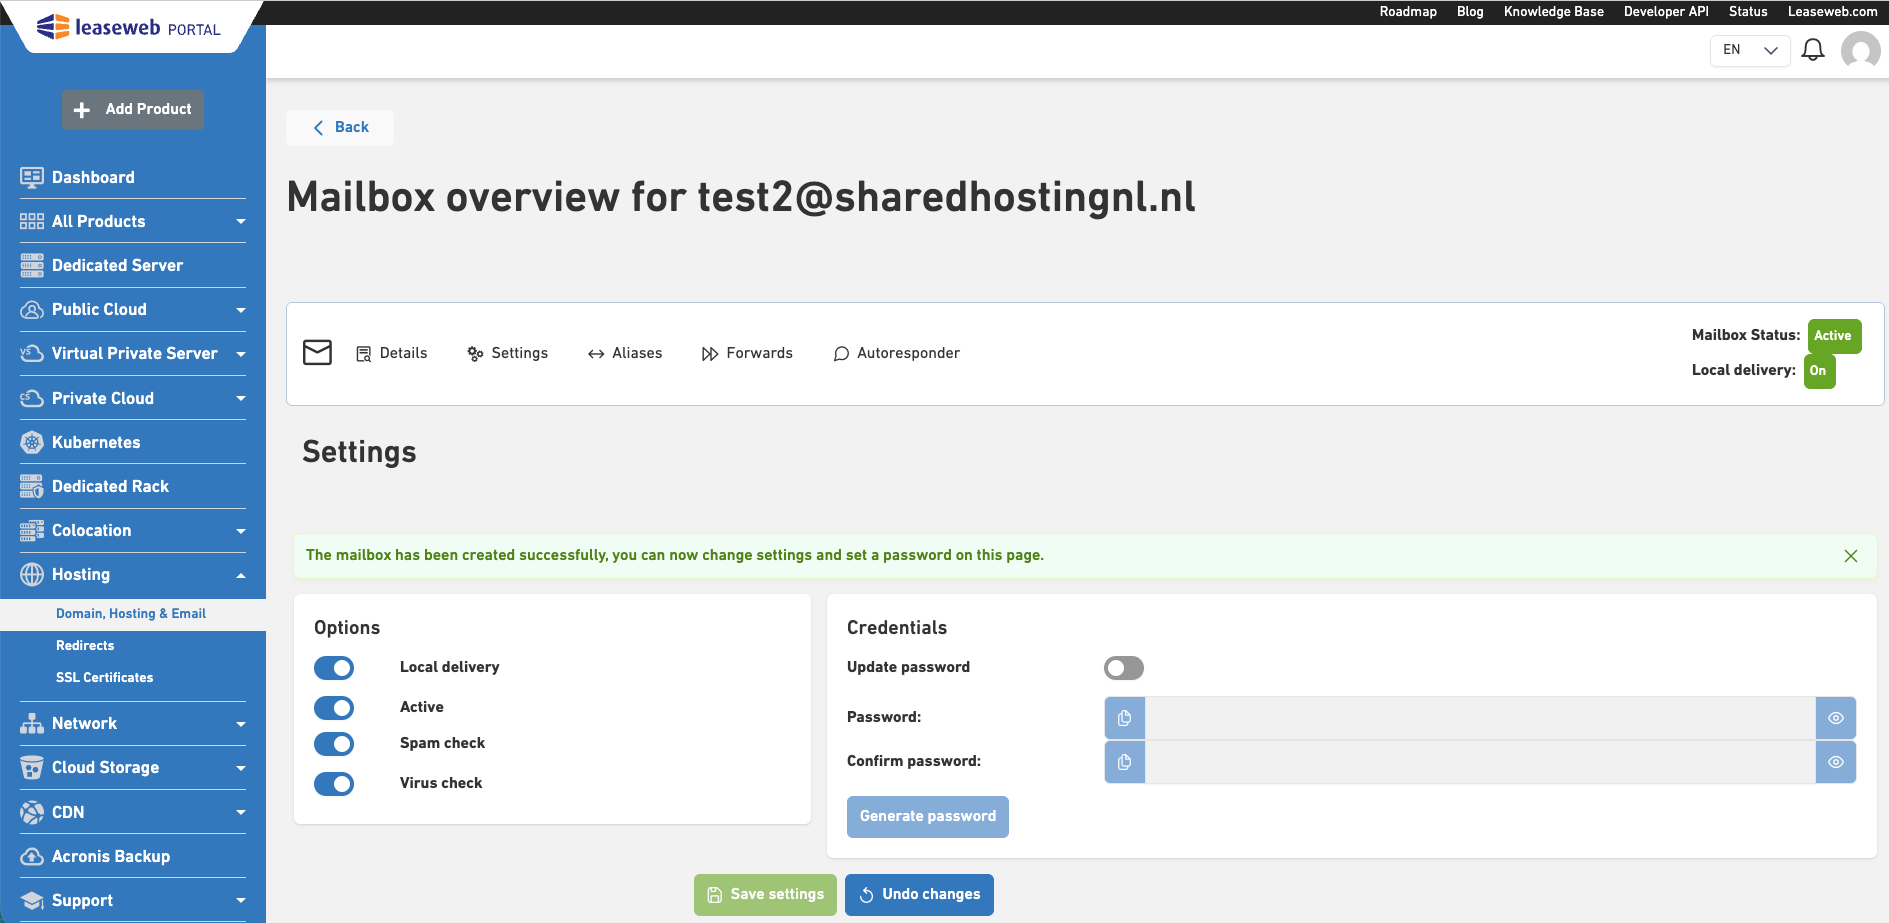
- You can make the changes and click the Save settings button to update.
After adding your new email account, you can configure it based on the instructions given in this topic: Configuring Email Settings.
Back to the top ↑Creating a mailbox for sub-domain
- From the Mailbox List page, click Add mailbox.

- In the pop-up, select the Subdomain to create a mailbox for sub-domain. Enter both the mailbox name and the sub-domain name to create a mailbox. Also, you can set the MX-record for the sub-domain by toggling the button only when DNS records are managed by Leaseweb.
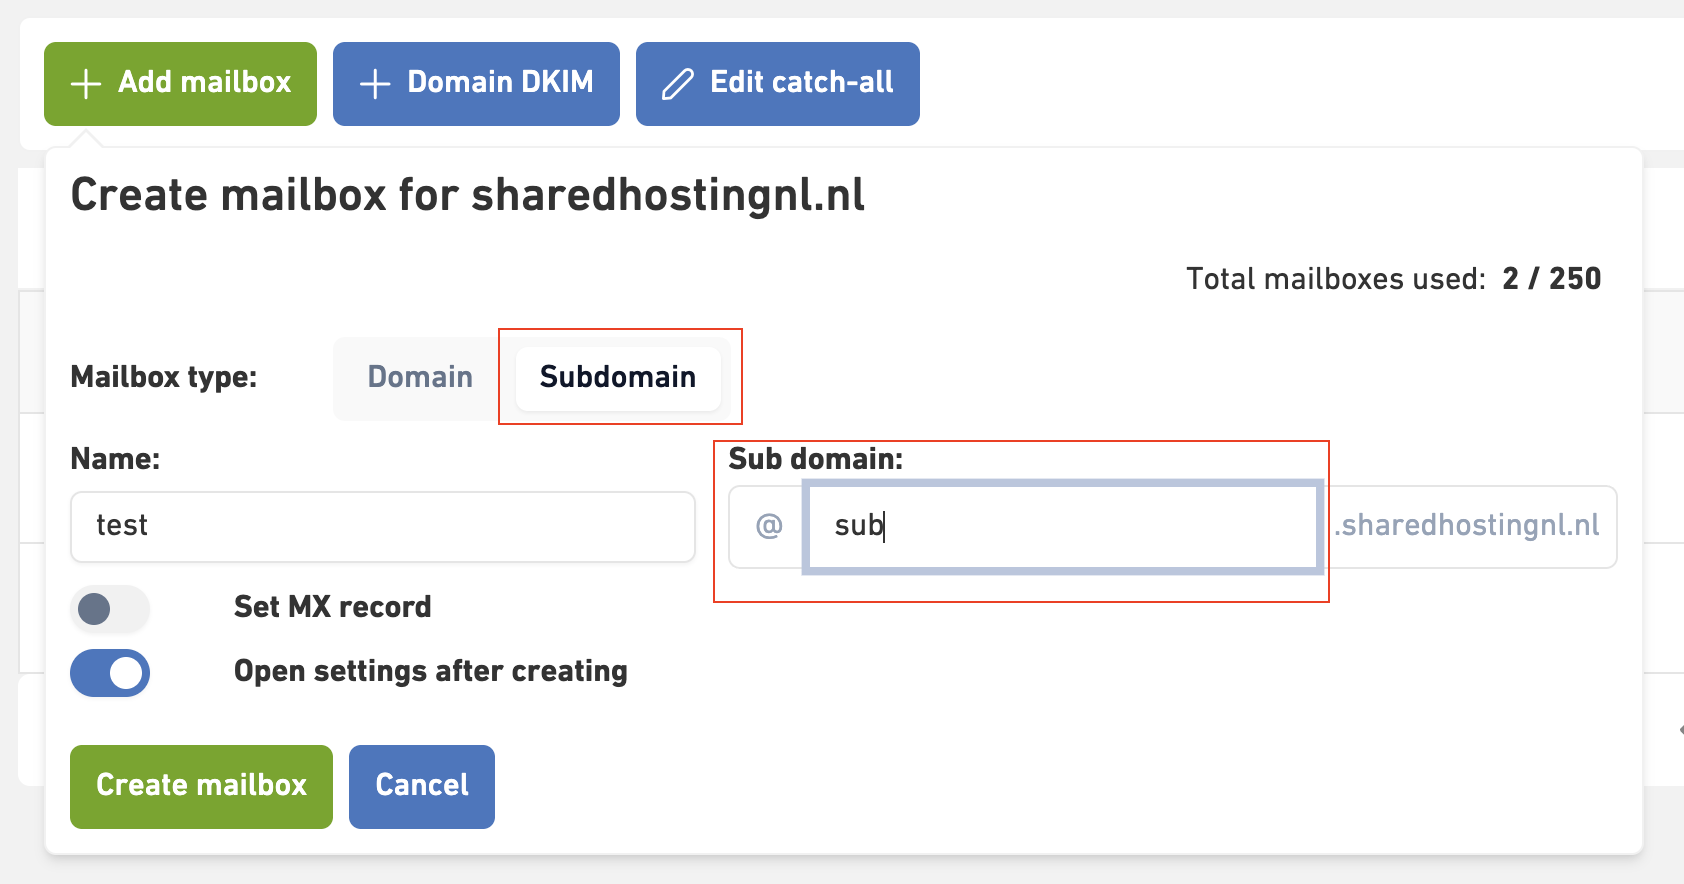
- After you click Create mailbox, a new mailbox for sub-domain is created, and you can set a password and adjust other mailbox settings in the settings page.

- You can make the changes and click the Save settings button to update.
After adding your new email account, you can configure it based on the instructions given in this topic: Configuring Email Settings.
Viewing and editing a mailbox
Perform the following steps to view or edit a mailbox:
- From the Domain Overview page, click the Manage Mailboxes link under the Actions column for the domain you want to manage mailboxes.

- A list of mailboxes associated with that domain will be listed. It is possible to view the details for each mailbox. Select Details under Mailbox Options.
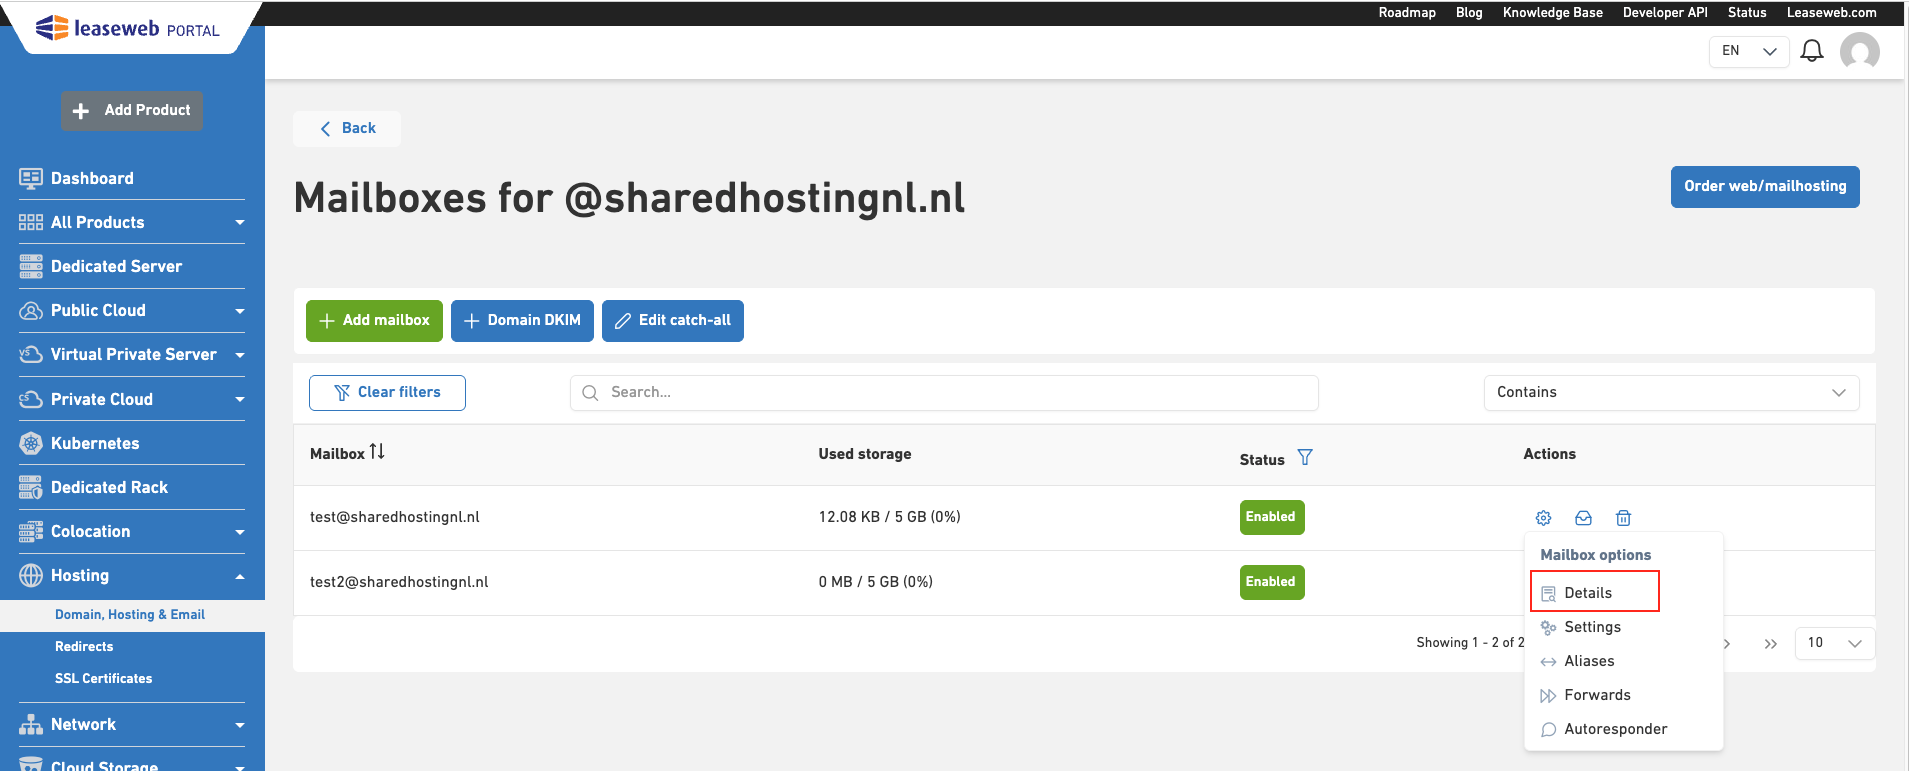
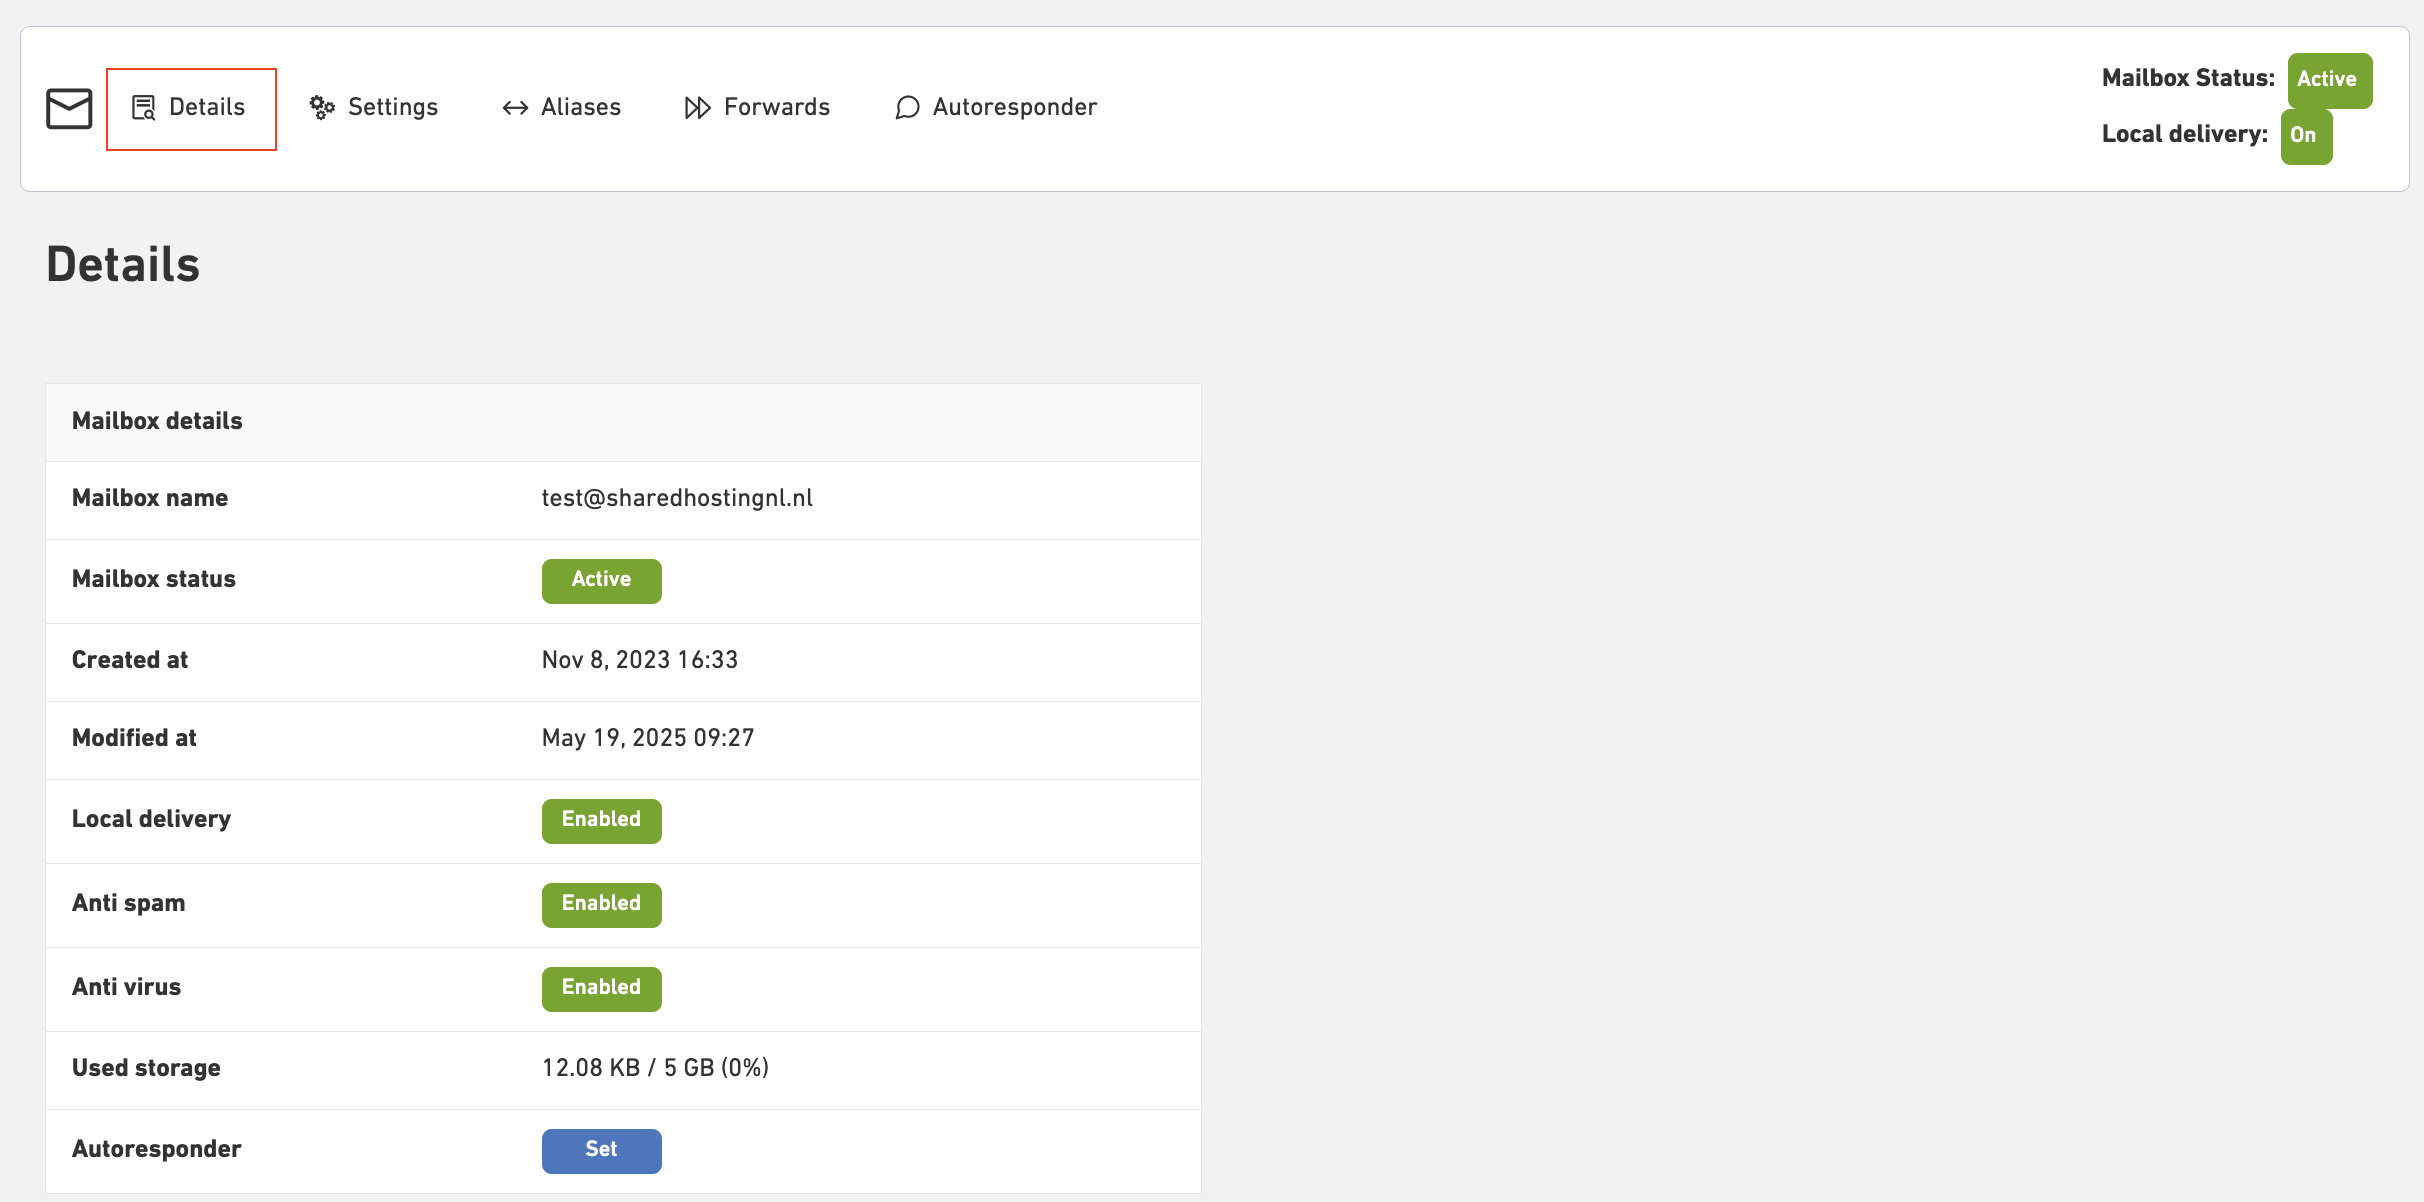
- Mailbox details can be viewed on a separate page.
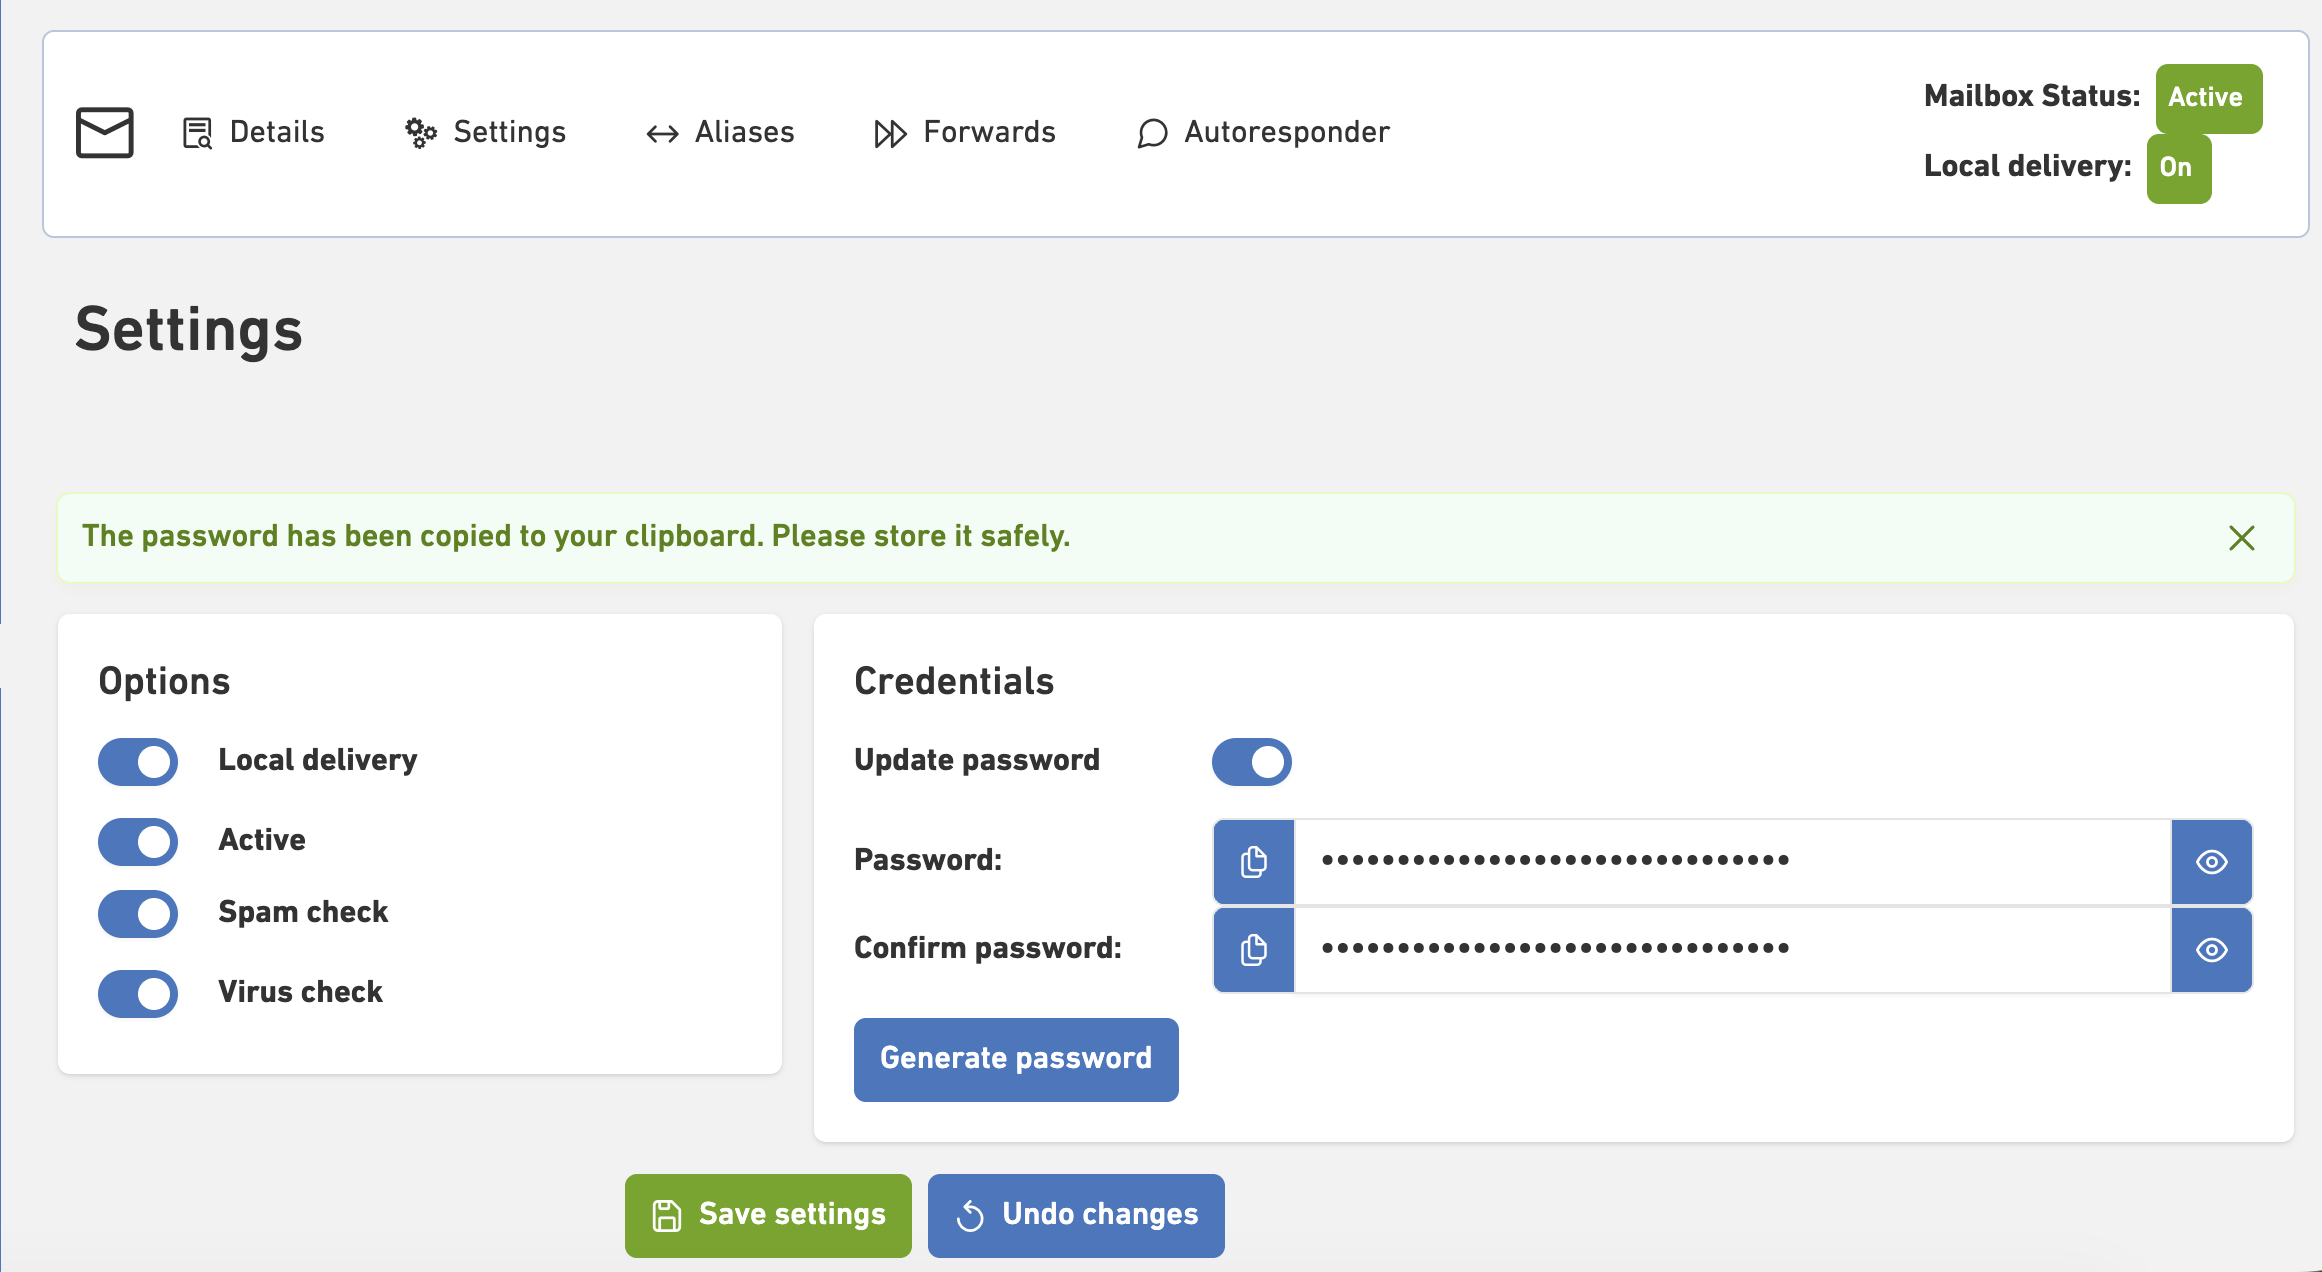
- By clicking on Settings, you can change the Anti-virus/SPAM option, change the password, and activate/deactivate the mailbox by switching the on/off button.
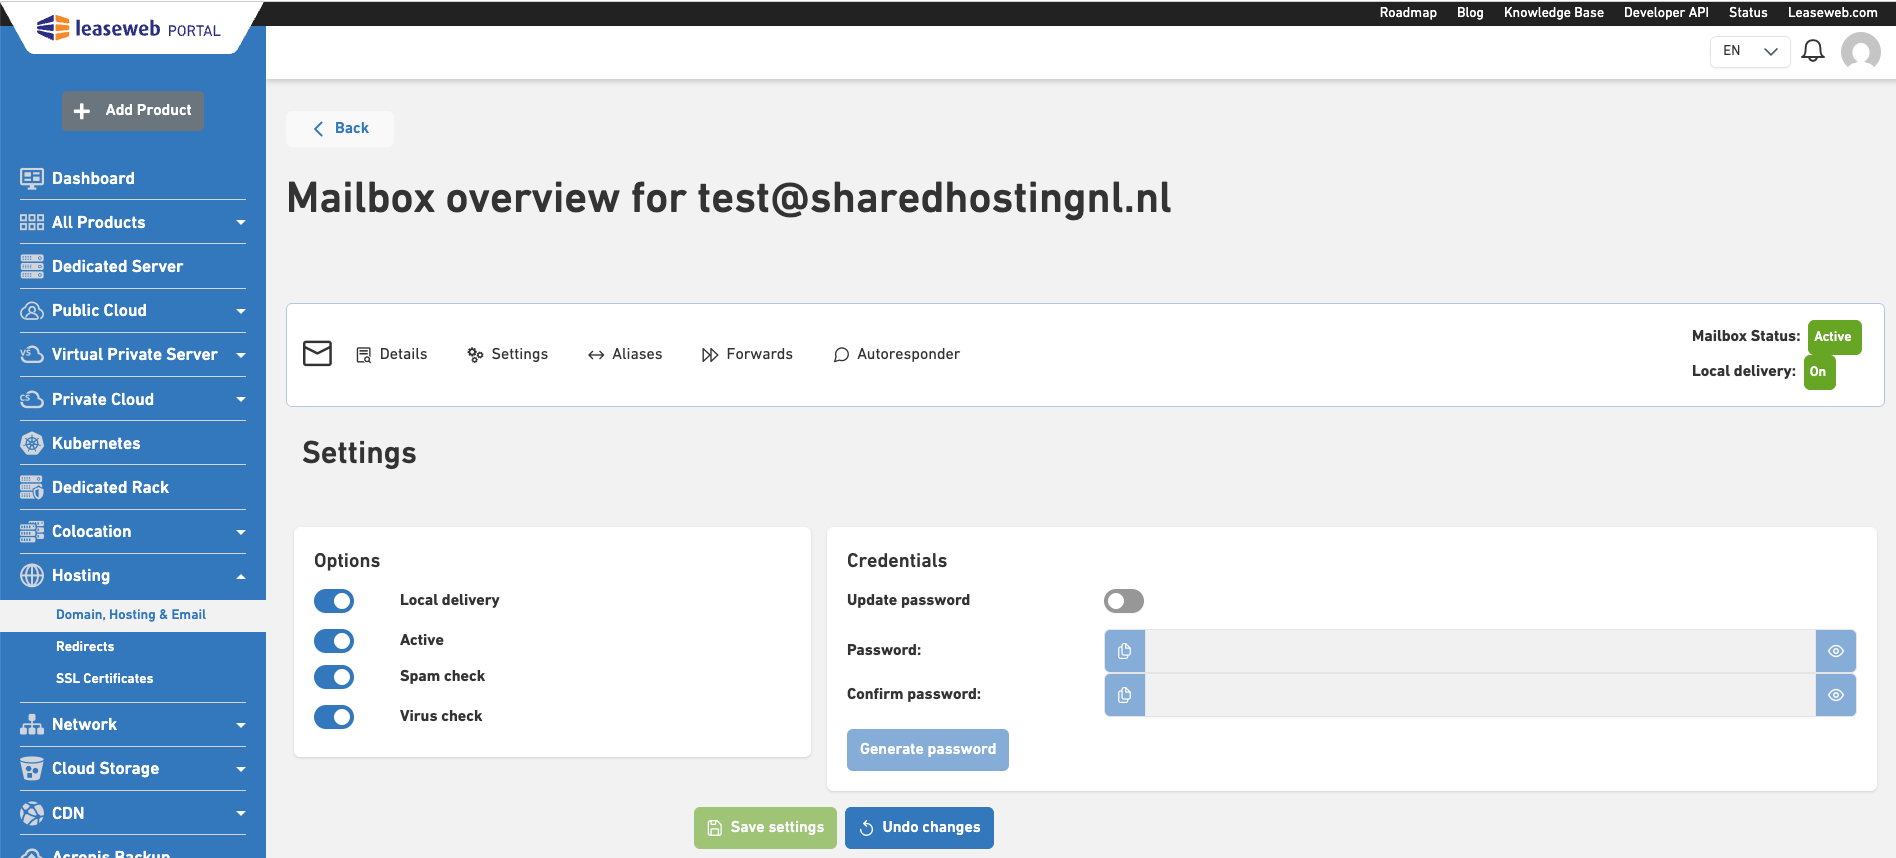
- To change the password, click Update Password. The password fields will expand. You can both create yourself, typing in the password and confirming it, or choose to Generate Random Password, by clicking the corresponding button. When you generate a random password, it will be automatically copied to your clipboard.
- Click the Save button.
Deleting a mailbox
Perform the following steps to delete a mailbox:
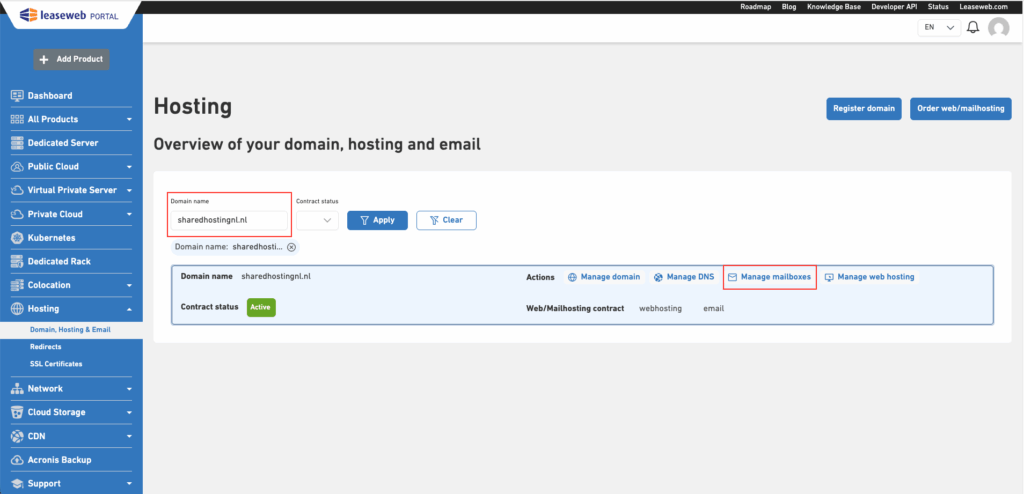
- From the Hosting Overview page, search for the domain you want to manage and then click the Manage Mailboxes link under the Actions column.
- Click the Delete Mailbox icon for the selected email address.
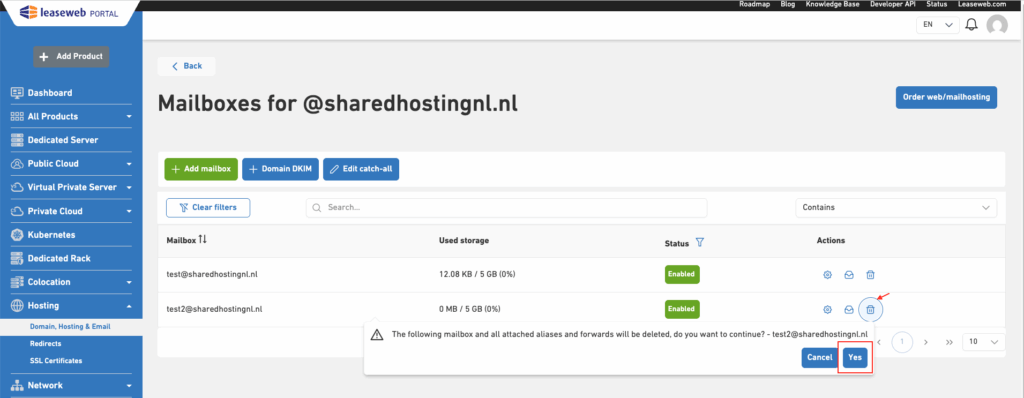
- You will need to confirm the changes. Once confirmed, the mailbox will be deleted.
Managing an email alias
You can view, edit, and delete your mailbox aliases.
Creating an email alias
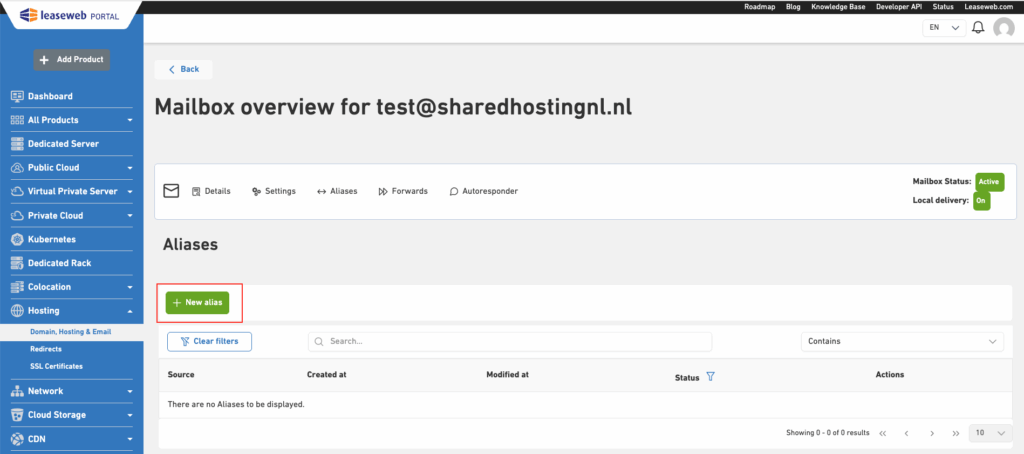
- From the Hosting Overview page, search for the domain you want to create an alias and then click the Manage Mailboxes link under the Actions column.

- Click on the Aliases link from the left column under the Action panel for a specific account.
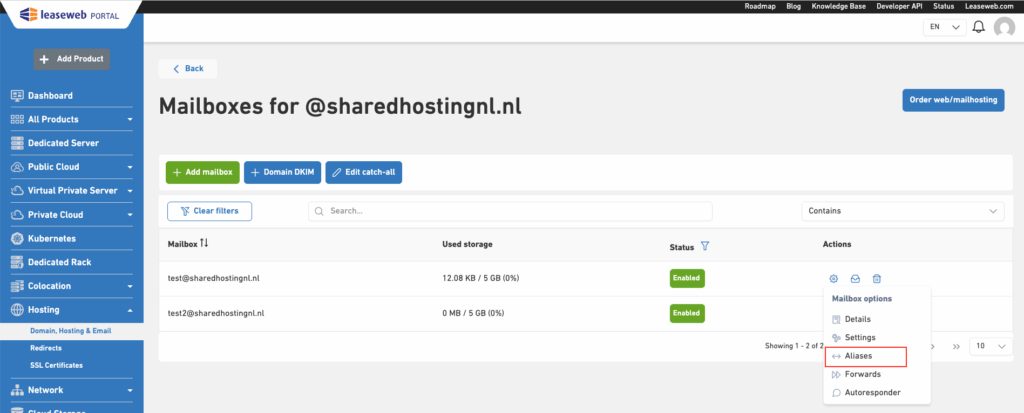
- Click on New alias button to create a new one
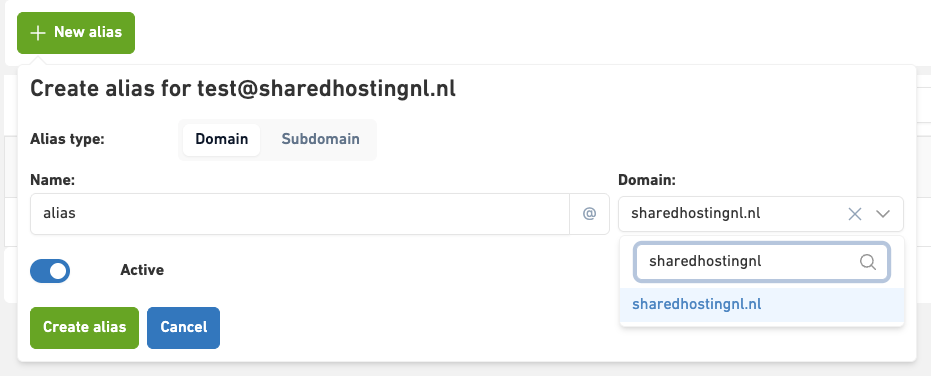
- You can create aliases for your domain and search the domain via a drop-down, then click on Create alias.
- Alias will be created and visible on the list.
Creating an email alias for sub domain
- From the Hosting Overview page, search for the domain you want to create an alias and then click the Manage Mailboxes link under the Actions column.

- Click on the Aliases link from the left column under the Action panel for a specific account.

- Click on New alias button to create a new one

- You can create aliases for your subdomain by selecting Subdomain then click on Create alias.
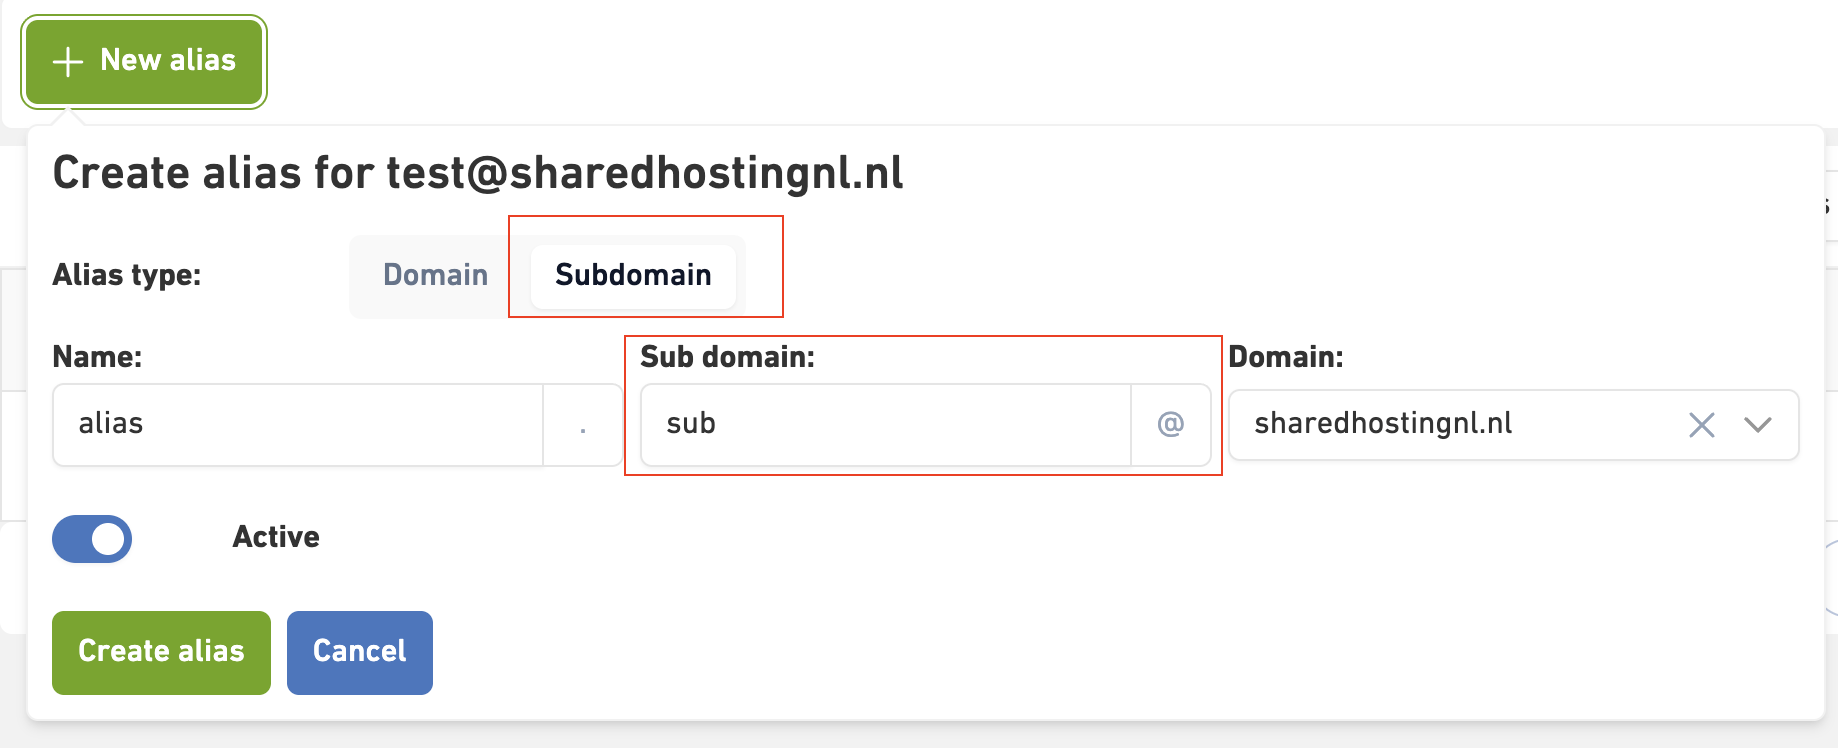
- Alias will be created and visible on the list.
Viewing and editing an email alias
- From the Hosting Overview page, search for the domain you want to create an alias and then click the Manage Mailboxes link under the Actions column.

- Click on the Aliases link from the left column under the Action panel for a specific account.

- Click the edit icon to edit desired alias.
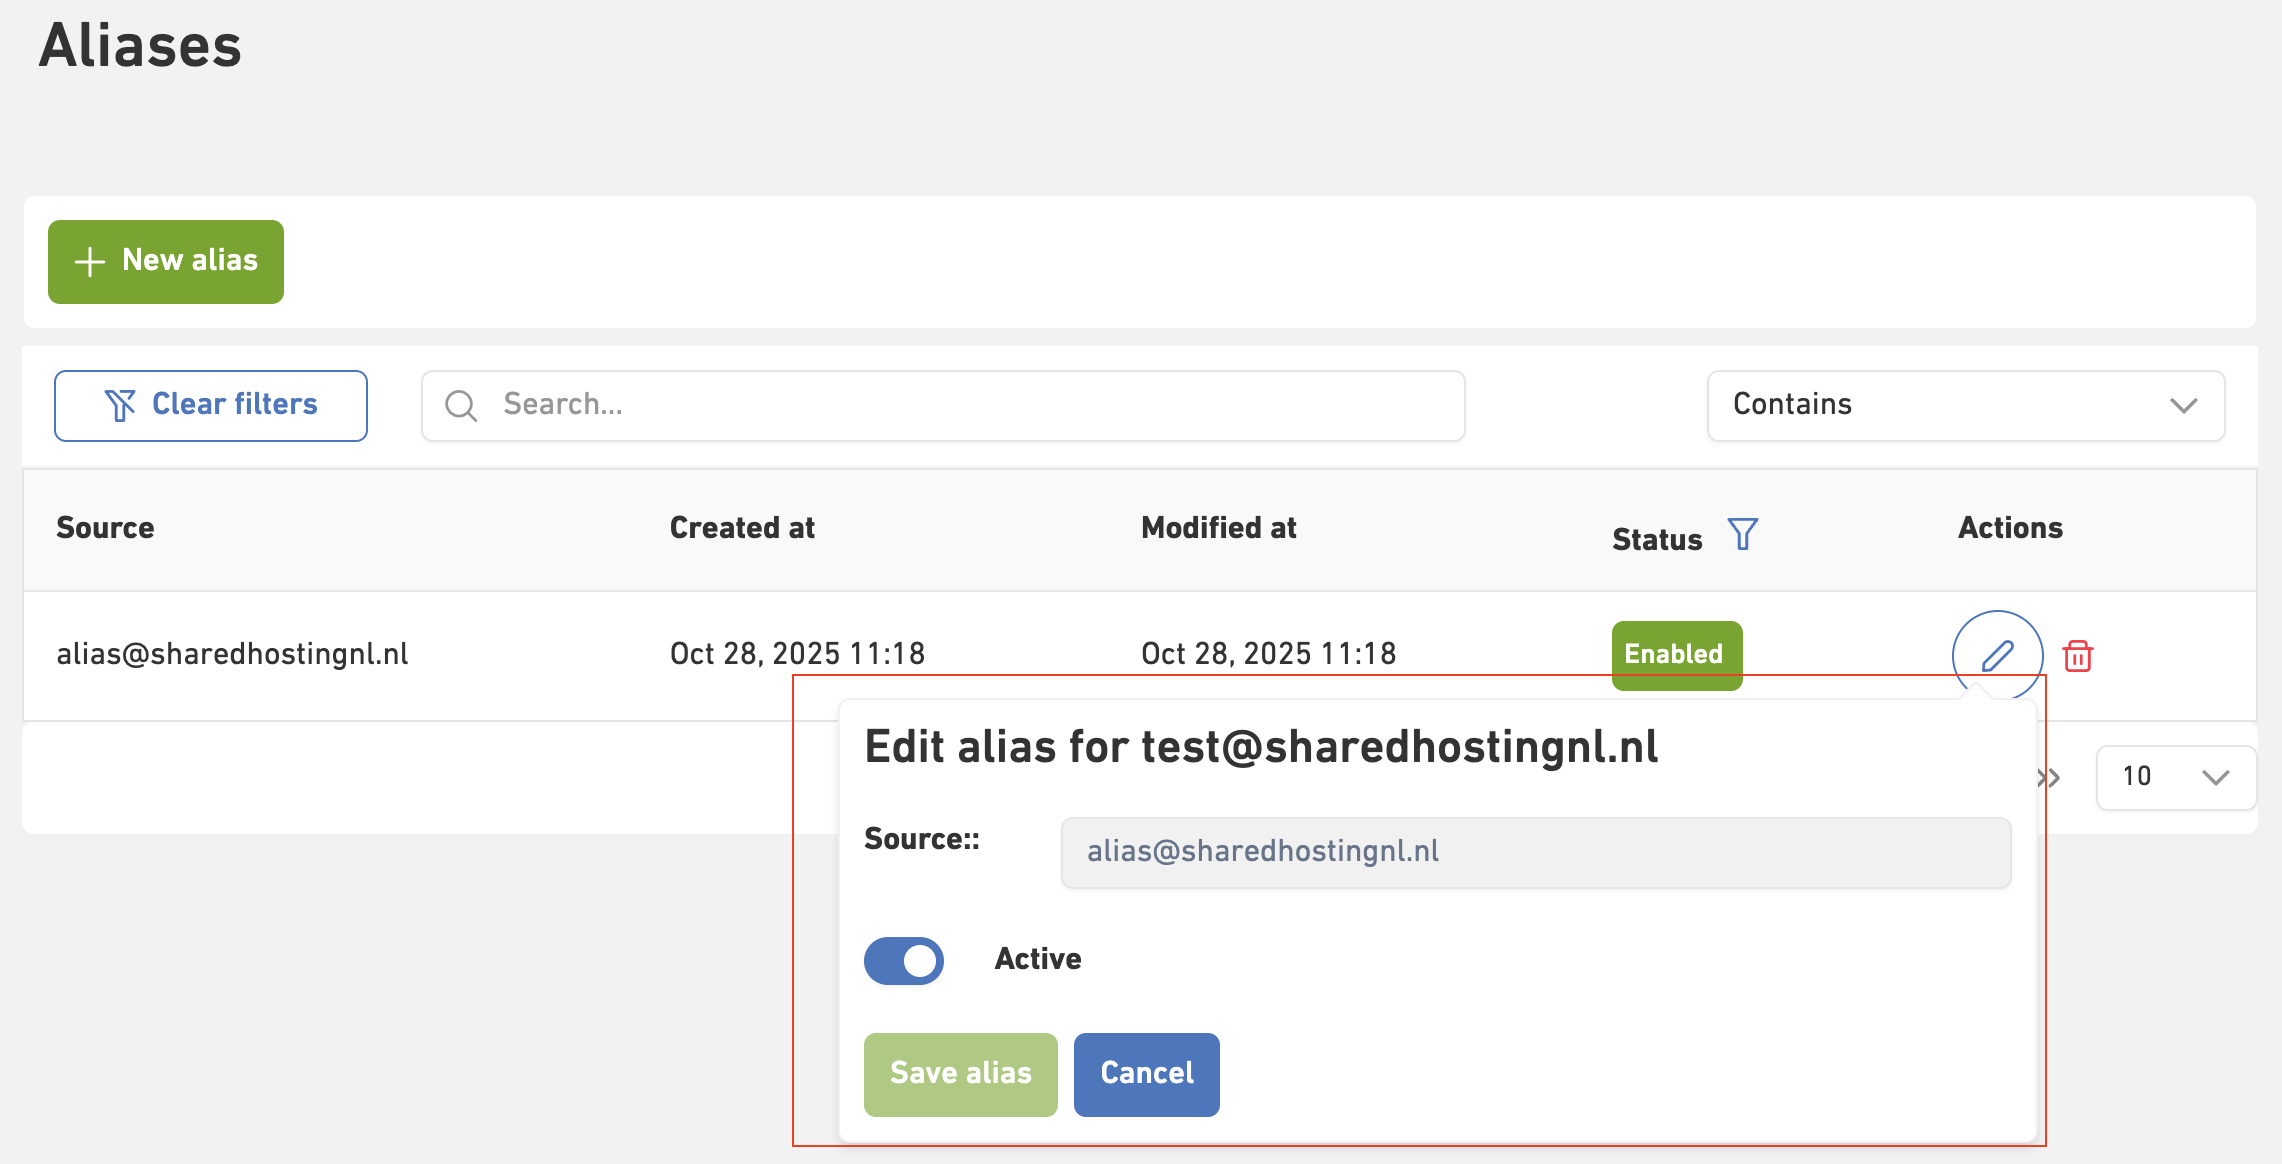
- You can activate/deactivate the email alias by switching the on/off button.
- Click the Save alias button.
Deleting an email alias
Perform the following steps to delete an email alias:
- From the Hosting Overview page, search for the domain you want to manage and click the Manage Mailboxes link under the Actions column.

- Click on the Aliases link under the Mailbox options panel.

- You will need to confirm the changes. Once confirmed, the email alias will be deleted.

Managing an email forward
You can add, view, edit, and delete your mailbox forwards.
Creating an email forward
- From the Hosting Overview page, search for the domain you want to manage and click the Manage Mailboxes link under the Actions column.

- Then click the Forwards link under the Mailbox options panel.
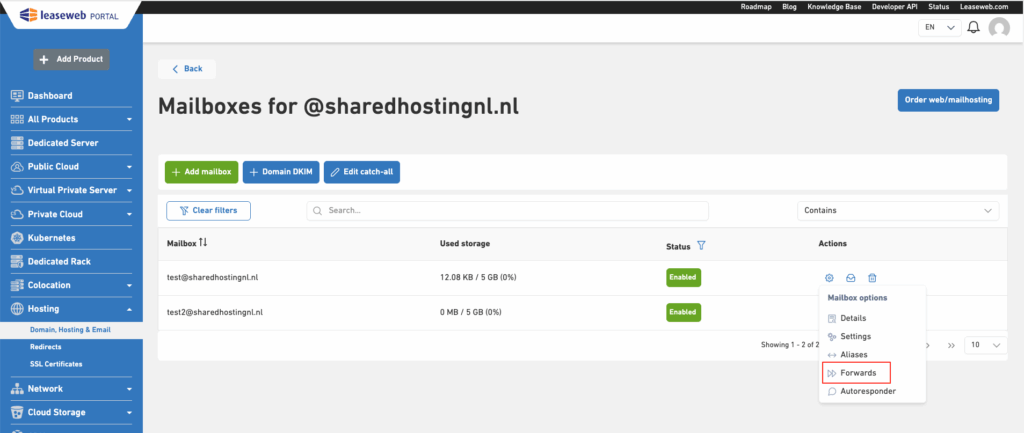
- Click on New forward button to create a new one.
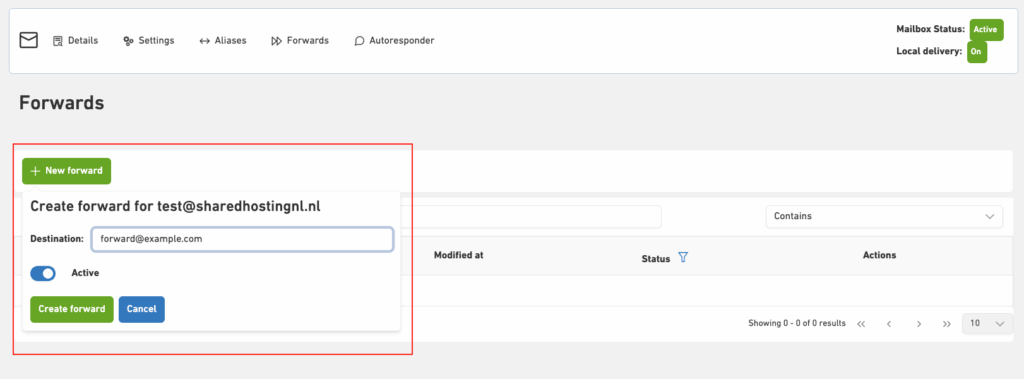
- Forward will be created and visible on the list.
Viewing and editing an email forward
- From the Hosting Overview page, search for the domain you want to manage and click the Manage Mailboxes link under the Actions column.

- Then click the Forwards link under the Mailbox options panel.

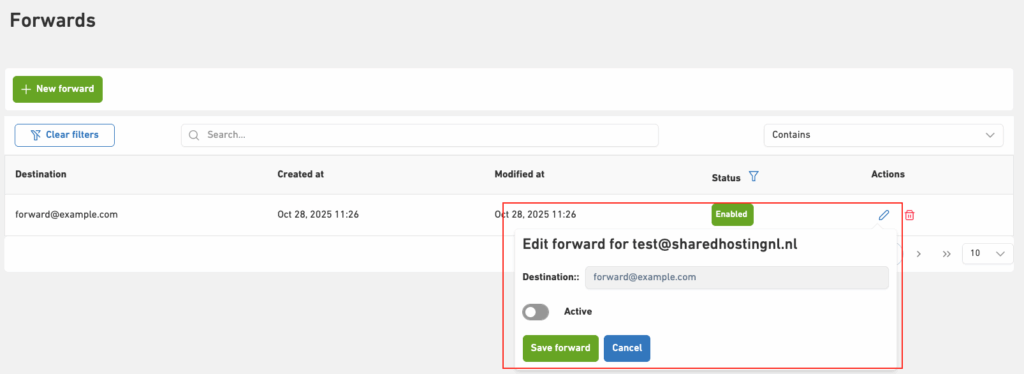
- Click on edit icon to activate or deactivate the email forward by switching the toggle and then click save.
Deleting an email forward
Perform the following steps to delete an email forward:
- From the Hosting Overview page, search for the domain you want to manage and click the Manage Mailboxes link under the Actions column.

- Then click the Forwards link under the Mailbox options panel.

- Click the delete icon to delete forward. You will need to confirm the changes. Once confirmed, the email forward will be deleted.

Managing autoresponders
You can view, edit, and add autoresponders.
Adding/Editing an autoresponder
Perform the following steps to add an autoresponder to a domain name:
- From the Hosting Overview page, search for the domain you want to manage and then click the Mailboxes link under the Actions column.

- Under the Mailbox options column, click Autoresponder.
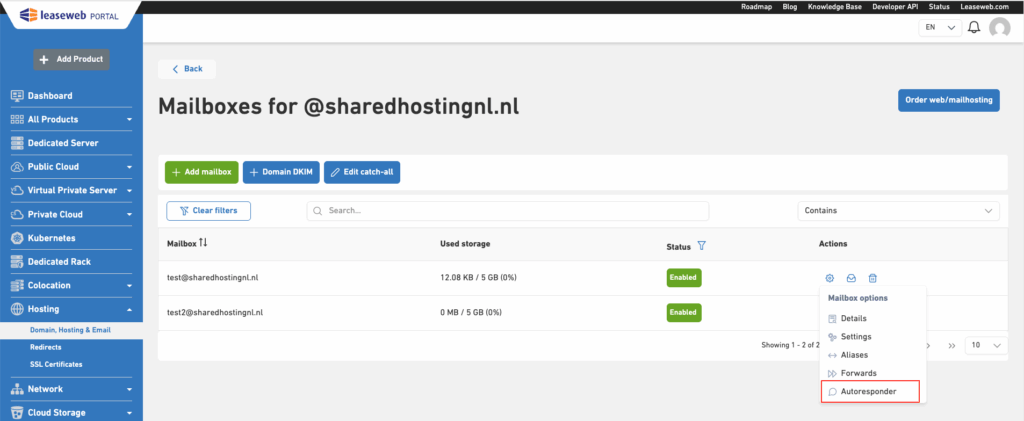
- Add/Edit the Subject and Body for the autoresponder content. Set Active to toggle On.
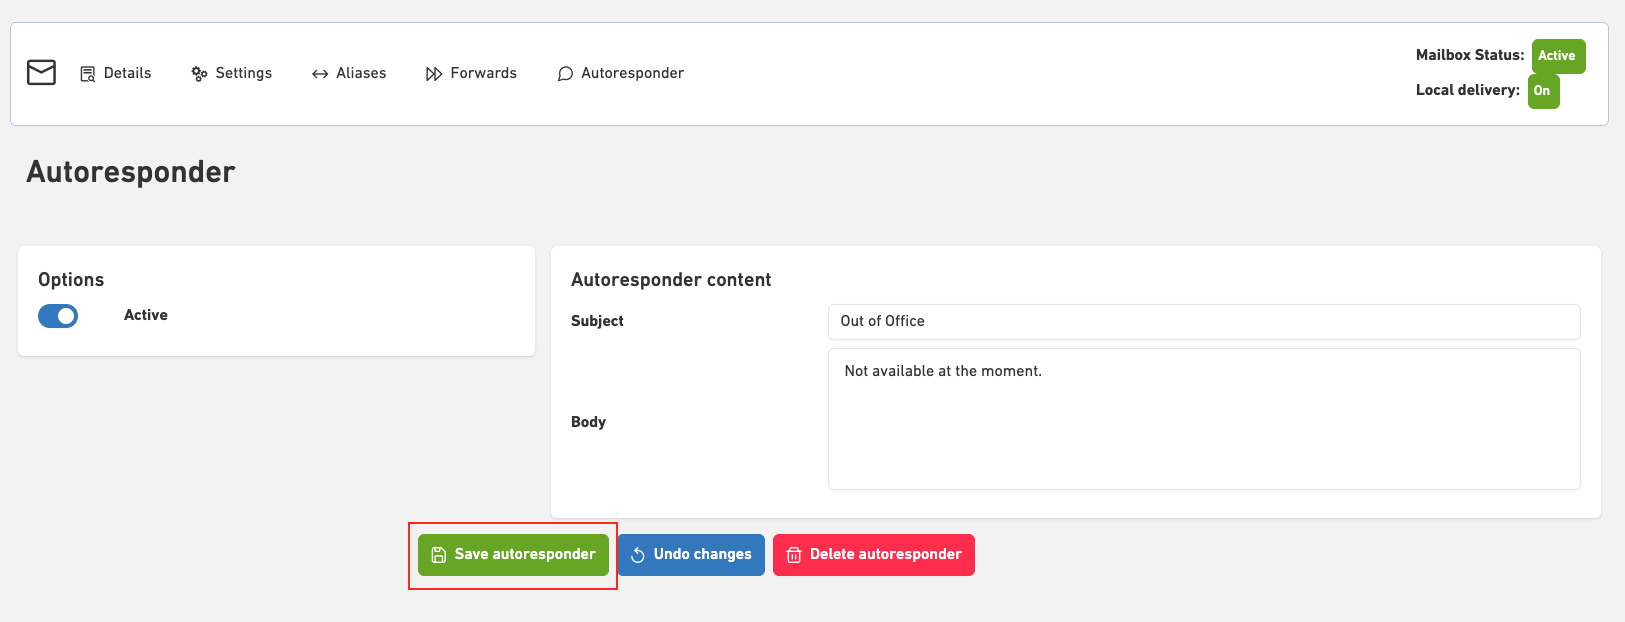
- Click the Save autoresponder button to apply the changes.
Deleting autoresponders
Perform the following steps to delete an autoresponder:
- From the Hosting Overview page, search for the domain you want to manage and then click the Mailboxes link under the Actions column.

- Under the Mailbox options column, click Autoresponder.

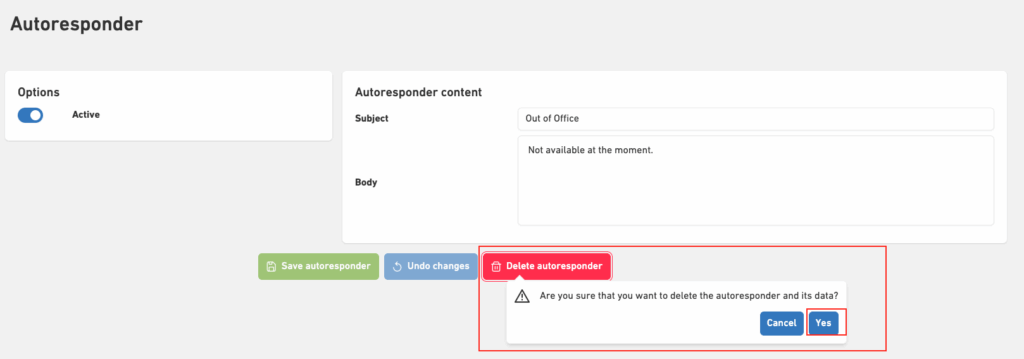
- Click on the Delete autoresponder button and confirm the changes. Once confirmed, the email auto-responder will be deleted.
Adding an email Catch-All
Perform the following steps to add an email catch-all:
- From the Hosting Overview page, search for the domain you want to manage and then click the Mailboxes link under the Actions column.

- Click on Edit catch-all button.

- Now set the catchup email box as per your requirement and click Save button.
