When accessing a server’s iLO 3 web portal or virtual console, you may run into browser compatibility problems, firmware quirks, or access-related issues. This article walks you through the step‑by‑step process of connecting to an iLO 3 controller via its web interface and launching the embedded remote console.
It covers the prerequisites you need before you can start:
- How to connect to the remote management VPN
- How to locate your user credentials
- Meet the required browser and Java specifications
- Troubleshoot common connection errors and apply quick‑fix work‑arounds.
By the end of this article, you will be able to:
- Access the iLO 3 GUI securely from any workstation connected to the remote management virtual private network
- Open the virtual console to perform BIOS configuration, OS installation, or hardware diagnostics without physical presence
- Diagnose and resolve typical connectivity problems that prevent iLO 3 access.
What Is iLO3 and Why Is It Important
iLO 3 (Integrated Lights-Out 3) is a remote management technology used in HPE ProLiant servers that allows administrators to monitor and control hardware independently of the operating system. It provides out-of-band access for tasks like remote console access, power cycling, and system health monitoring, even when the server is turned off or unresponsive.
The remote access console allows you to work on your server as if you were sitting in front of it with a physical screen, monitor and keyboard. This makes it possible to make changes to your server before it boots, or inside its BIOS, which are generally not possible via SSH, RDP or other similar remote management methods.
Leaseweb Remote Management VPN
 Before proceeding any further with this guide, make sure that you are connected to our isolated, secure, remote management VPN. Please follow these instructions in order to get connected. Once you are connected, you can proceed with this article.
How to Get Your IPMI IP Address and Credentials
To find the IP address and credentials that correspond to your servers IPMI / iLO 3 interface, follow the steps below:
- Open the Leaseweb Customer Portal
- Go to your server’s page under the Dedicated Servers option
- Select Actions -> Remote Management
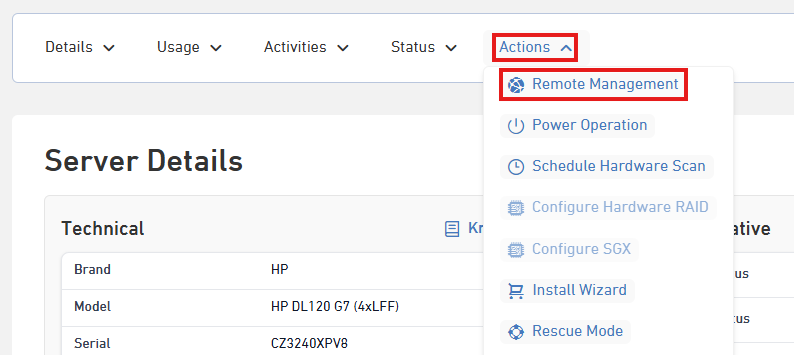
A window will appear in the center of your screen, similar to the one shown below. This window contains all the information you need to access your server’s IPMI/iLO 3 interface.
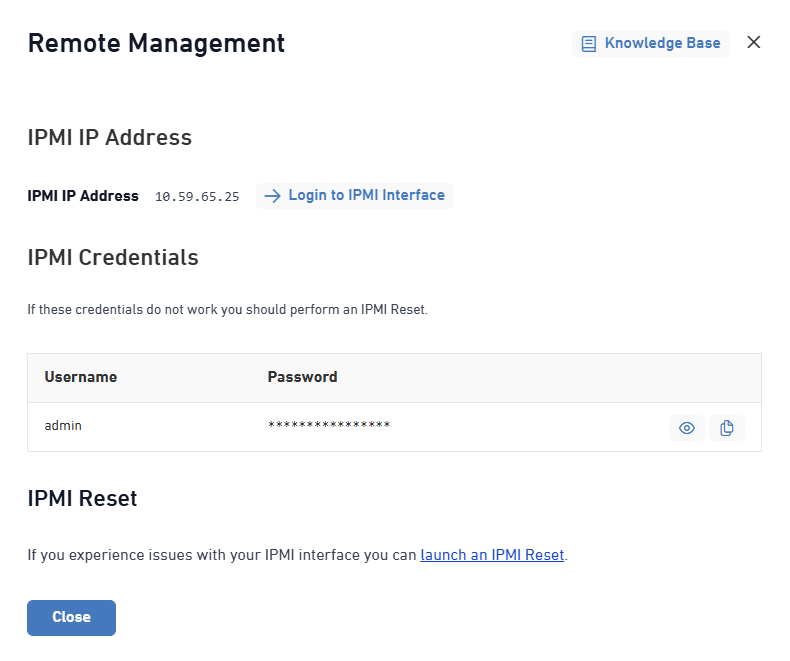
Here you will see the IPMI IP address, as well as a link that will load the web interface when clicked. You will also find the username and password (IPMI Credentials) that you will use to log in to the IPMI / iLO 3 interface. We will explain how to use these later in this article.
How to Launch an IPMI Reset
If you are connected to the remote management VPN but cannot log in with your credentials, or the IPMI interface does not load in your browser, we recommend resetting the IPMI controller. Do this by performing an IPMI reset. Click on the launch an IPMI Reset link at the bottom of the window to proceed.
The IPMI reset job will reboot the server and PXE boot it into an automated live environment. During this process, the server’s IPMI/iLO 3 network settings will be reconfigured, and a new username and password will be generated. Once the reset is complete, the updated credentials will be available in your Customer Portal.
HPE Lights-Out Standalone Remote Console for Windows
For the best experience when accessing your server’s console, we recommend you use HPE Lights-Out Standalone Remote Console for Windows.
HPE Lights-Out Standalone Remote Console for Windows is a lightweight application developed by HP that can be installed on your Windows computer. It allows you to access and control your server’s console directly, without the need to use a web browser.
You can download it directly from the HP website. After downloading it, you can proceed to install it. Once the application is installed, you should find an icon like the one shown below on your desktop or in the Start menu under All Programs.
How to Connect to HPE Lights-Out Standalone Remote Console for Windows
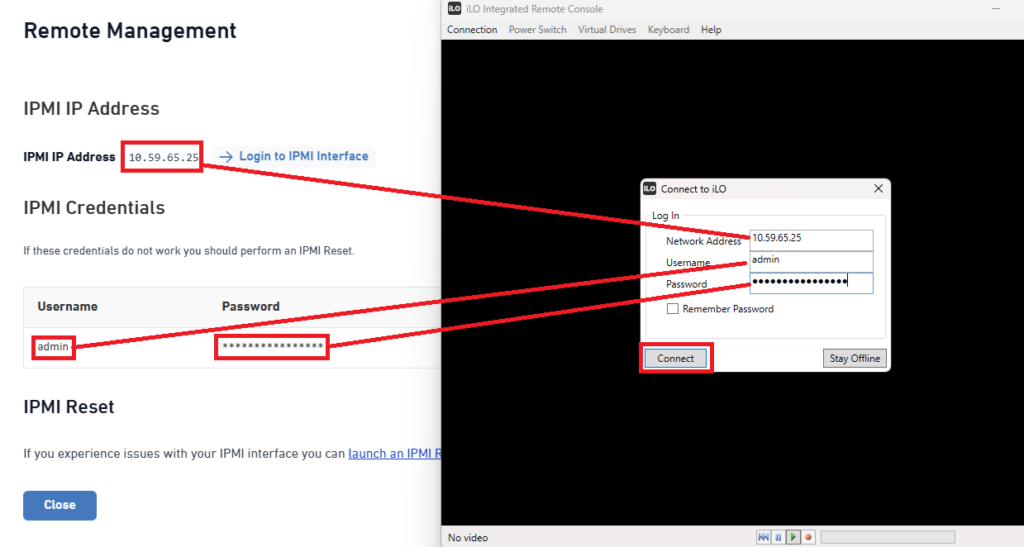
- Opening the program. You will see an interface like the one shown below:
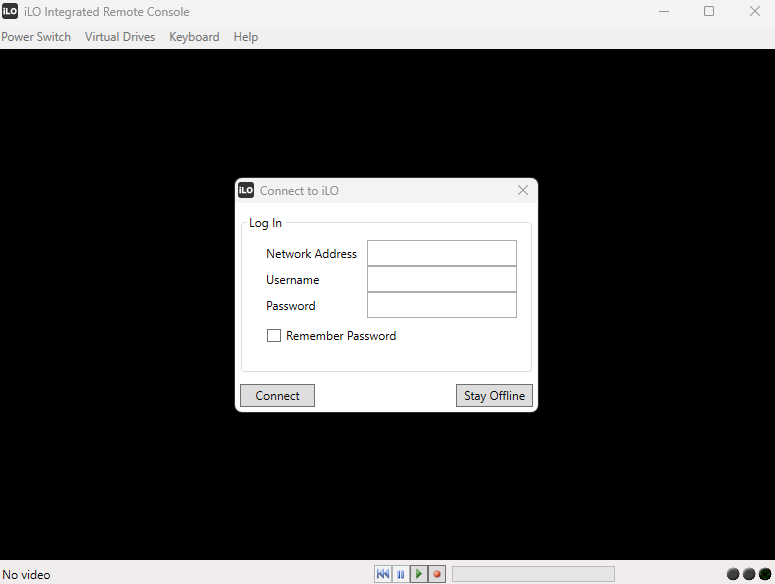
- To connect to your server’s console you will need your:
- Network Address
- Username
- Password
- Get these details by following the steps from How to Get Your IPMI IP Address and Credentials
- Enter the details and click Connect
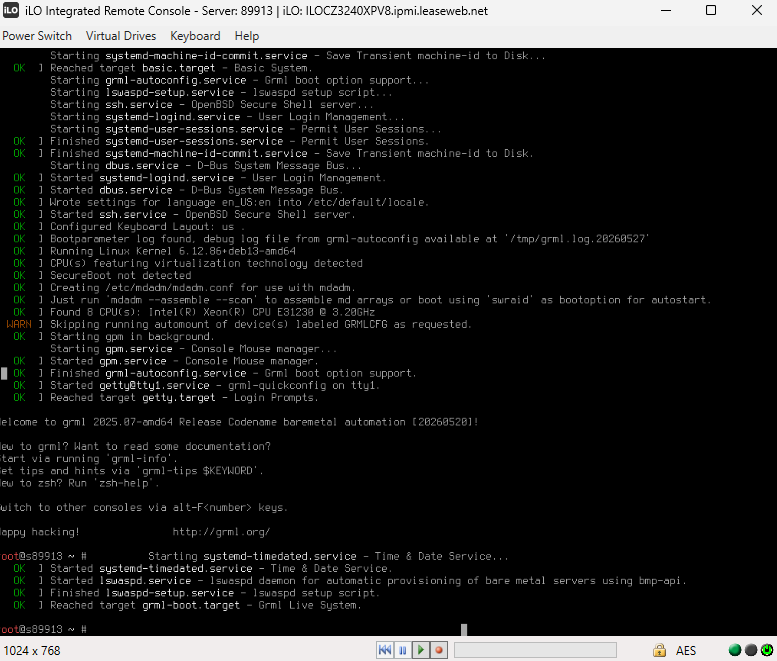
Once you are connected, you will see a screen similar to the one shown above. From here you can manage your sever just as if you were sitting physically in front of it with a screen, mouse and keyboard.
iLO 3 Web Interface and Console via Browser
The Integrated Lights-Out 3 web interface allows you to manage your server. You can perform actions like shutdown and reboot your server, monitor the health of the hardware and temperature and so much more.
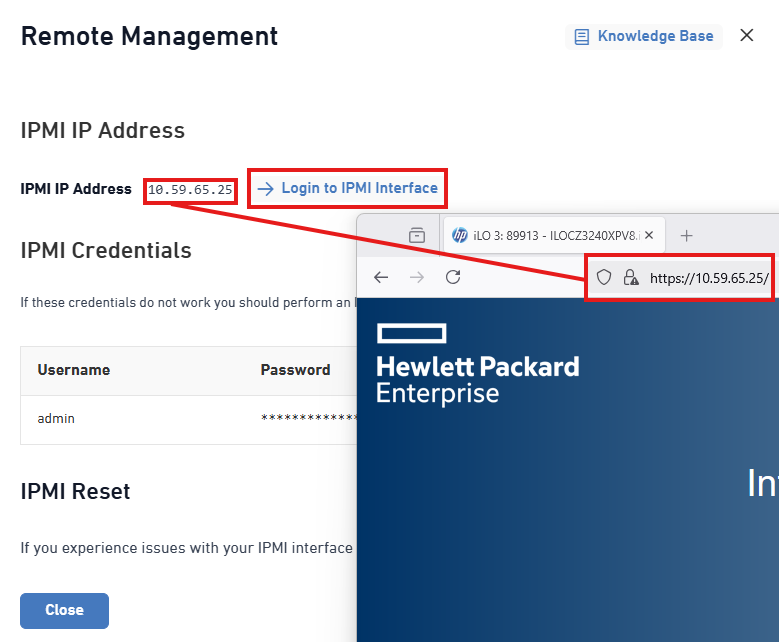
- To access it, go to Actions -> Remote Management
- Click on the Login to IPMI Interface button
- Alternatively, you can enter the IPMI IP Address as a URL in your browser. In this example, the IP address is 10.59.65.25 so the URL would be https://10.59.65.25/
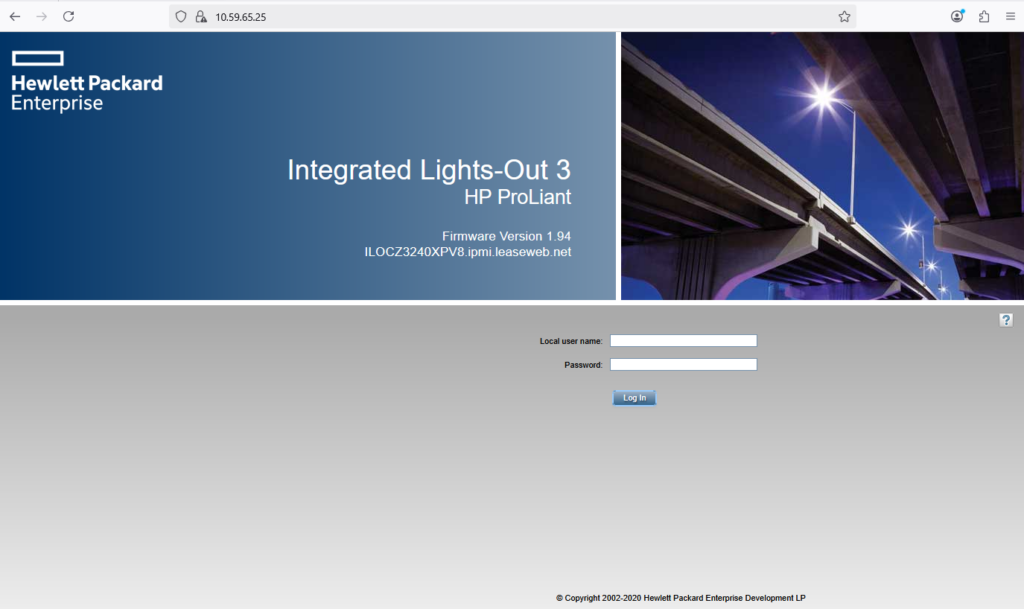
When the web interface successfully loads, you should see the login screen shown below.
iLO 3 TLS Errors
If you see an SSL/TLS error instead of the iLO 3 login screen, know that these errors are very common when accessing the iLO 3 web interface, especially on older hardware. Below are some of the most common SSL/TLS warnings and errors you may encounter.
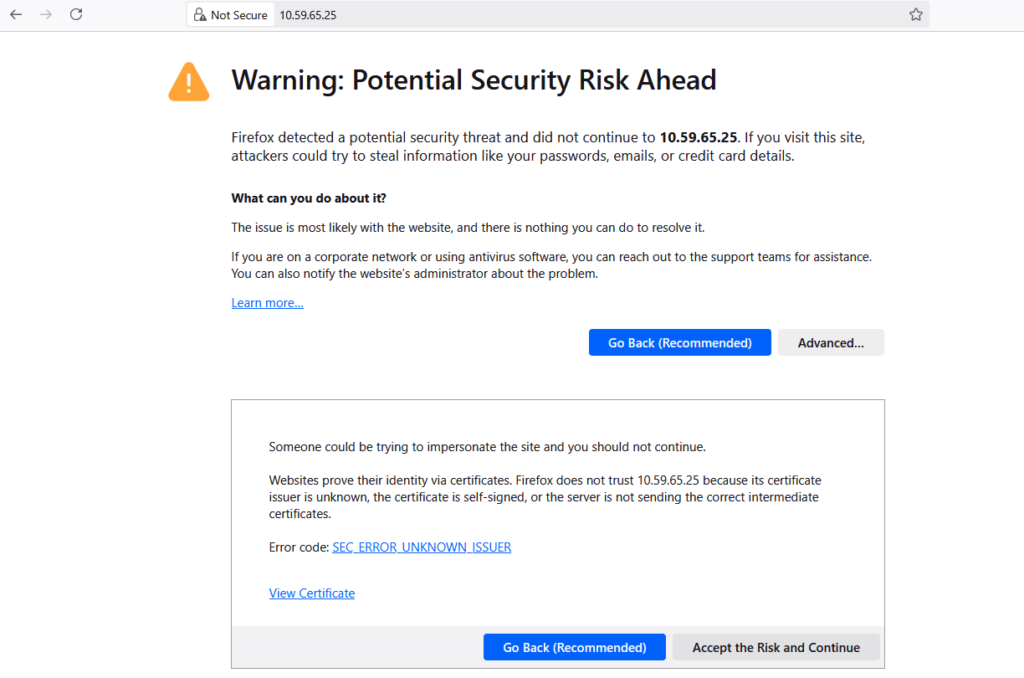
Error 1: Potential Security Risk Ahead
The warning appears because the SSL certificate on the iLO3 does not match the address used to access it. Since the iLO3 interface is not publicly exposed, and should remain internal, a publicly trusted SSL certificate is not required.
The warning can be concerning, but it is merely informational and does not pose any danger to your IPMI / iLO 3 access.
To proceed past this error:
- Click the Advanced button
- Then select Accept the Risk and Continue
Different browsers may display slightly different buttons, but the process to resolve remains the same.
Error 2: This site can’t provide a secure connection
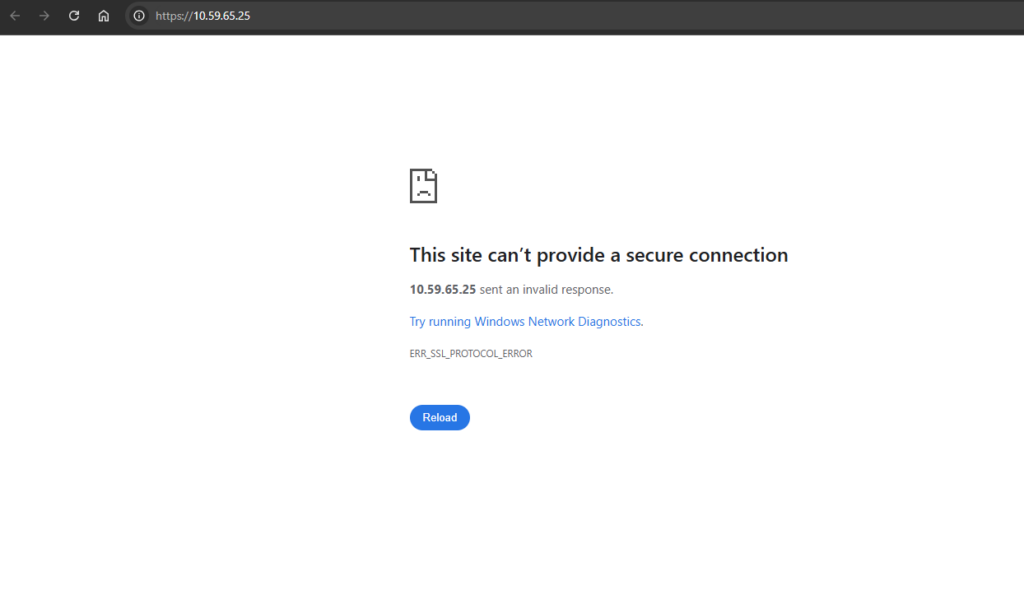
Some browsers may display a TLS error, as shown below, when accessing the iLO 3 web interface. iLO 3 no longer receives firmware updates and only supports TLS 1.1 or earlier, which can cause this error on modern browsers.
To bypass this error and access the web interface, you will need to temporarily enable TLS 1.1 in your browser. If you did not encounter this error when loading the iLO 3 web interface, you can proceed to the next step.
Logging into iLo3
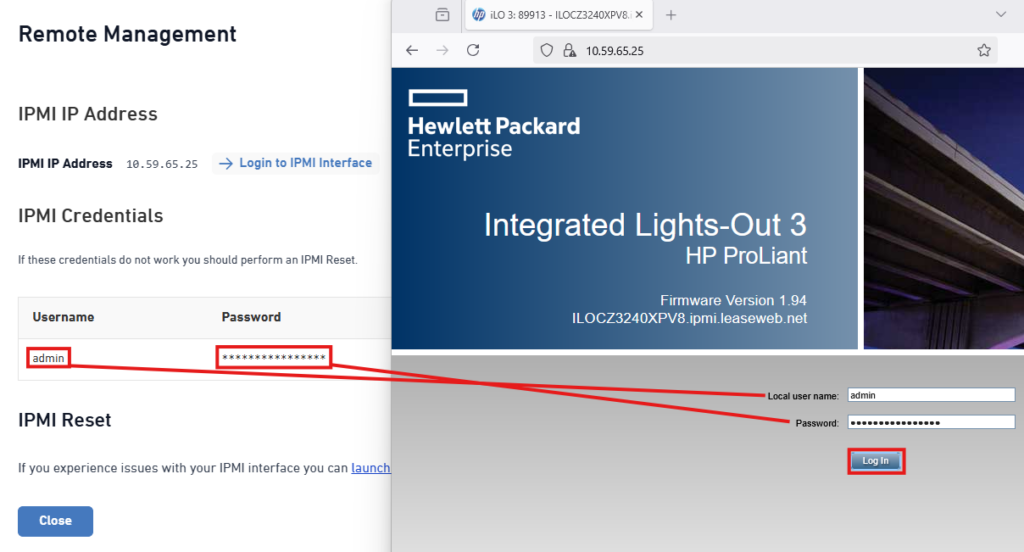
The username and password to log into iLO 3 can be found inside your Leaseweb Customer Portal – see here.
- Enter your username and password
- Click Log In to proceed
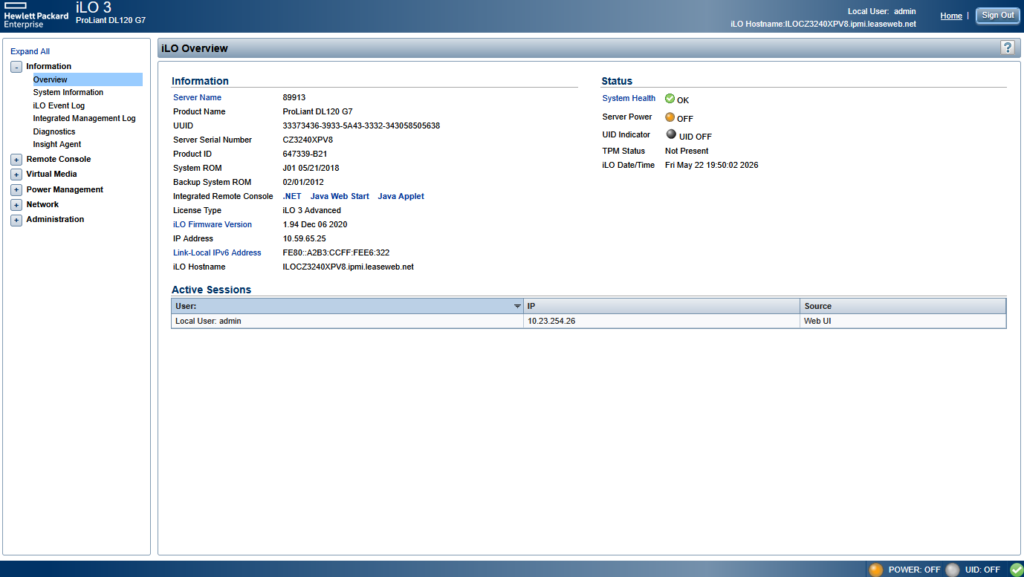
You will see the below overview. You can check the status of your server, On / Off, as well as the status of the hardware health.
Loading the Console Via the Web Interface
Before proceeding with this section, please make sure you have Java 8 or better installed on your system. You can download it from Java.com.
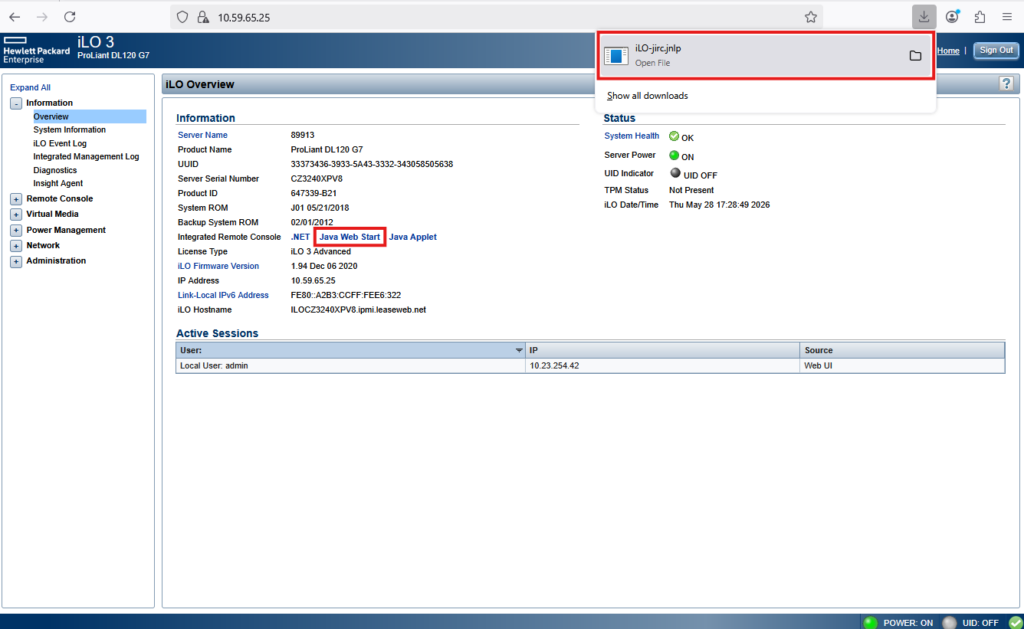
- To open the console, click on the Java Web Start link
- This will initiate a download. Once the download finishes, double-click on it to run it.
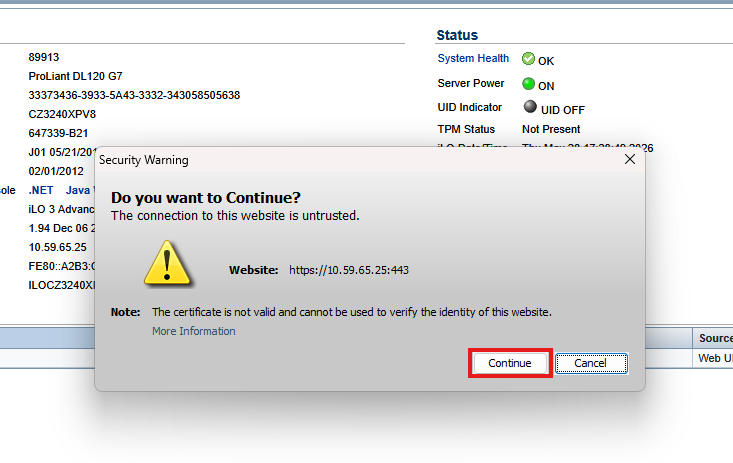
- Click Continue to finalize the installation
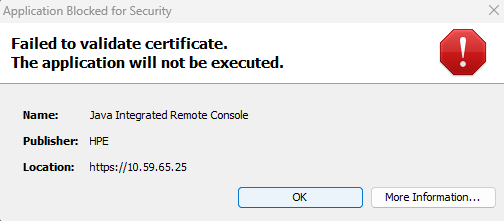
Java Security Errors
You may receive a Java security error message when attempting to launch the Java Web Start, which is very common and a result of Java’s strict security settings. Please follow this KB Article here to add the URL of your server’s IPMI interface into Java’s Exception Site List.
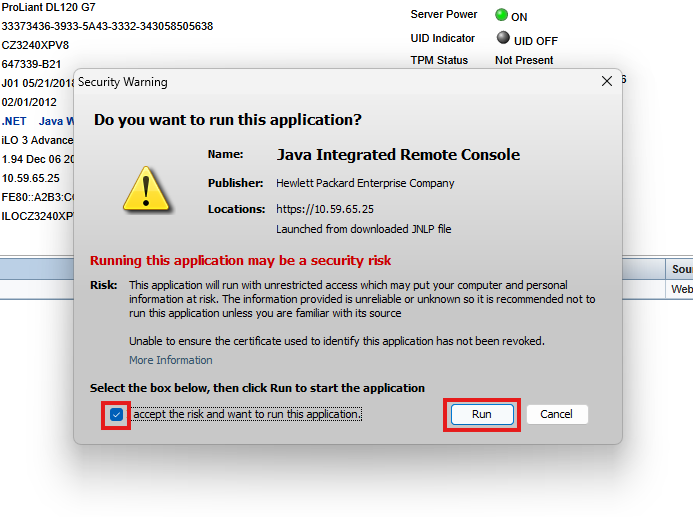
After clicking Continue above, you should see this message. Check off the checkbox to the left and click Run.
The below image confirms that you have successfully opened your server’s console via the web interface:
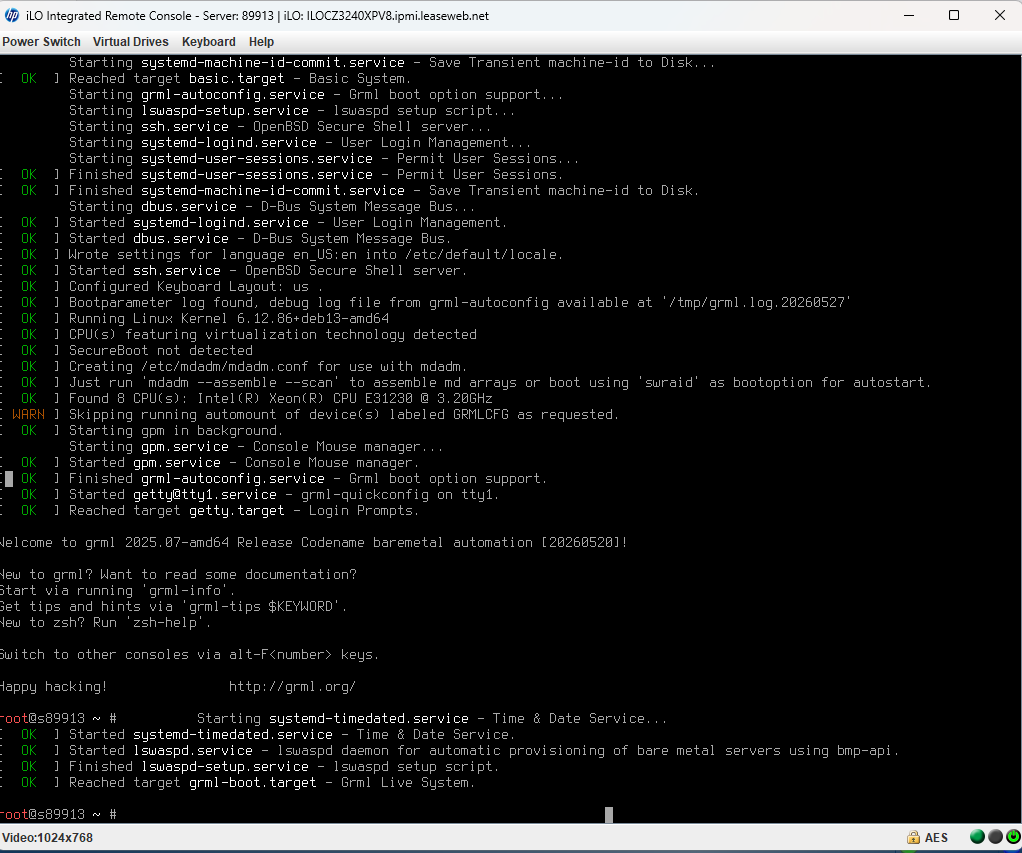
From this console you can make BIOS level changes and boot your server with custom images. Proceed to the next step to learn how to mount an ISO image.
How to mount an ISO
When managing a server, it is sometimes necessary to use an ISO image to boot the server into specialized software and tools, or to perform a custom operating system installation.
Information
In order to have the best experience when booting your server from an ISO, make sure you are using an internet connection that has a fast upload speed, preferably over a wired connection.
Additionally, keep in mind that the farther you are from your server geographically, the greater the latency, which can slow down the speed at which data is sent from your computer to the server. This increased latency can cause significant delays when switching between screens during an OS installation or during the OS booting process.
- Open the console interface
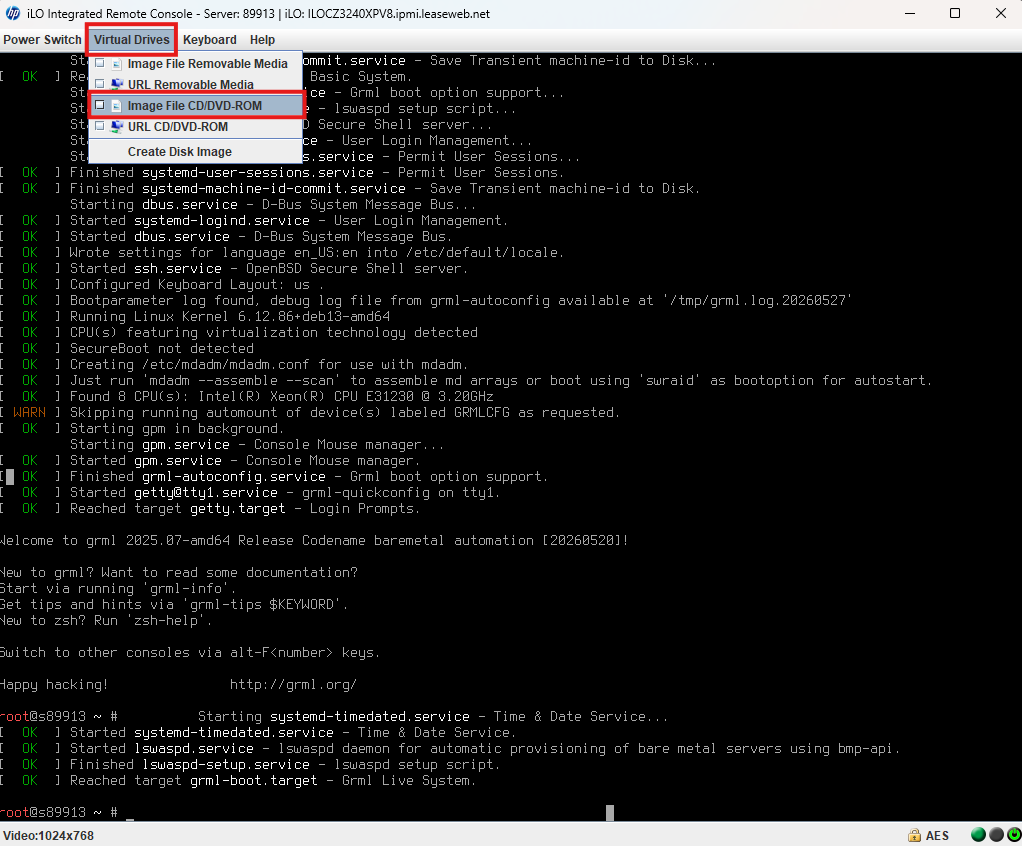
- Click on the Virtual Devices menu at the top
- Click on Image File CD/DVD-ROM
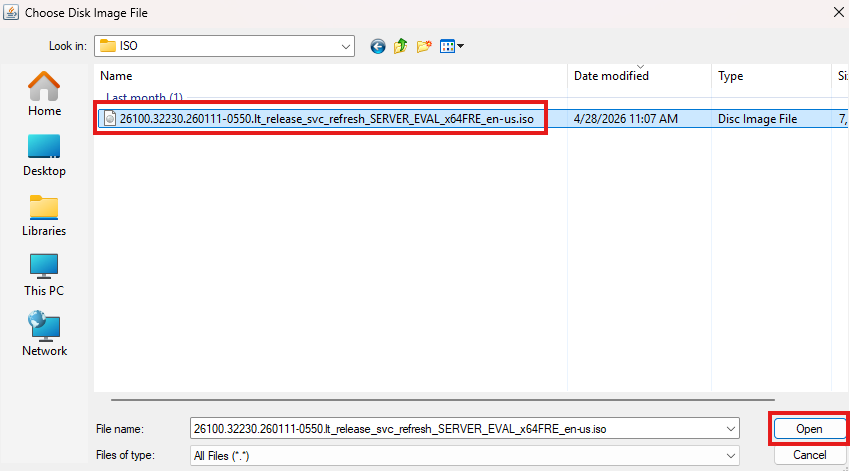
- Find and select the ISO image you need and click Open
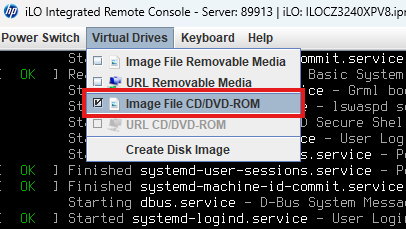
- Click on the Virtual Devices menu at the top once again to confirm your ISO image was successfully mounted, if you see a check mark next to Image File CD/DVD-ROM
- If no check mark is shown, try again from step 2
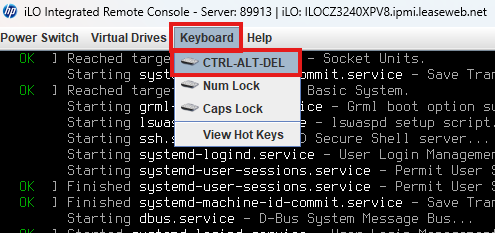
- Reboot the server -> click Keyboard -> CTRL-ALT-DEL. This will initiate a graceful reboot of your server
Troubleshooting ISO Booting
If you successfully mounted an ISO but the server did not boot from it, the boot order may be configured to prioritize the server’s internal disk over the virtual CD-ROM drive. The cause could be that the server started the operating system that was already installed instead of booting from the mounted ISO.
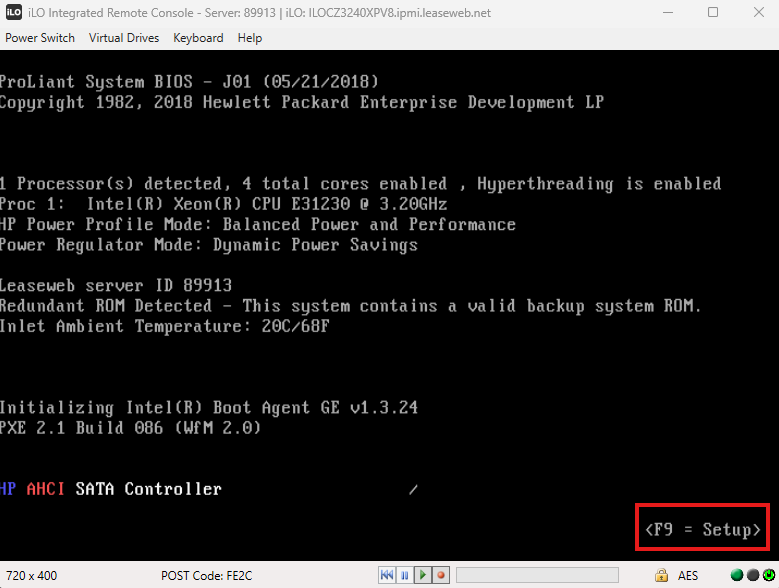
- To rearrange your boot order, reboot and press the F9 key as the server boots. This will take you into the BIOS menu
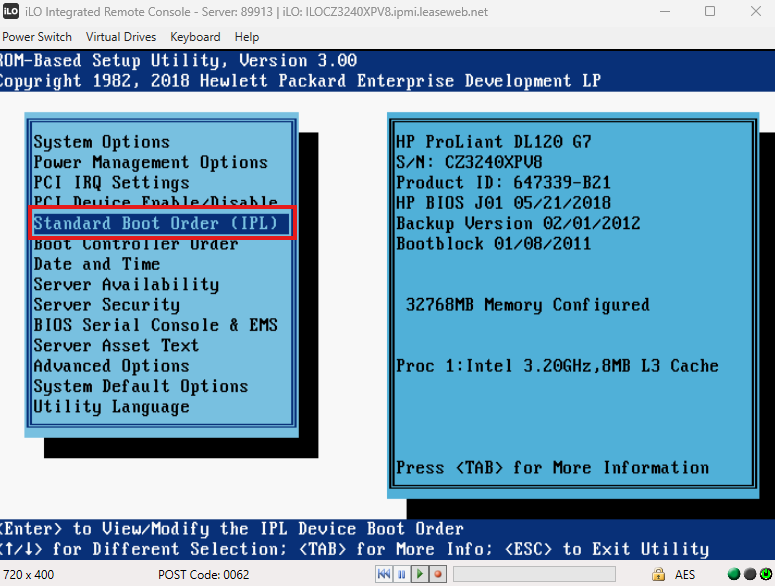
- Go to the Standard Boot Order (IPL) section in the BIOS menu
- You may notice that the CD-ROM device is set to 3 in the boot order, while the Hard Disk is set to 2. This means the Hard Disk has higher priority. If an operating system is already installed on the Hard Disk, the server will boot into it instead of the ISO you just mounted
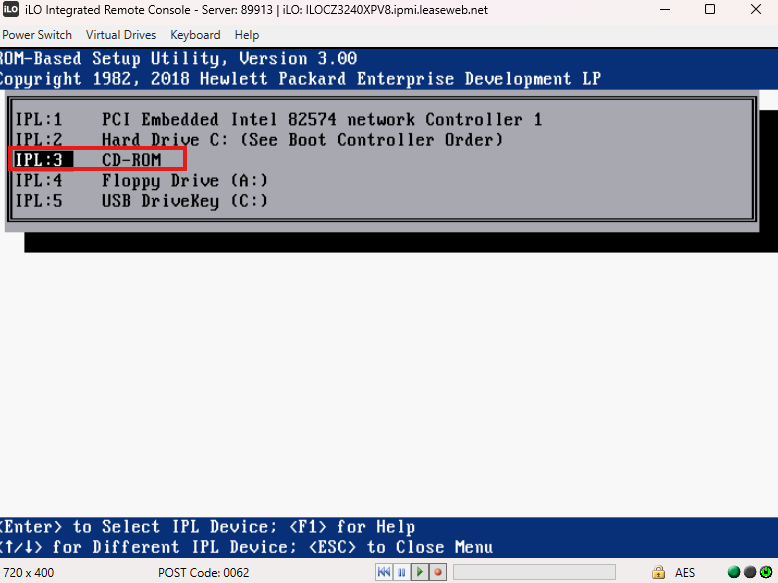
- Using the arrow keys move the CD-ROM option up to number 2
- Press the ESC key followed by the ESC again to go to the main menu
- Press F10 to Exit the BIOS menu and reboot.
Information
Please ensure that the network controller remains the first device in the boot order. Our automation depends on PXE booting from the network controller. If it is removed from the first position, PXE boot will not occur and the automation process will fail for any future automation jobs like OS reinstalls.
Warning
After the server reboots, it should begin booting from the mounted ISO. Keep in mind that this process can take some time (and in some cases even fail), especially if you have a slow internet upload speed or if your computer is connected over Wi-Fi. The delay can be compounded the further you are geographically from your server. The virtual media connection depends on the speed and stability of the network connection between your computer and the server.
Alternatives for Custom OS Installation
If you experience issues installing the operating system using the ISO boot method, you can use the netboot.xyz option available through our automation.
Netboot.xyz uses PXE/network booting instead of booting directly from an ISO image. When the server boots from the network, netboot.xyz downloads the installation files and boot components required for the selected operating system directly from the configured repositories. This allows the operating system installation to proceed without mounting or booting from an ISO image.
- Go to Actions -> Customer Installation
- Select the boot file netboot.xyz menu
- Check the Power cycle after the creation of the reservation box
- Click Submit.
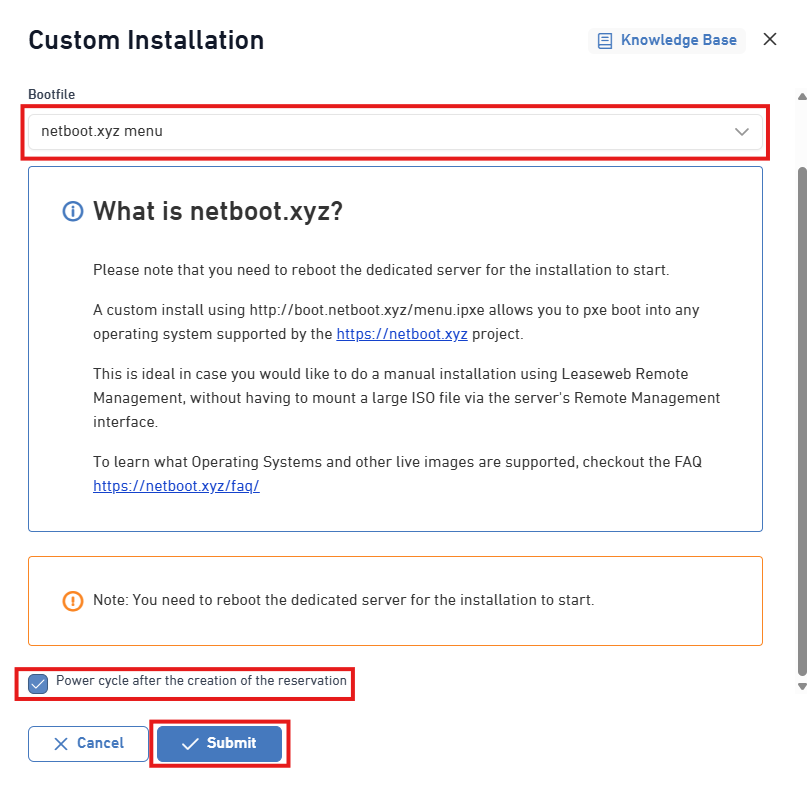
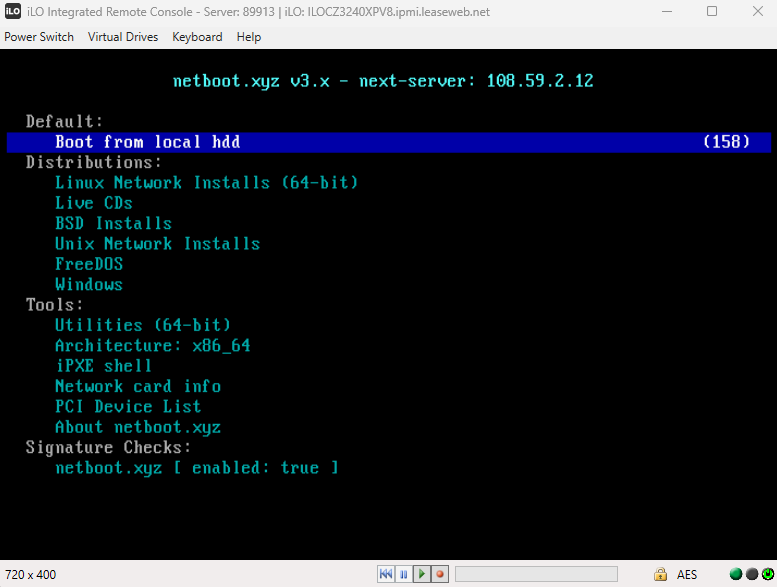
The server will reboot on the netboot.xyz boot file to load the neboot.xyz menu. If you chose to gracefully reboot your server, you could leave the power cycle after the creation of the reservation checkbox unchecked. Once netboot.xyz has booted it should look as shown below.
To learn more about netboot.xyz and other PXE boot option, check out this Knowledge Base article.