Leaseweb offers managed shared Web Hosting services. Currently, we have different platforms offering Linux Web Hosting and Windows Web Hosting. Both platforms are monitored 24/7 by our highly skilled Shared Hosting Operations team.
Information
For our Legacy Platform, please see the Legacy Platform tab.
Be informed that we are planning to migrate all existing domains of our Legacy Platform into our New Platform. All customers will be informed in advance.
For our New Web Hosting Platform, please continue below.
Types and sizes of Web Hosting packages
Leaseweb provides Web Hosting packages with the following specifications:
Please note that there is no PHP available on the Windows Web-Hosting package!
| Feature | Linux NL | Windows NL | Linux US |
|---|---|---|---|
| Operating system | CloudLinux | Server 2019 | Ubuntu |
| Web server | Ngnix 1.20 | IIS 10 | Apache 2.4 |
| Scripting language(s) | PHP 7.4 PHP 8.0 PHP 8.1 | ASP 10.0.17763.1 ASP.NET 3.5.30729.4926, ASP.NET 4.8.0 | PHP 7.2 |
| Database server | MariaDB 10.3 | MariaDB 10.11 MSSQL 2019 | MariaDB 10.1 |
| Control panel | Plesk 18.0 | Plesk 18.0 | Plesk 17.8 |
| Available sizes | S, M, L | S, M, L | S, M, L |
| SNI Support | Yes | Yes | Yes |
| IPV4 | Yes | Yes | Yes |
| IPV6 | Yes | Yes | No |
- Sizes (S, M, L): For detailed specifications of the Web Hosting pack sizes, please visit the Web Hosting section.
- Types (Linux, Windows): You can also check our Web Hosting section for the current supported specifications.
- Our Web-Hosting supports the FTP and FTPS (FTP over SSL) protocols.
- We use SNI on our Web-Hosting platforms, so no additional ip address is needed for SSL.
If you require additional details on our Web Hosting packages, please contact our team at domains@leaseweb.com.
Web Hosting packages are applicable for a 3-month, 6-month, 1-year or 2-years contract term and 1-month, 3-month, 6-month or 1-year billing frequency.
Limitations of the Web Hosting pack
Please see the following limitations for the Web Hosting packages:
- Users can do 150.000 MySQL database queries per hour. If the limit is exceeded, the database cannot be accessed until the next hour. This limit is fixed and there is no grace period.
- All limits are fixed within the chosen package. If you need more resources, you can upgrade your package to the next available package by contacting domains@leaseweb.com.
- Cron jobs or scheduled tasks are not provided on any of the hosting packages.
- ColdFusion is not supported.
- Tomcat is not supported.
- Mailing lists (module known as mailman) are not supported.
Domain name hosted with Web Hosting pack
Hosting your domain under the Web Hosting pack
You can host your website under one domain, and you can link multiple aliases to this website.
Using a domain name with Leaseweb’s Web Hosting pack
When ordering a Web Hosting pack with Leaseweb you can assign the Web Hosting pack to a new domain name (to be registered) or to an existing domain name (already registered). But the first step is to choose the package that you would like, either Small, Medium, or Large
For an existing domain name, you can either transfer the domain name registration to Leaseweb or you can choose to maintain the domain name registration at a different registrar.
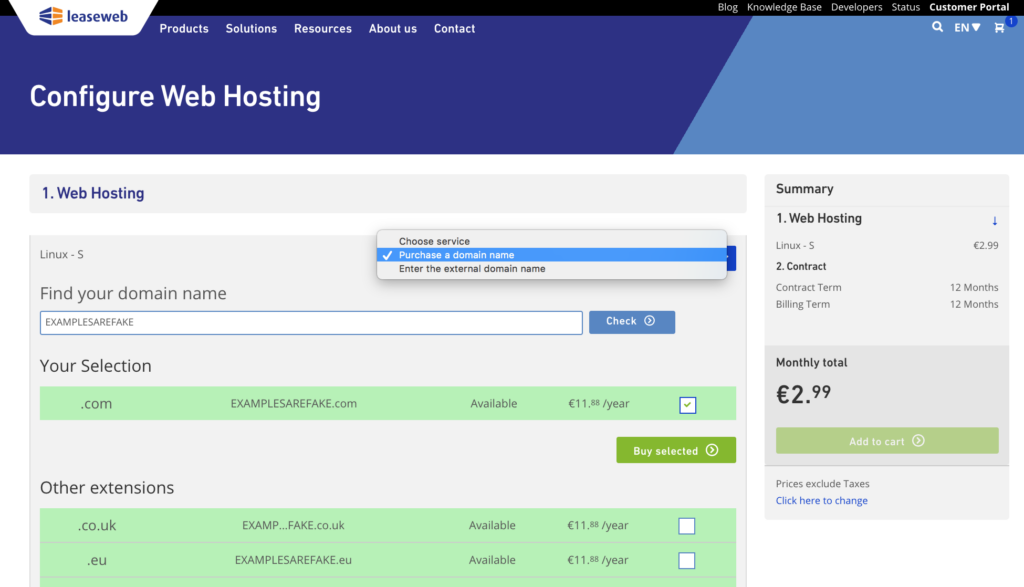
Creating the Web Hosting pack for a new domain name (to be registered)
When you order online a Web Hosting pack for a new domain name, first select Buy Domain Name from the link provided below to obtain your domain.

It will redirect you to the domain order page, where you will be able to purchase your new domain name.
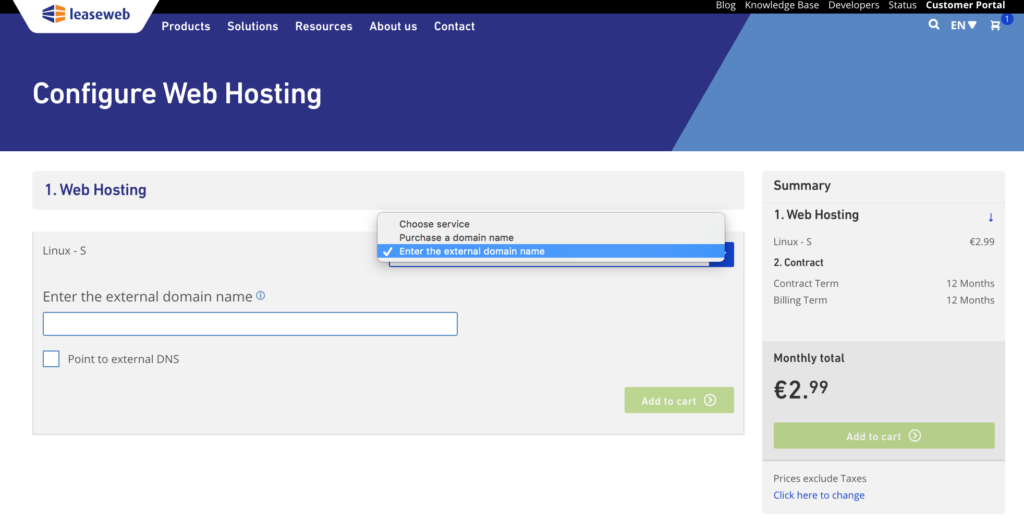
Creating the Web Hosting pack for an existing domain name (already registered)
When you order online a Web Hosting pack for an existing domain name, first you need to enter the domain name in the field below ‘Link your domain name to our package’. After that, you need to select the correct tld next to the domain name.

Be aware to select the Data Center Location where you want to have your Web Hosting Pack from the dropdown list, and click the Add to cart button.

Information
If you would like to transfer your domain to Leaseweb, first follow the same steps from the above section: Creating the Web Hosting pack for a new domain name (to be registered).
Using DNS records for your domain hosted under a Web Hosting pack
Domain name DNS records are assigned during the setup of the Web Hosting pack, and you can view and edit them from the Customer Portal (Domains->View/Edit)
To know more about the most used DNS record types, please visit: DNS records types.
Setting email accounts for your domain
Mail packs are no longer offered separately by Leaseweb.
We only provide email accounts through our Web Hosting packages.
For each email account, you will have a 5 GB mailbox space. The maximum amount of accounts is 250.
Email accounts are managed via the customer portal. Our article Configuring Email Settings provides additional details on how you can set the emails.
How to articles for the web hosting Plesk panel
How to use our New Customer Portal overview
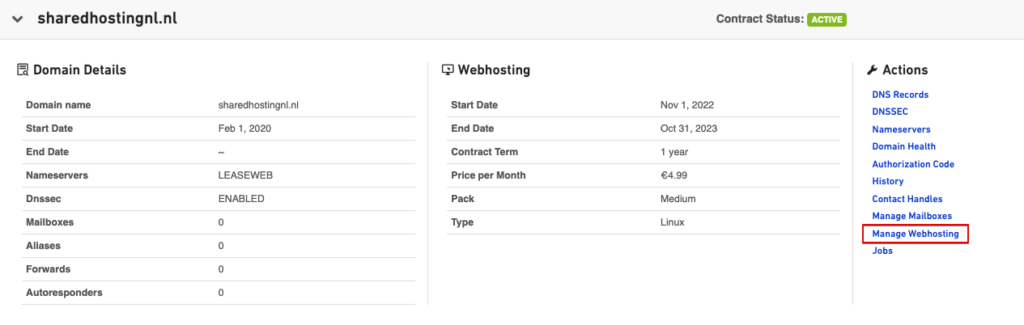
- Log in to the Customer portal, and choose Hosting → Domain, Hosting & Email
- Select your domain and press Manage Web-Hosting

- Here you can find useful information related to your Web-Hosting and also edit users:

- Here you can find Contract details as well as Usage details.
- Here you can also find and access the respective Panel URL of your domains platform.
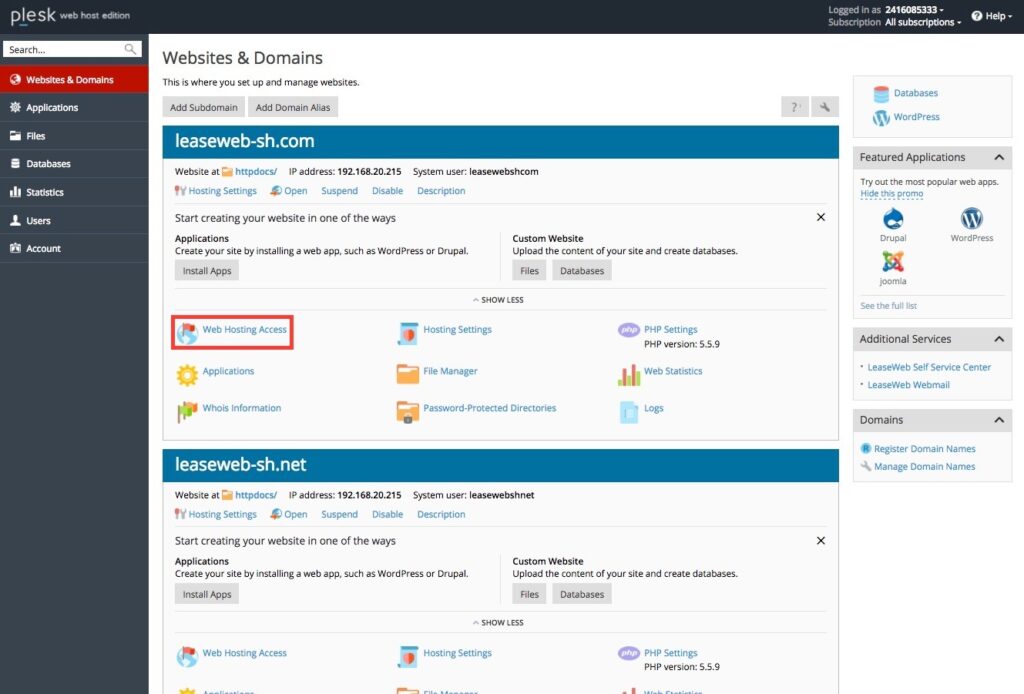
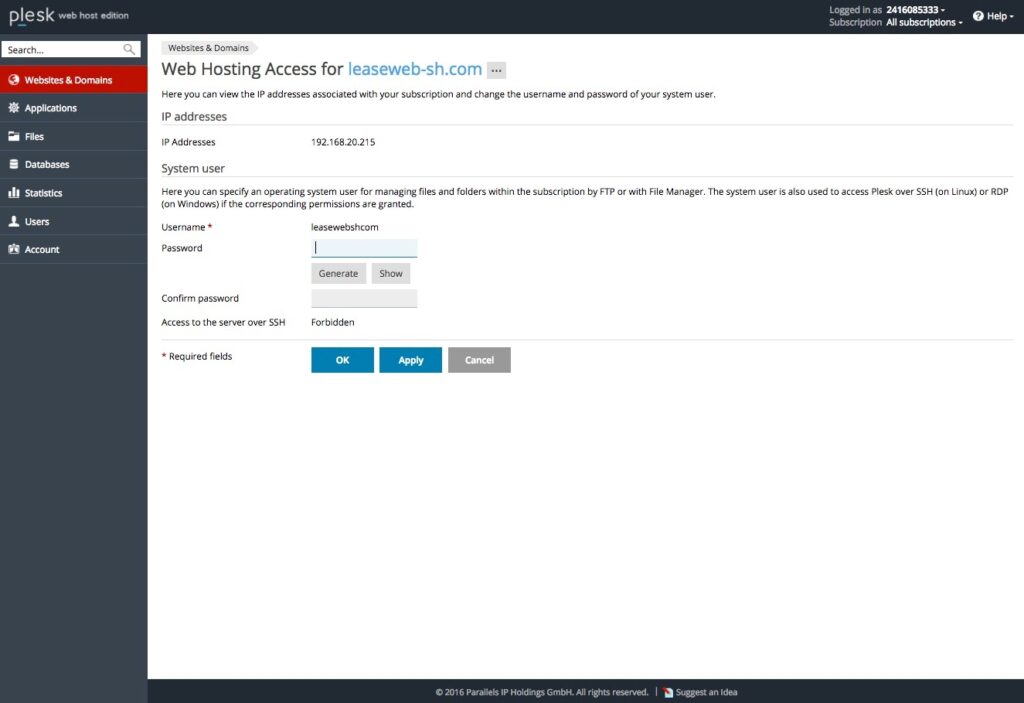
- At Users tab you can find, copy and reset your login credentials for the Plesk users platform as well as FTP users credentials see below articles.
- Here you can also find what IPV4 or IPV6 your domain is using.
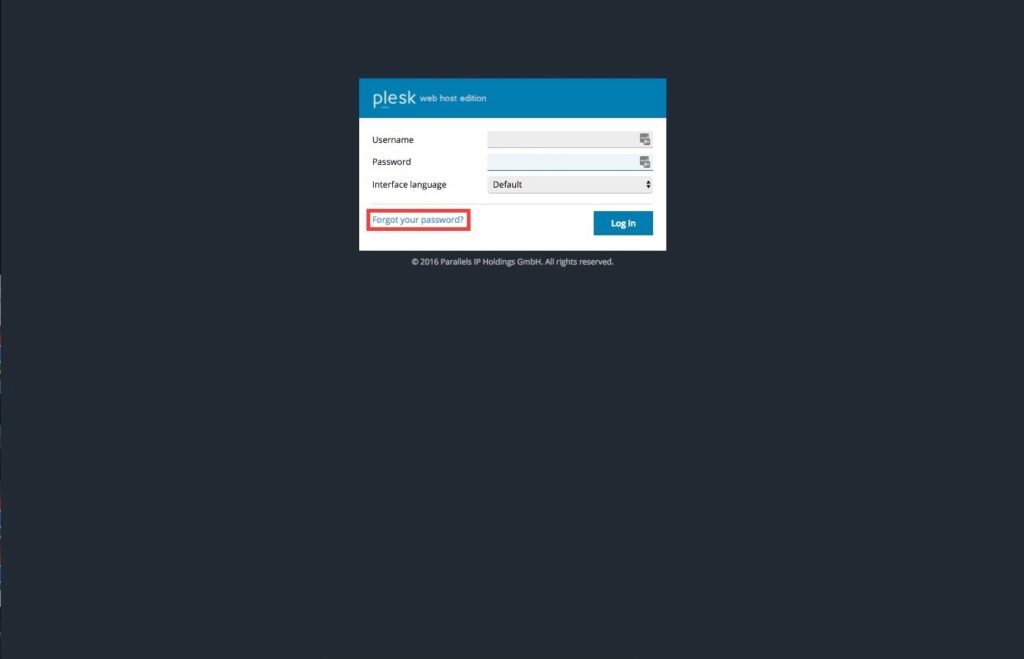
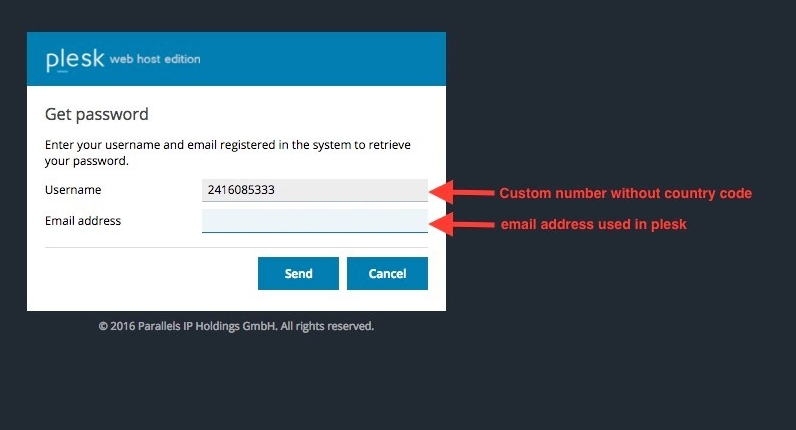
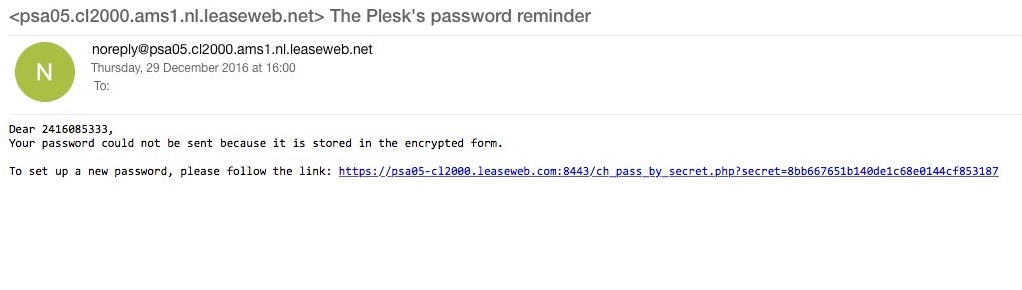
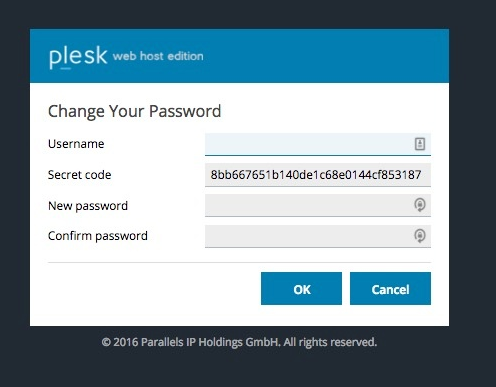
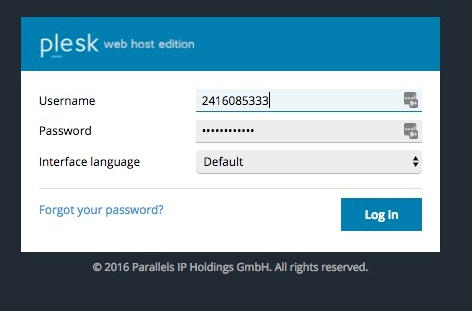
How to reset the password of your Plesk user name
Information
In case your current credentials are not valid, we advise resetting your password and trying again.
- Log in to the Customer portal and choose Hosting → Domain, Hosting & Email
- Select your domain and press Manage Web-Hosting
- Select Users

- Press Reset

How to reset the password of your FTP user
Information
In case your current credentials are not valid, we advise resetting your password and trying again.
Please note that your FTP username is not the same as your Plesk username. The steps below show you how to look up your username and password:
- Log in to the Customer portal and choose Hosting → Domain, Hosting & Email
- Select your domain and press Manage Web-Hosting
- Select Users
- Locate FTP Username and Password Press Reset:

- Open the Web-Hosting Plesk panel and log in to your account with your new reset password.

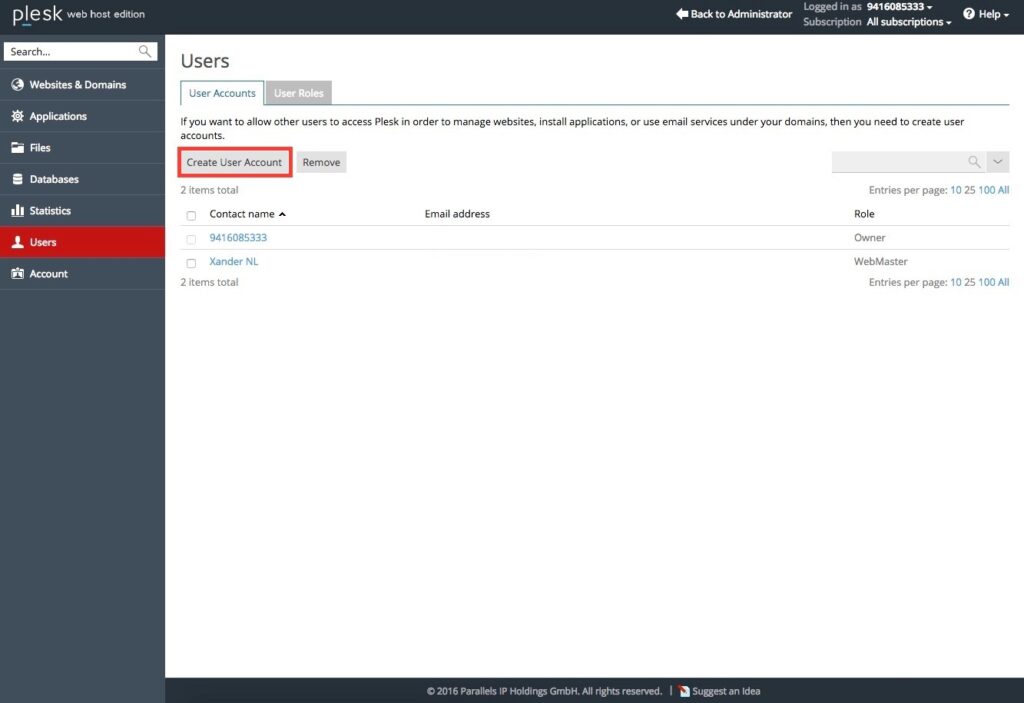
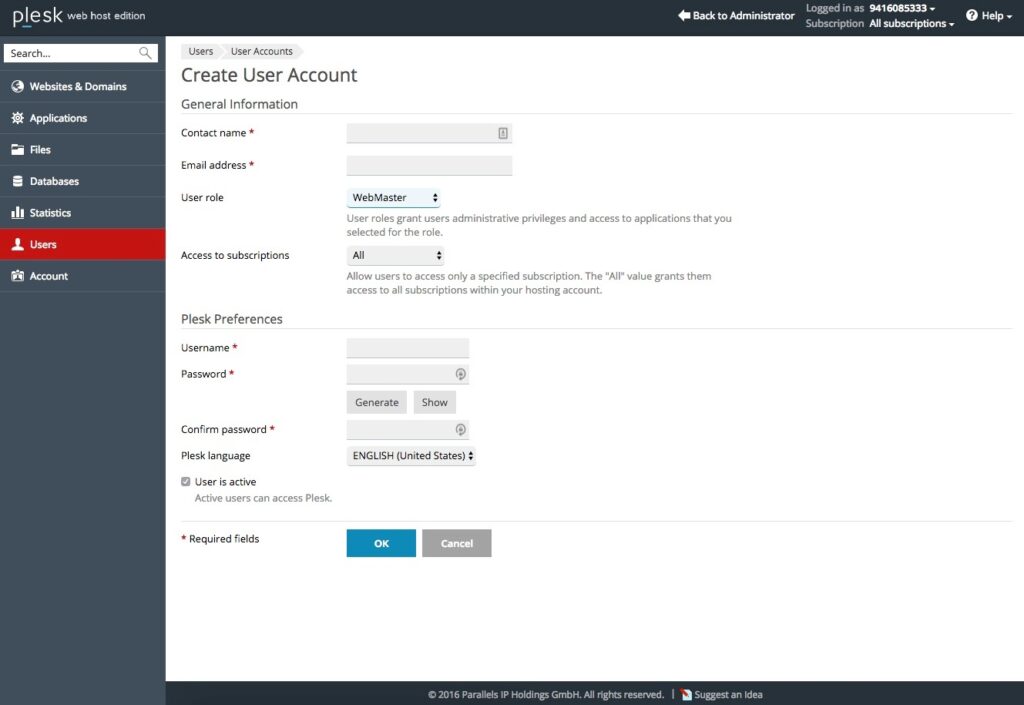
How to create an additional web hosting Plesk user
Below is a step-by-step guide on how to create an additional Plesk user for our web hosting platform. With this additional user, you or somebody you want can log in to Plesk and manage one or multiple of your subscriptions.
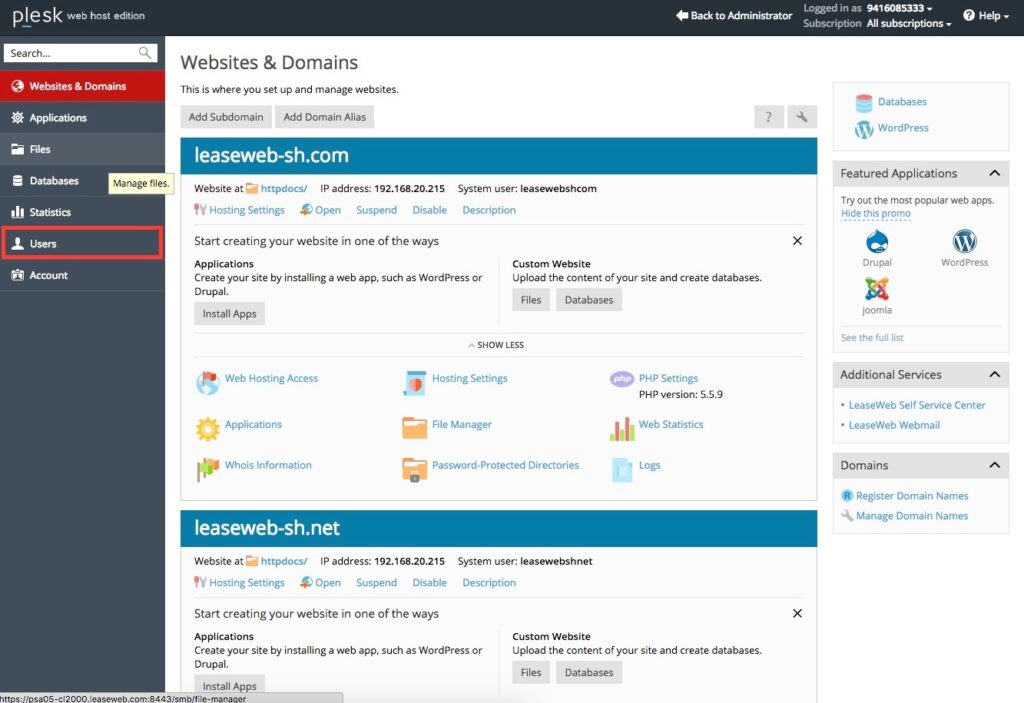
- Open the Web-Hosting Plesk panel and log in to your account.
- Click on the Users link in the menu on the left.

- Click on the Create User Account button

- Fill in the form as desired and click OK to add the user.

An additional Plesk user has now been created and can be used.
How to enable two-factor authentication for Plesk users
- Open the web-hosting Plesk panel login page and log in to your account
- Click on the Google Authenticator link in the menu on the right

- Click on Enable Multi-factor Authentication, follow the instructions shown on the pag,e and click OK.

From now on, you will be asked for a second validation to log in to Plesk.
How to choose PHP Handlers
Within the Leaseweb Customer Portal
- Log in to the Customer portal, and choose Hosting → Domain, Hosting & Email
- Select your domain and press Manage Webhosting
- Click on PHP

- Choose the PHP version and press Activate selected version
 This function is available only on Linux Web-Hosting
Now your respective PHP version has been set for your website.
Within the Plesk web hosting panel
- Open the web-hosting Plesk panel login page and log in to your account
- Click on the PHP Selector link in the menu on the left

- Choose a PHP version

- Press Set as Current, and your respective PHP version has been set for your website.

- It is also possible to enable or disable certain php modules/extensions from the same page. Also, if you want to configure some PHP-related settings, such as memory_limit, upload_max_filesize, etc., it can be done from the Options page.

- It is also possible to enable or disable certain php modules/extensions from the same page. Also, if you want to configure some PHP-related settings, such as memory_limit, upload_max_filesize, etc., it can be done from the Options page.
How to manage SSL Certificates
Within the Leaseweb Customer Portal
- Log in to the Customer portal, and choose Hosting → Domain, Hosting & Email
- Select your domain and press Manage Webhosting
- Select Certificates:

- Here you can select a free Let’s Encrypt Certificate or upload your own certificate
- For the Let’s Encrypt Certificate, simply press the button Request Let’s Encrypt and press ✅
- Make Sure you have a valid A Record pointing to the correct Web-Hosting platform.

- To upload a custom Certificate simply press the button Upload custom certificate
- Here you have to add the following values provided by the Certificate issuer:
- CSR, Private Key, Certificate, Ca-Bundle
- Once all of the above steps are done, click Upload certificate at the bottom of the pop-up window

- Here you have to add the following values provided by the Certificate issuer:
Within Plesk web hosting panel
- Open the web hosting Plesk panel login page and log in to your account

- Select your domain and select SSL/TLS Certificates

- Here you can select a free Let’s Encrypt Certificate or upload your own certificate, as well as manage your certificates

 You can check at the following link for any Plesk SSL-related article:
https://support.plesk.com/hc/en-us/search?utf8=%E2%9C%93&query=ssl+certificate
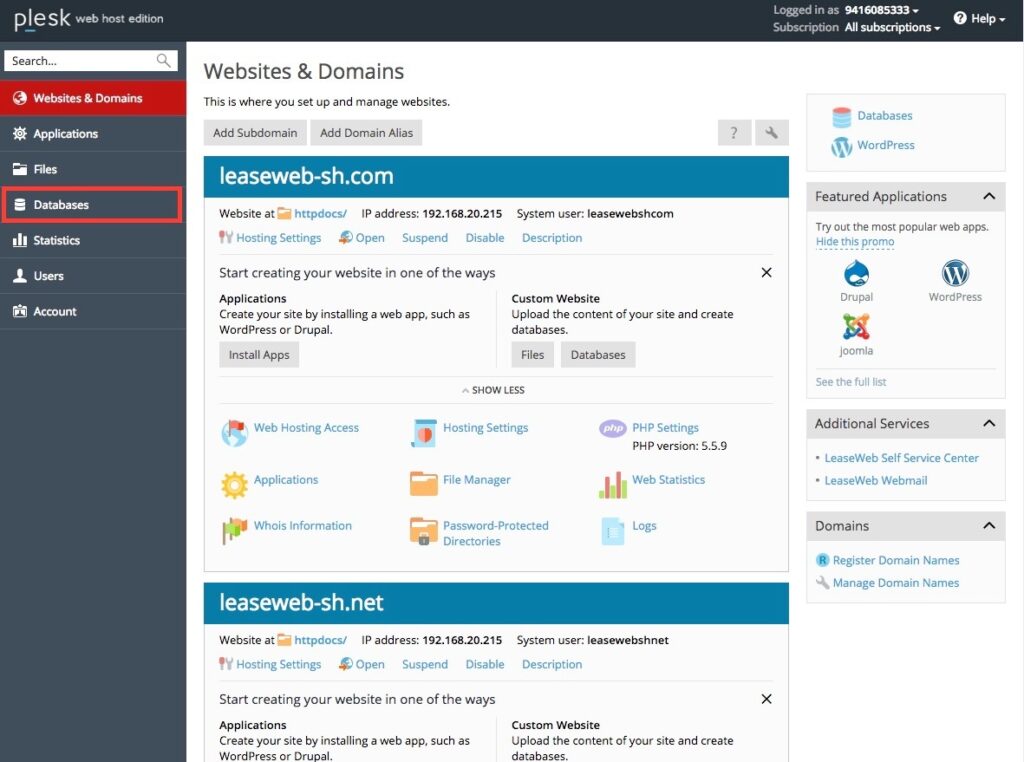
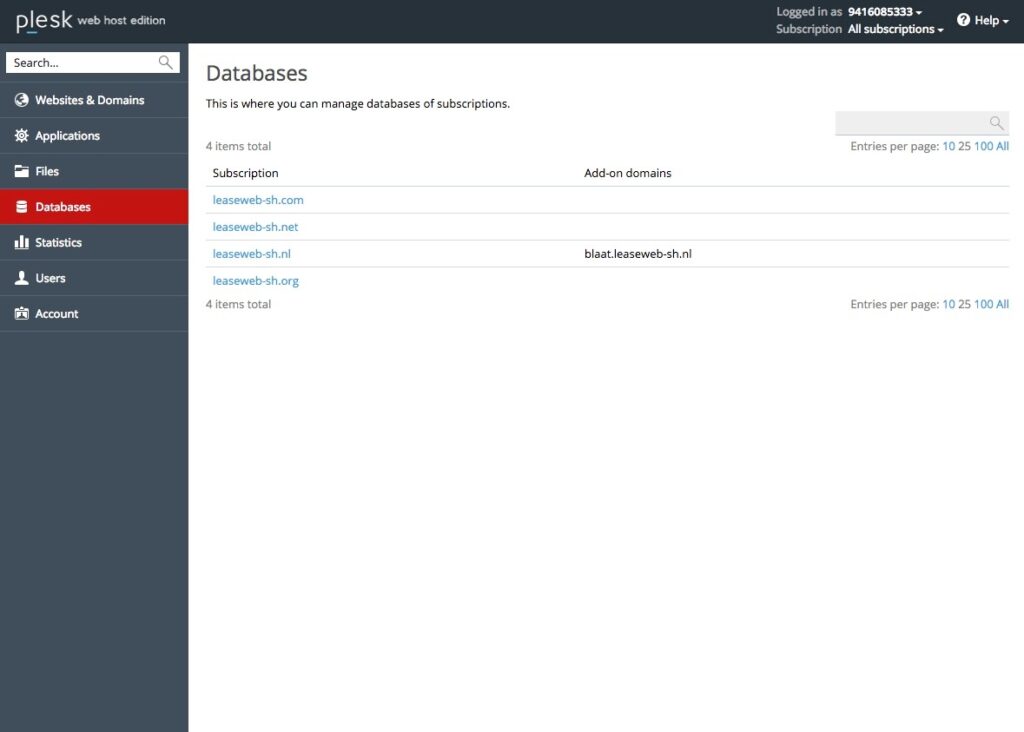
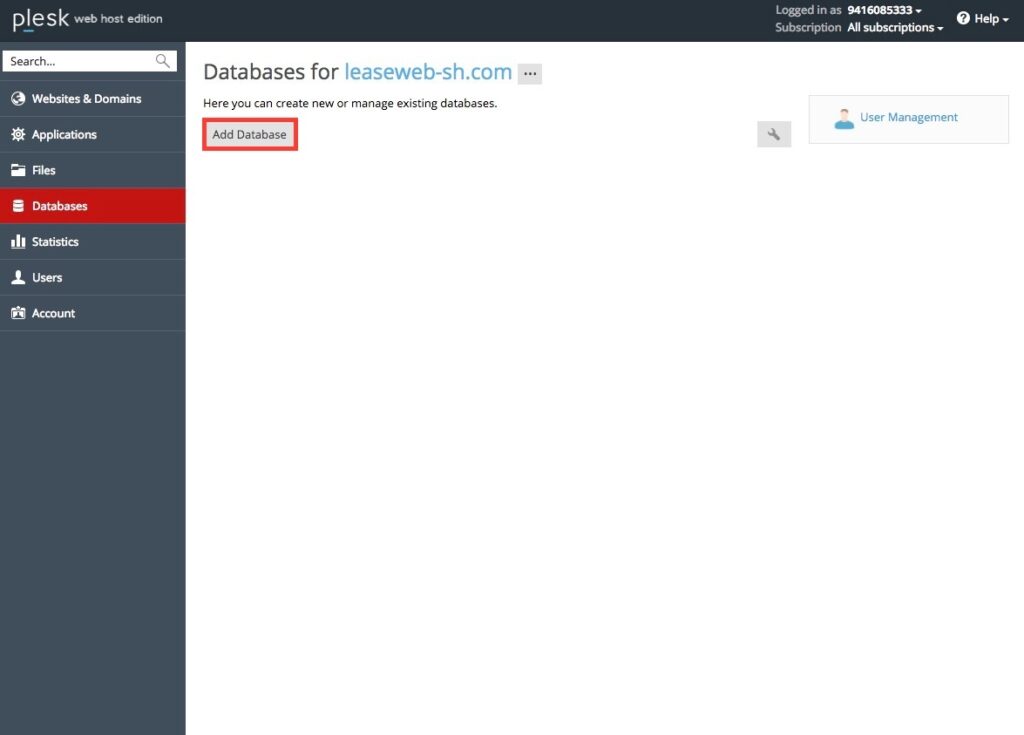
How to manage databases within the Plesk web hosting panel
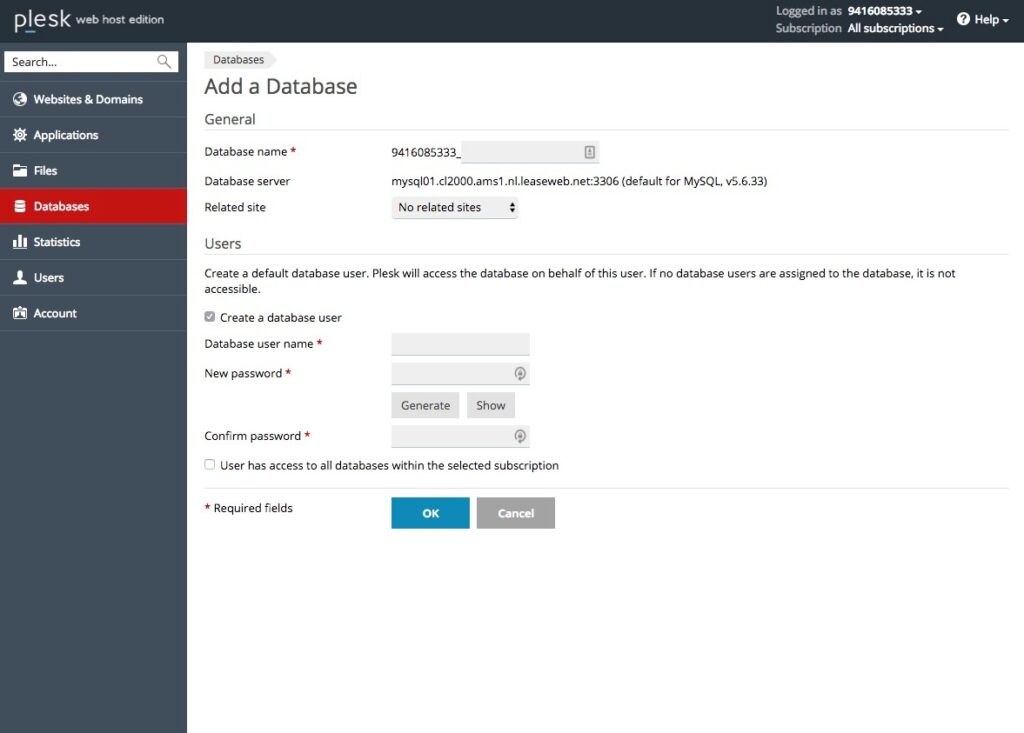
Create a new database
- Open the Web-Hosting Plesk panel login page and log in to your account

- Click on the Databases link in the menu on the left

- Choose a domain

- Click on the Add Database button.

- Fill in the information as desired and click on the OK button

- Now the new database is created

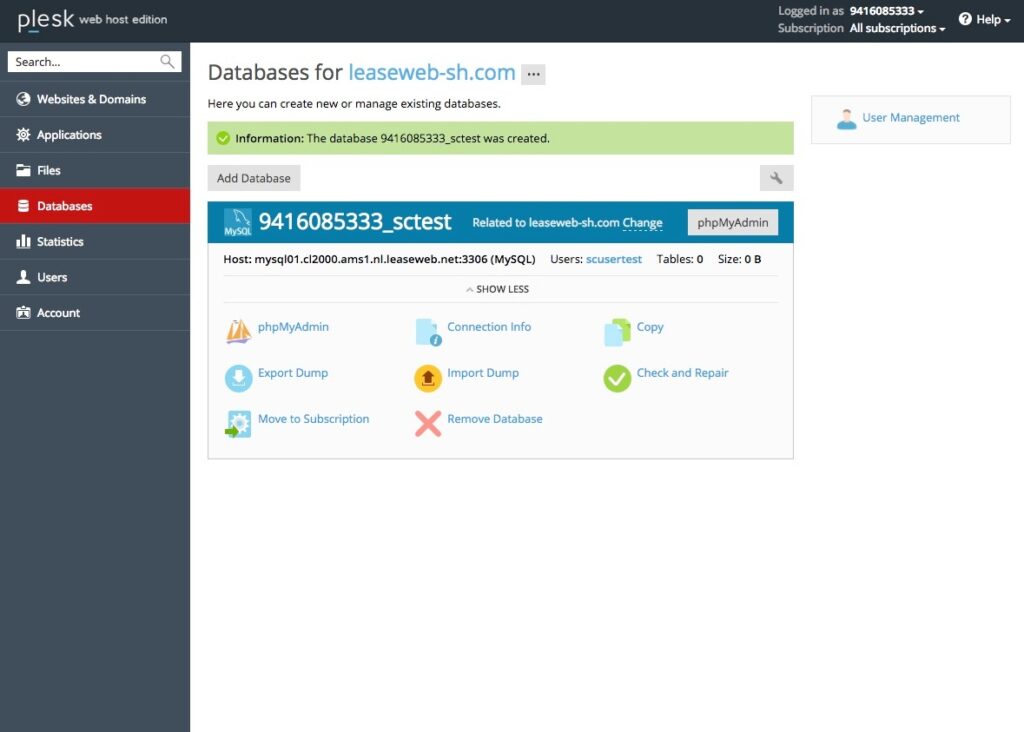
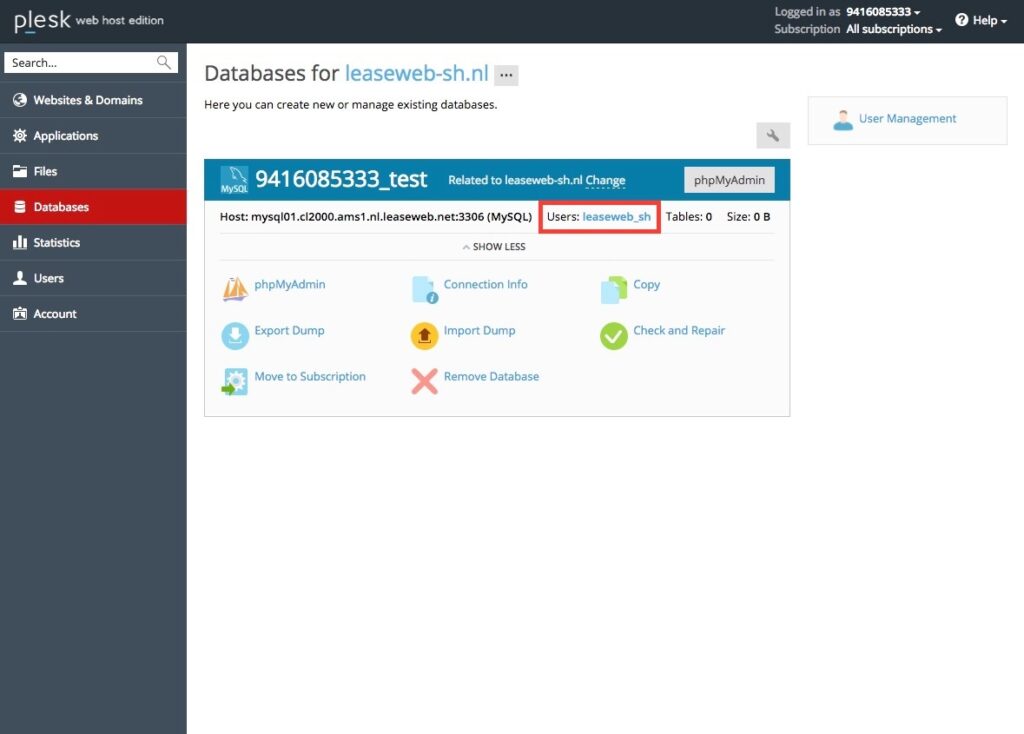
Edit an existing database
- Open the Web-Hosting Plesk panel login page and log in to your account
- Click on the Databases link in the menu on the left
- Choose a domain to manage
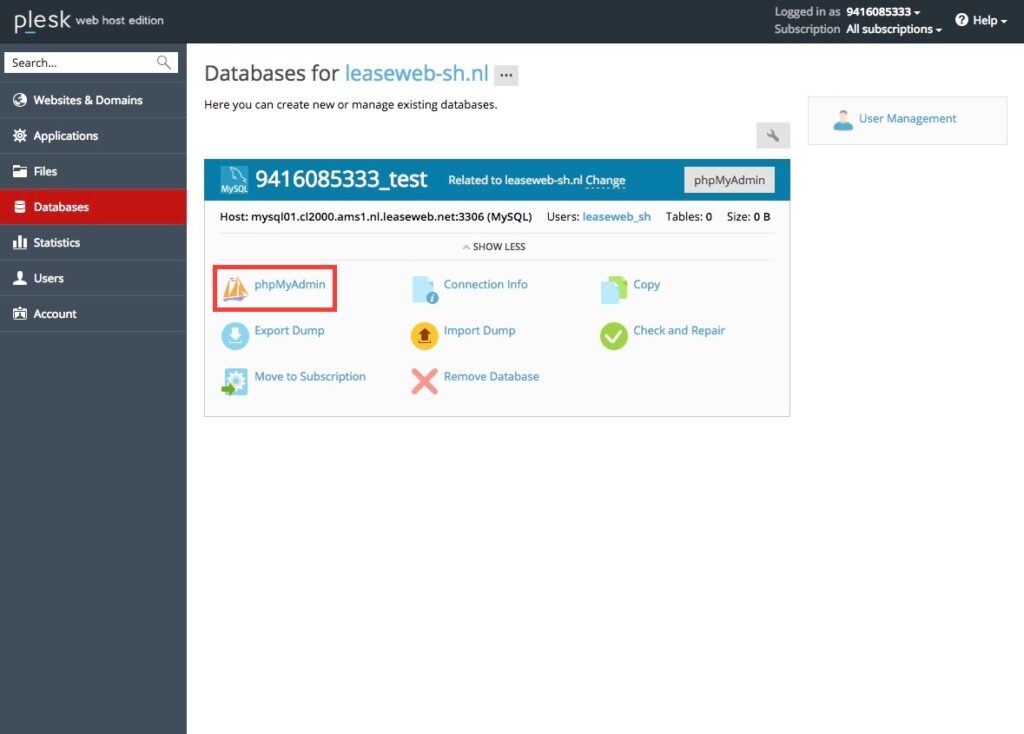
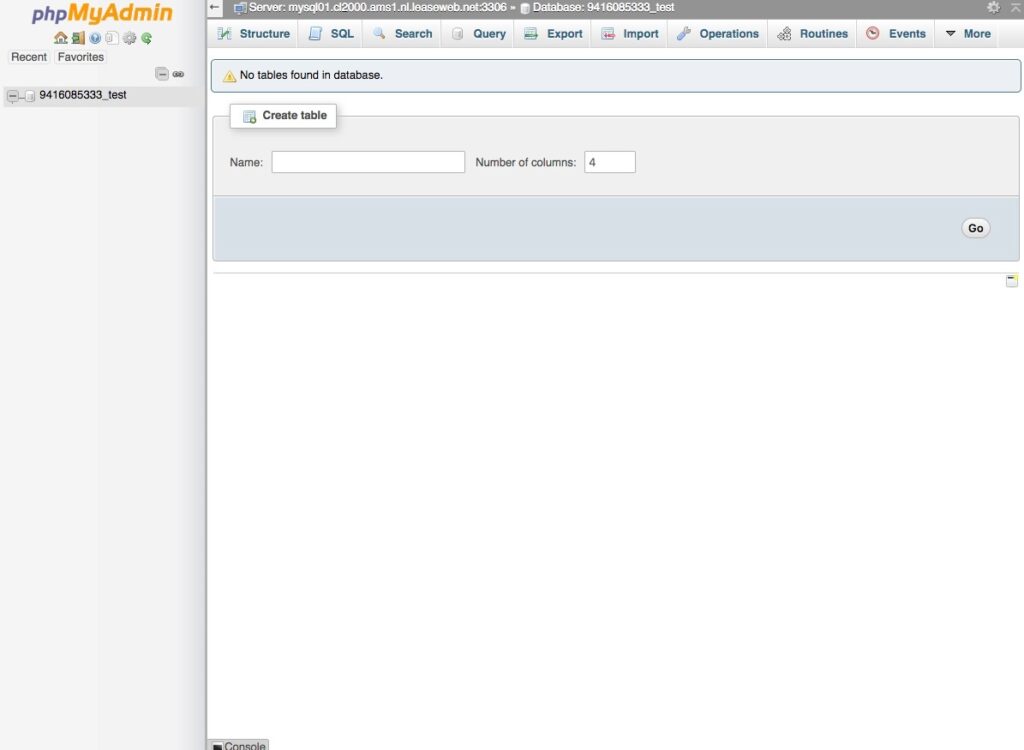
Edit tables or content
- Click on the PhpMyAdmin option

- Within the phpMyAdmin pop-up screen, you can edit tables or content

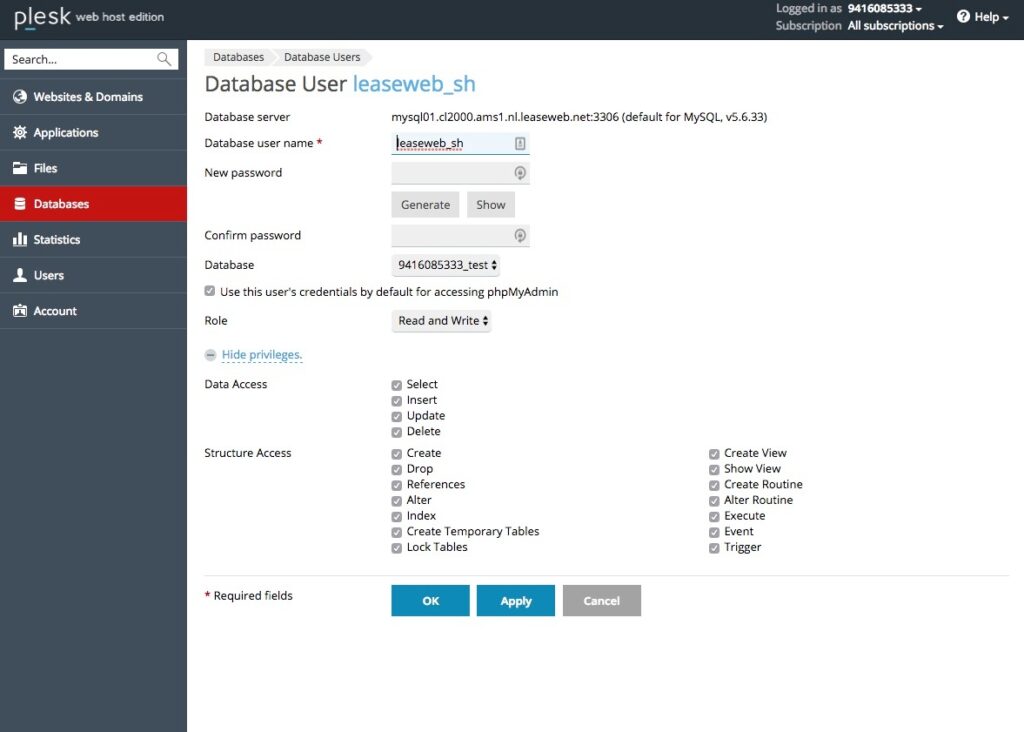
Edit the database user
- Click on the user to go to the edit user page

- Edit the user as desired and click on the OK button

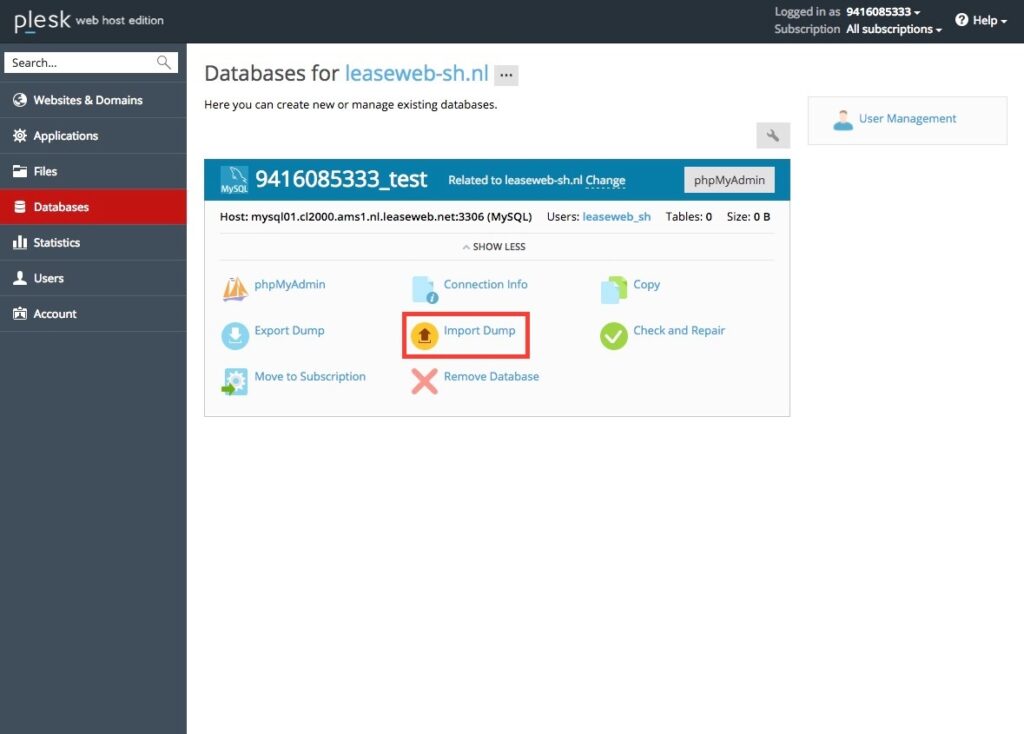
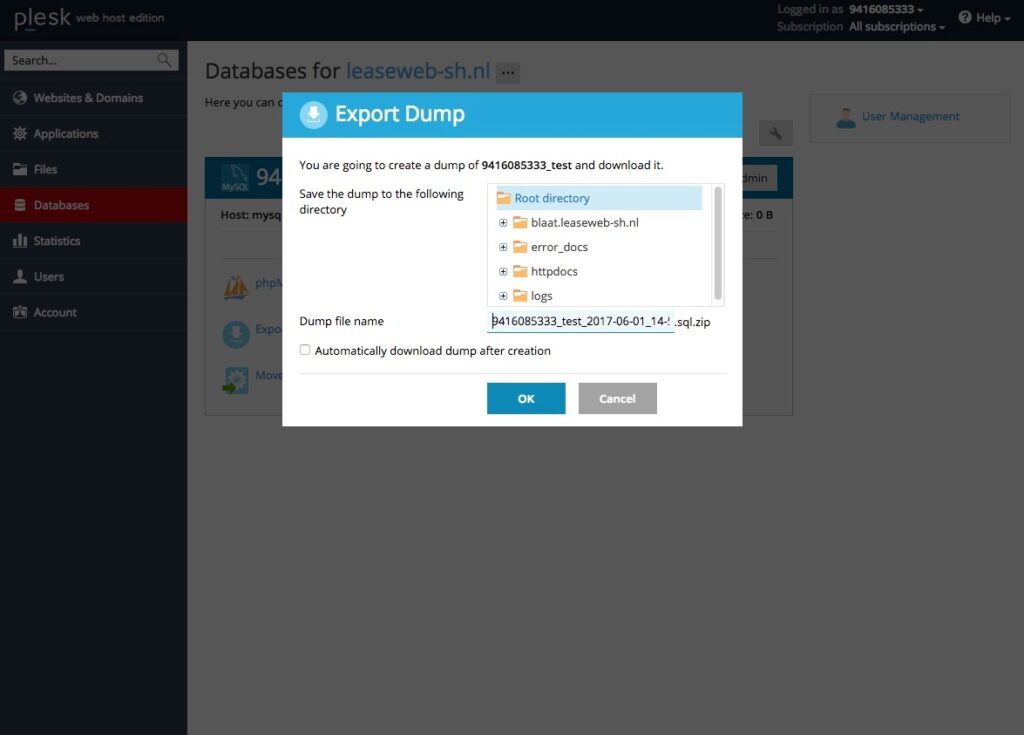
Export/Import a database dump
- Open the Web Hosting Plesk panel login page and log in to your account
- Click on the Databases link in the menu on the left
- Choose a domain and see next steps for how to import or export it
Import a dump
- Click on the Import Dump option

- Within the pop-up window, choose a file by uploading or importing it and press the OK button

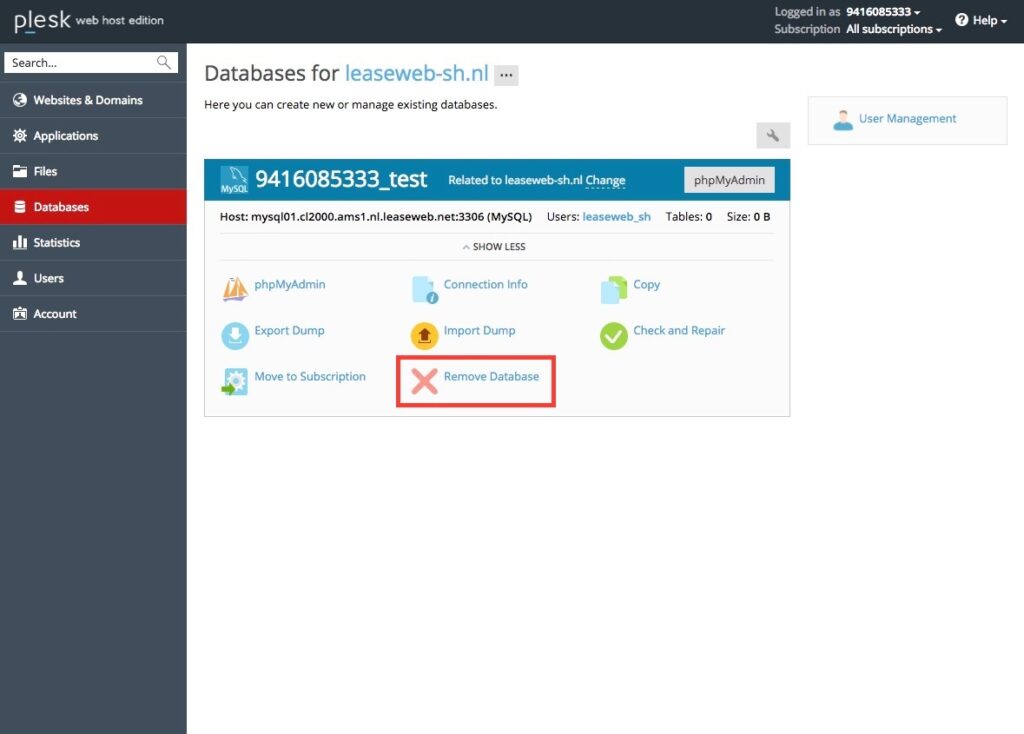
Delete a database
- Open the Web-Hosting Plesk panel login page and log in to your account.
- Click on the Databases link in the menu on the left
- Choose a domain
- Click on the Remove Database option

- Now the database is deleted

How to Whitelist IPs to access MSSQL databases on the Windows Platform
This Whitelist provides access to the MSSQL Database port:1433.
- Log in to the Customer portal, and choose Hosting → Domain, Hosting & Email
- Select your domain and press Manage Web-Hosting
- Select Mssql Whitelist

- Add your IPv4 and press the + button

- To delete, click on the delete icon corresponding to the IP you want to remove

How to enable monitoring for Web-Hosting
- Log in to the Customer Portal, and choose Hosting → Domain, Hosting & Email
- Select your domain and press Manage Web-Hosting

- Press the Manage Monitoring Button to enable monitoring for Web-hosting

How to Change .NET version for Windows Web Hosting through the Customer Portal
Information
This function is available only on Windows Web-Hosting
- Log in to the Customer Portal, and choose Hosting → Domain, Hosting & Email
- Select your domain and press Manage Web-Hosting
- Press .NET on the top
a. Here you can choose an available version then click to activate the selected version
How to Auto Login to the Plesk panel
- Select your domain and press Manage Web-Hosting
- Log in to the Customer Portal, and choose Hosting → Domain, Hosting & Email
- Here, click on the Auto Login link from the bottom right corner of the Pack Details section

- Upon clicking the Auto Login link, it will redirect to the Plesk panel in a new browser tab and automatically log in
- If you have enabled 2 Factor Authentication, it will display a pop-up screen as below. Here, you have to enter the 2-factor auth code that displays in your authentication app.
- Enter the correct code and click OK to automatically log in to the Plesk panel

How to Use Acronis Backup
Acronis backup is a Plesk extension we provide to customers in order to manage their own backups and retrieve/recover their web-hosting app in case of a disaster situation or any break changes.
This backup is available only in Plesk for Linux or Linux web-hosting packs.
Information
For Windows Backups, customers can contact Leaseweb Support directly and request a recovery of up to max. 14 days; please keep in mind that we cannot ensure any backup before that time frame.
- Log in To Plesk and go to Dashboard -> Acronis Backup

- Here you will find Available Backups based on certain dates and times

Warning
We take backups on daily basis for up to 12 month. We cannot ensure any backup outside ofthat time frame.
- After selecting the date, choose the corresponding web hosting backup you want to recover

- Choose to restore the following:
- Databeses – This will restore only database; you can choose one ore multiple
- Domains – This will recover everything: “Databases, Apps, Files”
- Files – This will recover only files

- For example, to recover everything:
- Choose the Specific Web-hosting and press “Recover”

- In the next window you can choose to include or exclude “Sub-domains” and the press “Recover” again to start the recovery Proccess
- Choose the Specific Web-hosting and press “Recover”
- Monitor the progress by via the”Recovery Operations Log” -> “View Details”

- Here you can see the progress as well as useful data for you recovery

- Once recovery is done you will see “Succeeded”

- In case of failed recovery please contact Leaseweb Support to assist you further.
- Here you can see the progress as well as useful data for you recovery
Information
The login token is generated based on the user’s IP address; hence, the Auto Login URL will work only from the IP address from which the token was generated.
Adding a website to the host file and testing it
In many cases, you might be transferring a website from another hosting platform to one of Leaseweb’s web hosting servers. Following the below instructions, you can test the website functionality without making any changes to the domain’s DNS records.
You will need to know the new IP address of the web hosting server. You can usually find this from the order confirmation email/details.
The host’s file is one of the several system facilities that assist in addressing network nodes in a computer network. It is a common part of an operating system’s Internet Protocol (IP) implementation and serves the function of translating hostnames into numeric protocol addresses, called IP addresses, that identify and locate a host in an IP network.
In some operating systems, the contents of the hosts file are used preferentially to other name resolution methods such as the Domain Name System (DNS), but many systems implement name service switches to provide customization, such as nsswitch.conf for Linux and UNIX. Unlike remote DNS resolvers, the hosts file is under the direct control of the administrator of the local computer.
Editing the hosts file
In Linux
Most of the Linux distributions use the hosts file at /etc/hosts. You will need root/sudo access to edit this file. Use your favorite editor to open the file. By default, it looks something like this:
127.0.0.1 localhost
::1 localhost ip6-localhost ip6-loopback
To add your domain for testing purposes, in the hosts file, you need to specify what domain points to which IP address. In this example, we will use the IP address 192.168.0.1 and the domain example.com. You will need to add the line:
192.168.0.1 www.example.com example.comThe file should look like this after editing:
127.0.0.1 localhost
::1 localhost ip6-localhost ip6-loopback
192.168.0.1 www.example.com example.com
Save the file. All requests for the domain www.example.com and example.com will be directed to the specified IP (192.168.0.1).
In Windows
In Windows XP and higher versions, the hosts file is located in %SystemRoot%\system32\drivers\etc\hosts, where %SystemRoot% is the directory where Windows has been installed.
By default, this should be C:\Windows\System32\drivers\etc\hosts. You can edit the file with Notepad, but in most cases, you will have to do this as an admin user. To do this:
- Click the Start menu.
- Select All Programs.
- Select Accessories.
- Right-click on Notepad and select Run as administrator.
- Browse to the following path: %SystemRoot%\system32\drivers\etc\ (or by default C:\Windows\System32\drivers\etc\).
- You will need to choose that instead of showing Text Documents (*.txt), you will see all files in the directory.
- Open the hosts file.
By default, there should be no entries. You can add new entries after the comment lines that start with #. After editing, the file should look like this:
.
.
.
# localhost name resolution is handled within DNS itself.
# 127.0.0.1 localhost
# ::1 localhost192.168.0.1 www.example.com example.com
In Mac OS X
Mac OS X stores the hosts file at /etc/private/hosts. The easiest way to edit this is from the Terminal. You can do this either by typing “Terminal” into Spotlight or by opening Finder and navigating to Applications > Utilities > Terminal. To open the hosts file for editing, type:
sudo nano /etc/private/hostsThe file itself should look the same as in Linux or any other *nix system. You can add the new IP for the domain:
127.0.0.1 localhost
::1 localhost ip6-localhost ip6-loopback
192.168.0.1 www.example.com example.comTesting the hosts file
Pinging the domain name is the easiest way to test if the newly configured IP is working. Tools like dig, nslookup, and host use the DNS data to retrieve information – because of this, you don’t see the changes in effect.
To test that the domain is pointed to the correct IP in your hosts file, type the following:
ping www.example.comThe response should come from the newly configured IP:
PING www.example.com (192.168.0.1) 56(84) bytes of data.
64 bytes from www.example.com (192.168.0.1): icmp_req=1 ttl=58 time=1.40 ms
64 bytes from www.example.com (192.168.0.1): icmp_req=2 ttl=58 time=1.31 ms
64 bytes from www.example.com (192.168.0.1): icmp_req=3 ttl=58 time=1.36 ms
64 bytes from www.example.com (192.168.0.1): icmp_req=4 ttl=58 time=1.36 ms
In Linux or Mac OS X, you can use ping from the Shell or Terminal respectively. In Windows, you will need to open the command line: Press CTRL + Windows button on the keyboard. In the pop-up window, type cmd and hit Enter.