Information
For our Legacy Platform, please see the Manage tab.
Be informed that we are planning to migrate all existing domains of our Legacy Platform into our New Platform. All customers will be informed in advance.
For our New Instructions for redirecting a domain, please continue below.
Adding a new redirect
Perform the following steps to redirect your domain from the Leaseweb Customer Portal:
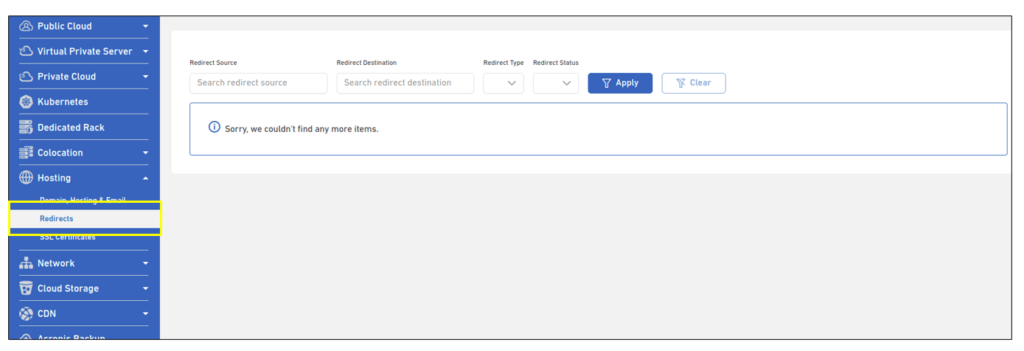
- Log in to your Customer Portal account and click Redirects under the Hosting drop-down menu.
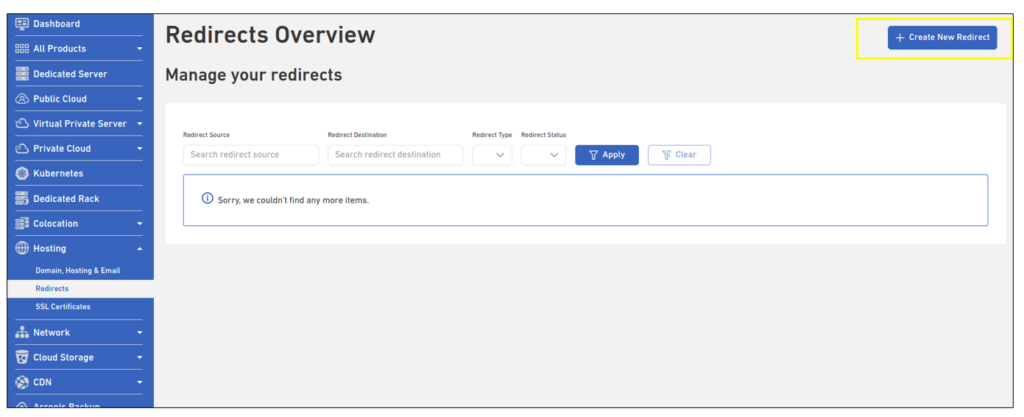
- Click the Create New Redirect button.
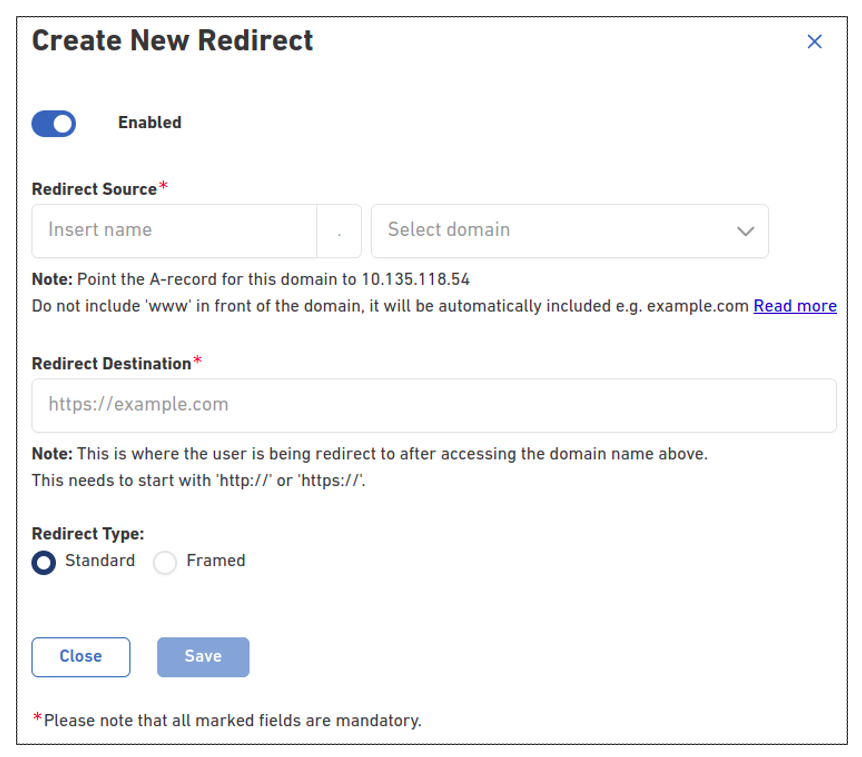
- The Create New Redirect screen displays
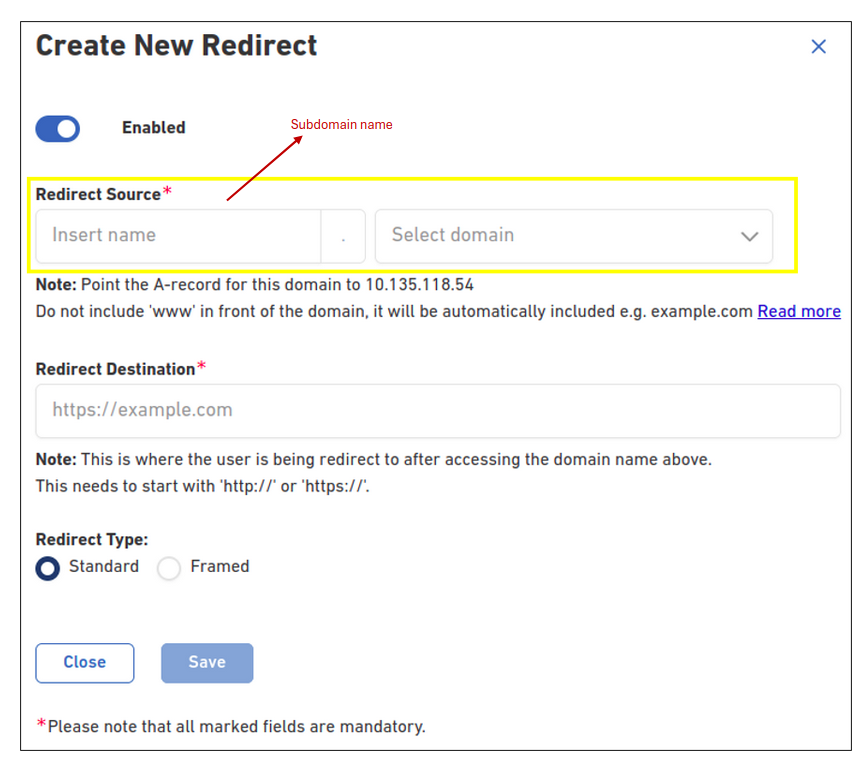
- Select the domain name from the drop-down that you want to redirect. If you want to redirect a subdomain, enter the subdomain name in the text field provided.
 Do not include www – it is automatically handled by our redirect service.
- If the domain is using Leaseweb nameservers, update the A record in the portal. If the domain uses external name servers, make this change with the external DNS provider.
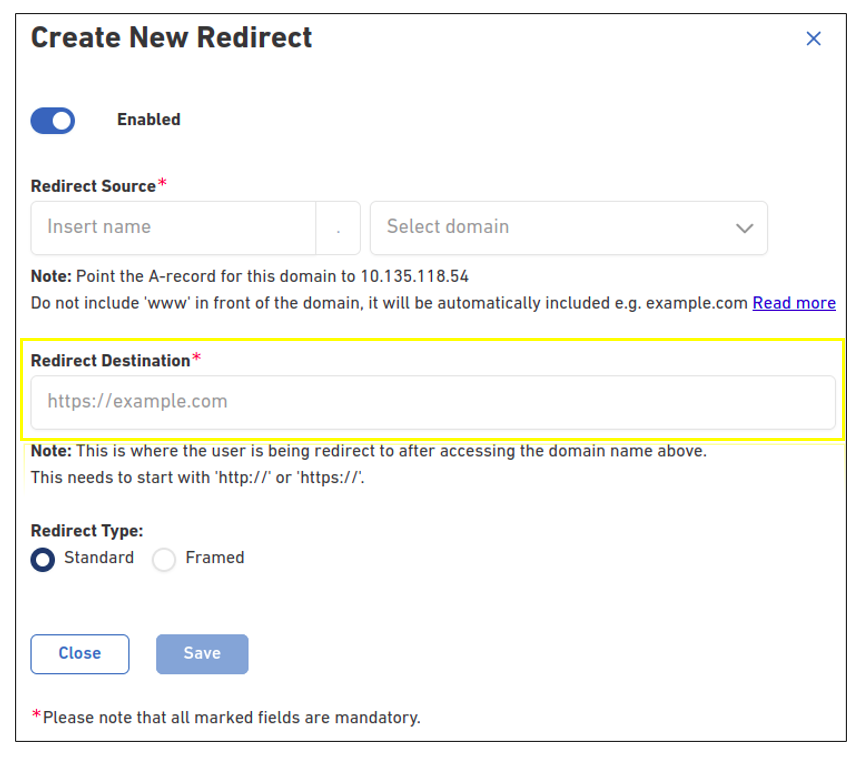
- Add the Redirect url. This is where the user is being redirected to after accessing the domain name
Information
For the changes to be saved successfully, make sure to add the redirect URL in the following format: https://example.com.
- Choose the redirect type. The available options are Standard or Framed forward.
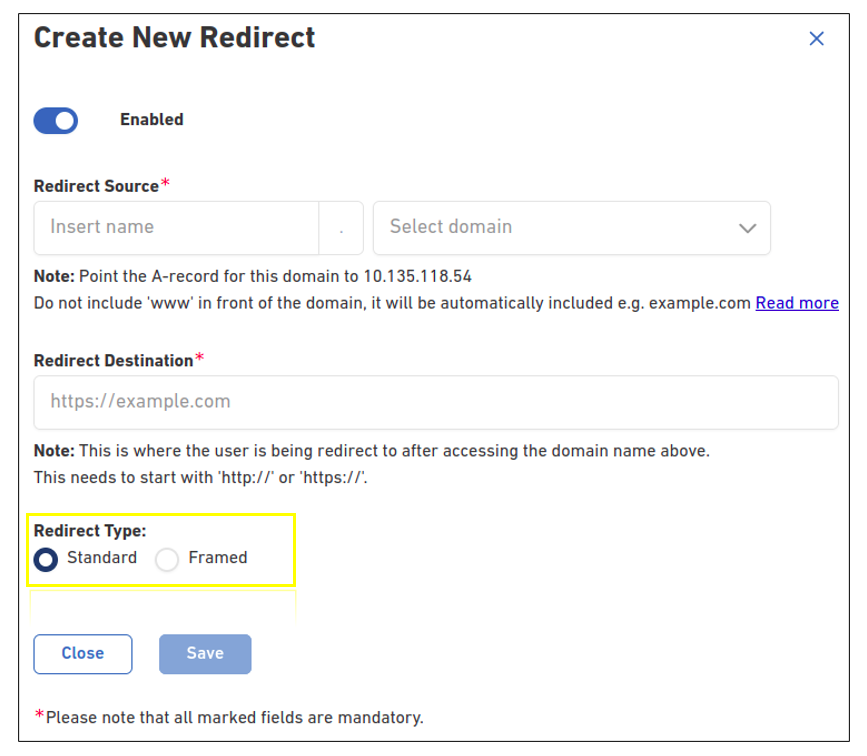
 Description of each Redirect type:
- Standard Redirect: Forwards the URL to its new address and changes the URL in the browser.
- Framed Forward: Cloaks the forward address and shows the domain the user typed in.
- Click on Save. You will receive a message that the redirect has been successfully created.

Viewing your redirects list
Perform the following steps to view your redirects list:
- Log in to your Customer Portal account and click Redirects under the Hosting drop-down menu

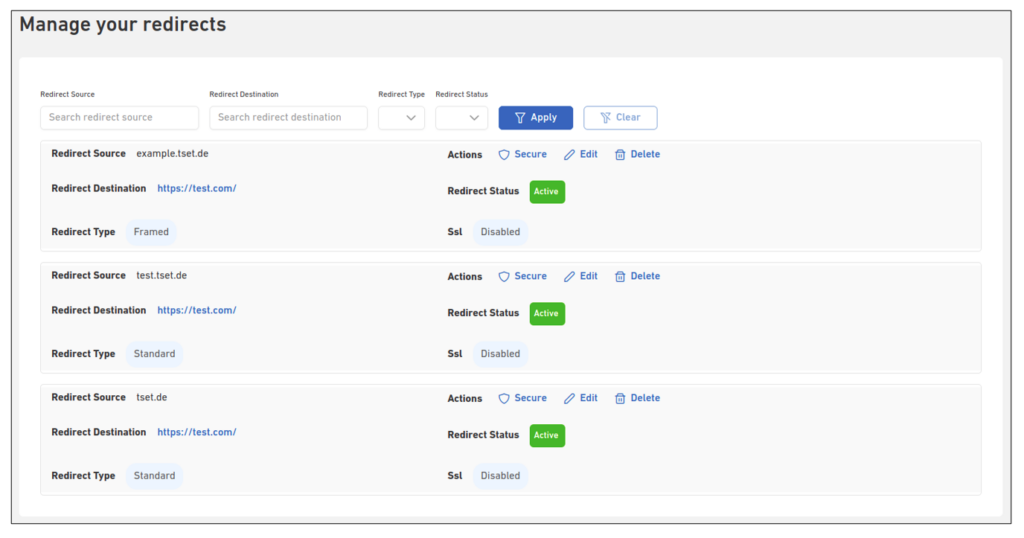
- The Redirects page displays, where you can view all the Redirects added under your customer account.
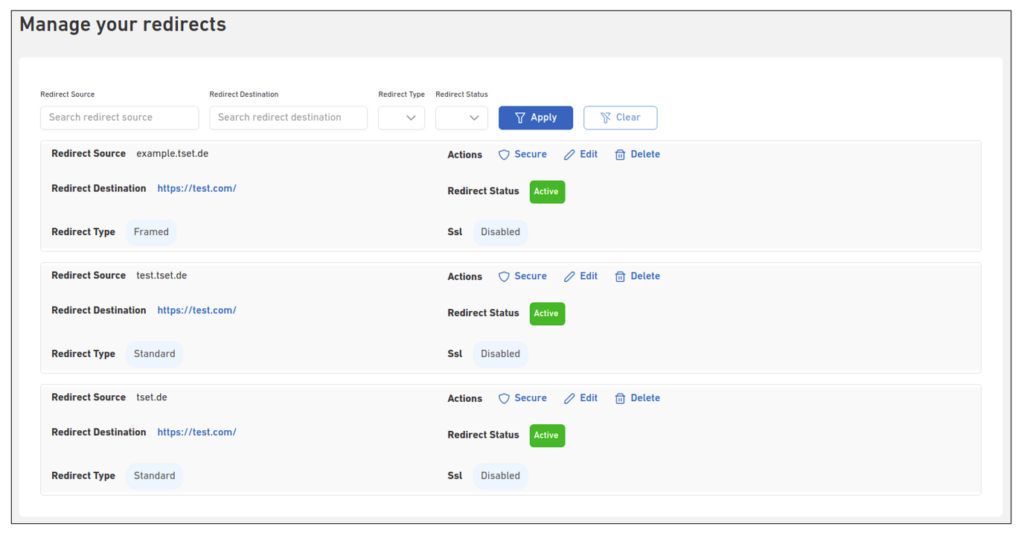
The listing page has the following filter options to search for specific redirects.
- Search by Redirect Source
- Search by Redirect Destination
- Search by Redirect Type
- Search by Redirect Status
Search by Redirect Source
- Enter the redirect source domain in the input box
- If the redirect source is found, it will display in the drop-down. Select the domain that you want to search from the drop-down. Then click on the Apply button.
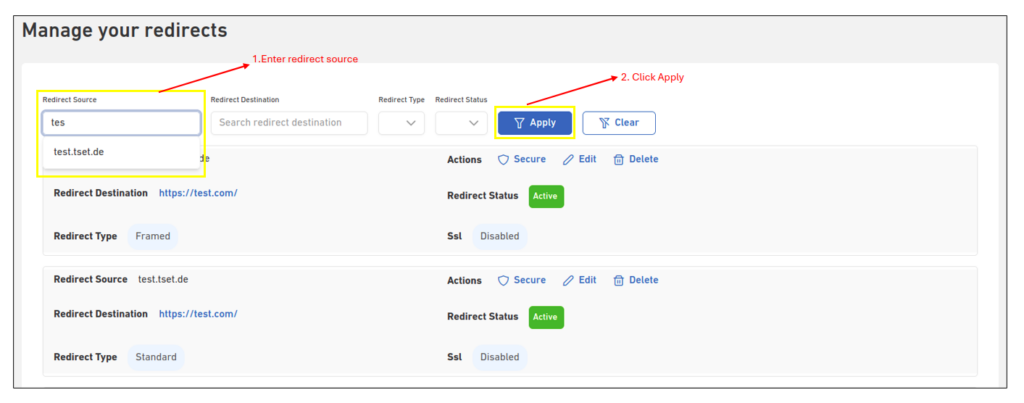
- The search result will be displayed in the listing page.

Search by Redirect Destination
- Enter the redirect destination in the input box
- If the redirect destination is found, it will display in the drop-down
- Select the domain that you want to search from the drop-down. Then click on the Apply button.

- The search result will be displayed on the listing page.
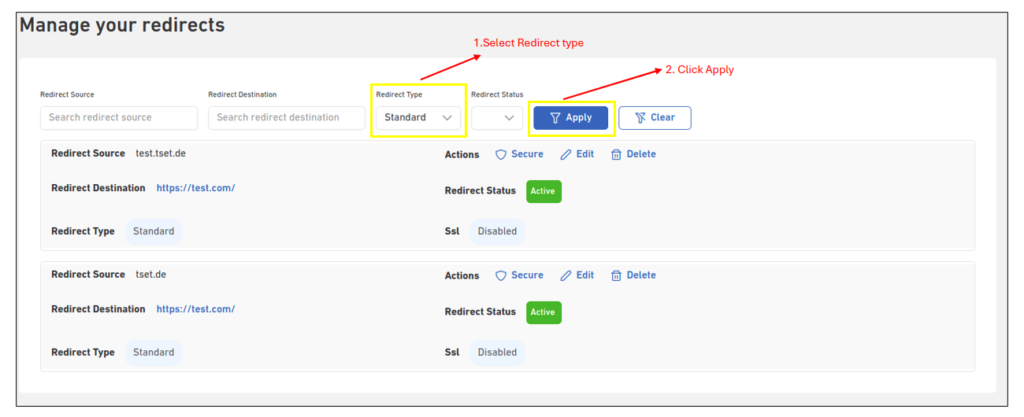
Search by Redirect Type
- Select from the drop-down the Redirect Type you want to search for. Then click on the Apply button
- The search result will be displayed in the listing page for the selected Redirect type
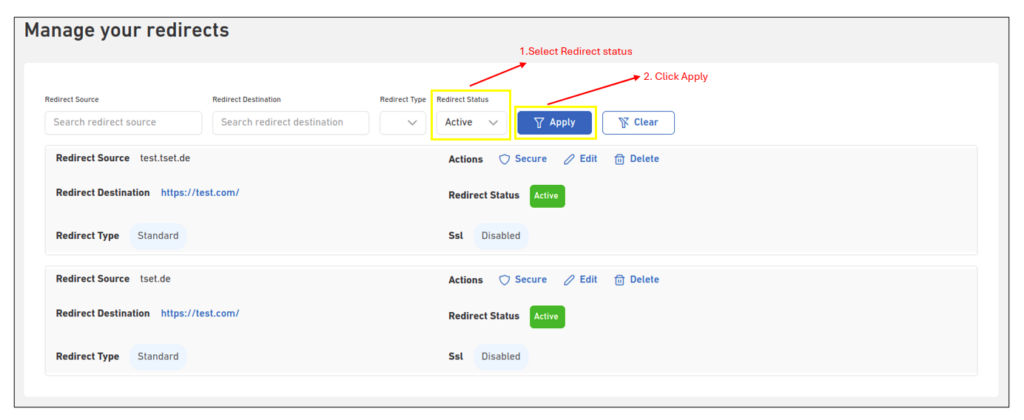
Search by Redirect Status
- Select Redirect Status from the drop-down. Then click on the Apply button
- The search result will be displayed in the listing page for the selected type status.
Editing an existing redirect
You can perform the following changes for a redirect that you have already added under your customer account:
- Change the redirect URL (Redirect destination)
- Change the redirect type
- Enable/disable your redirect
- Delete a redirect
Change the redirect URL
Perform the following steps to successfully change a redirect URL set for your domain:
- Log in to your Customer Portal account and click Redirects under the Hosting drop-down menu
- The Redirects page displays the list of redirect belongs to your account

- Click on Actions -> Edit for the redirect that you wish to change.
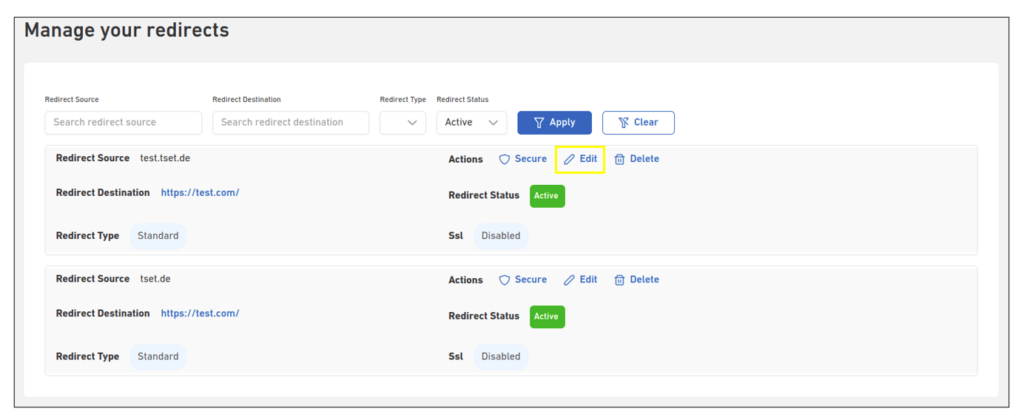
- The Edit Redirect page displays as below
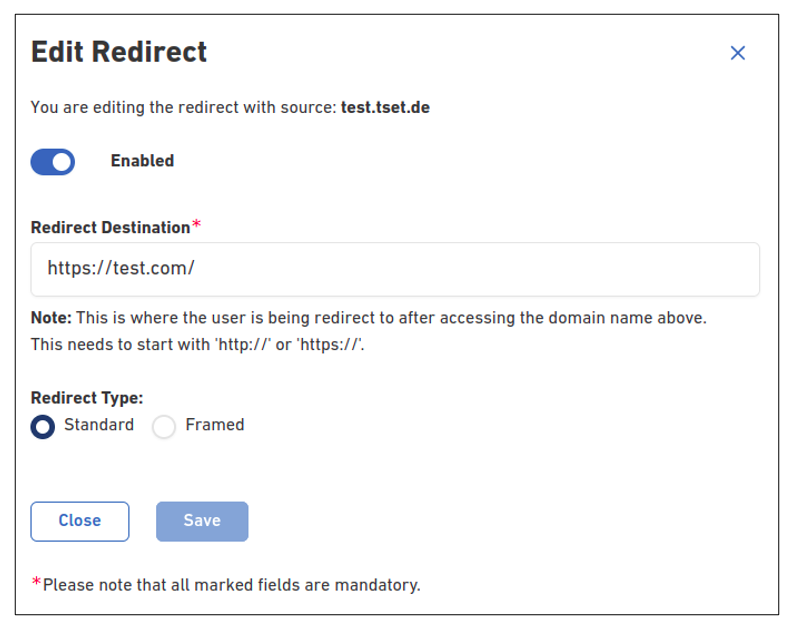
- Go to the Redirect Destination field and add a new url where it needs to be redirected.
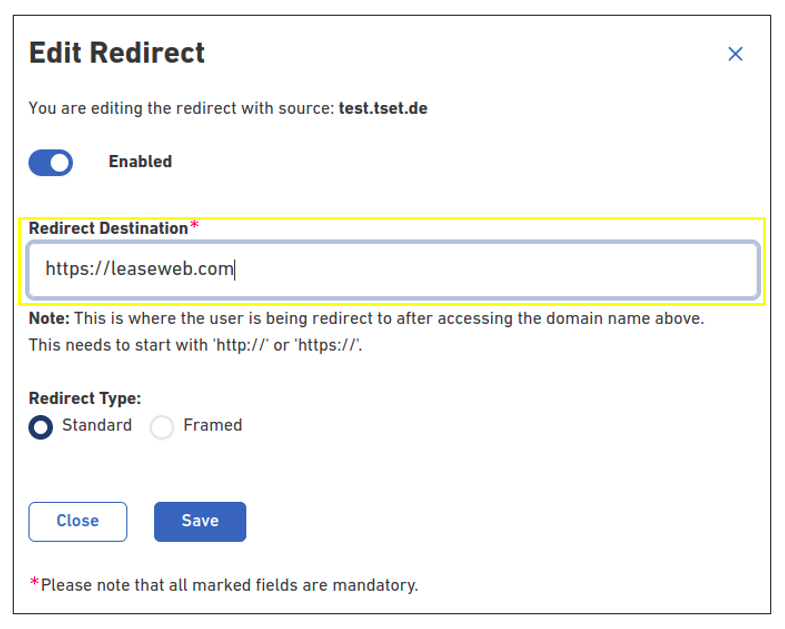
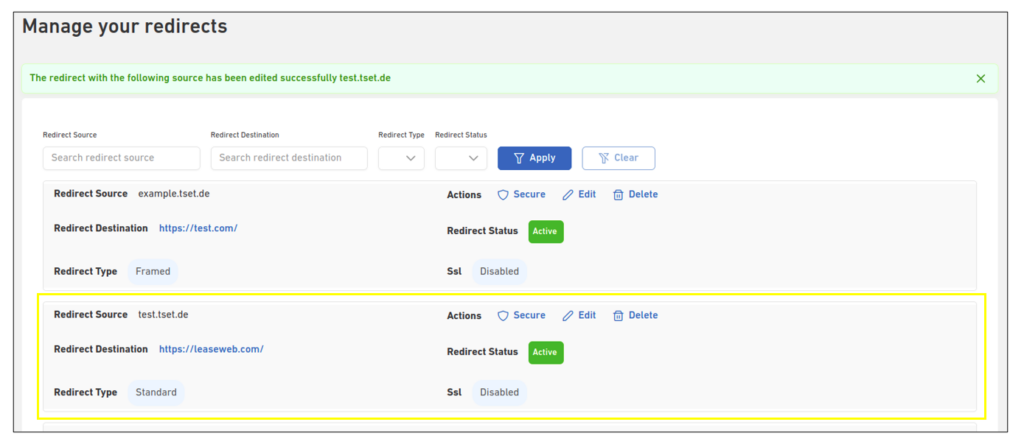
- Click Save. A message will display confirming that your redirect is updated.
- The Redirect will also be listed in the overview with the new redirect URL.
Change redirect type (Standard or Framed Forward)
Perform the following steps to change the redirect type:
- Log in to your Customer Portal account and click Redirects under the Hosting drop-down menu
- The Redirects page displays the list of redirect belongs to your account

- Click on Actions -> Edit for the redirect that you wish to change
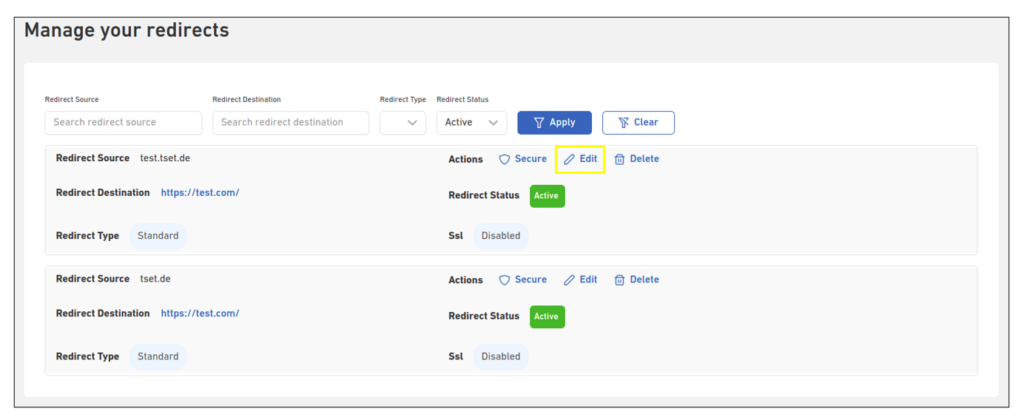
- The Edit Redirect page displays as below
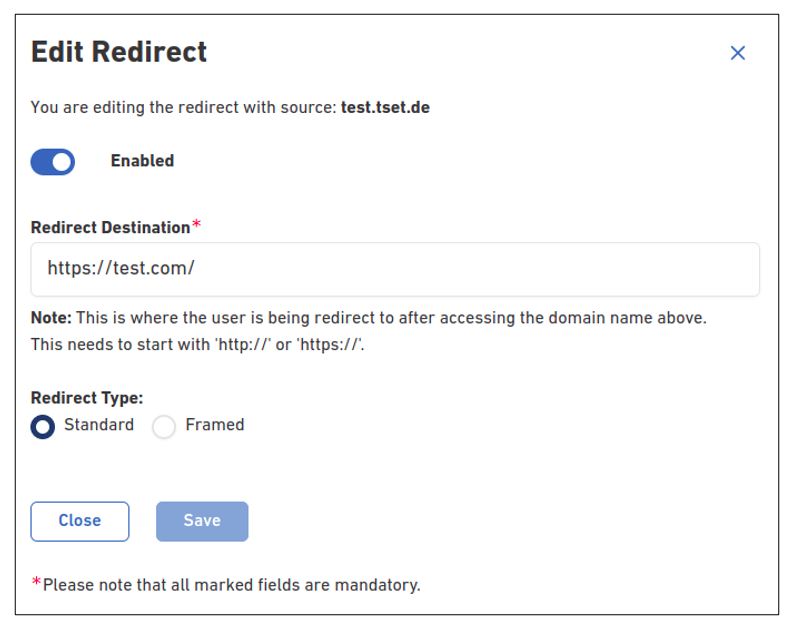
- Go to the Redirect Type field and select the Standard or Framed option.
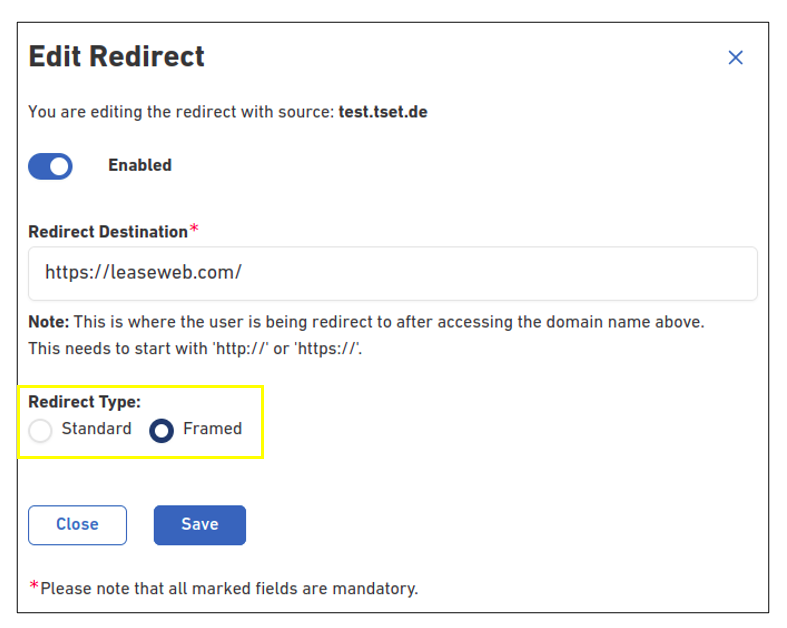
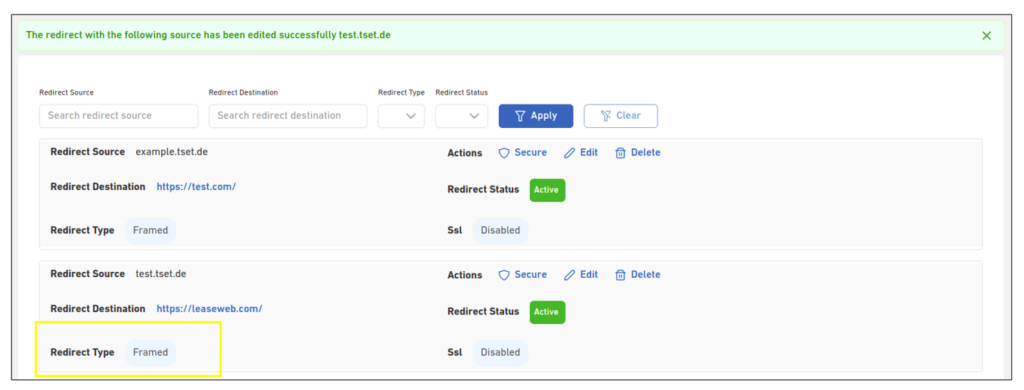
- Click Save. A message will display confirming that your redirect is updated
- The Redirect will also be listed in the overview with the updated type
Enable/Disable your redirect
Perform the following steps to enable or disable your redirect:
- Log in to your Customer Portal account and click Redirects under the Hosting drop-down menu
- The Redirects page displays the list of redirect belongs to your account

- Click on Actions -> Edit for the redirect that you wish to change
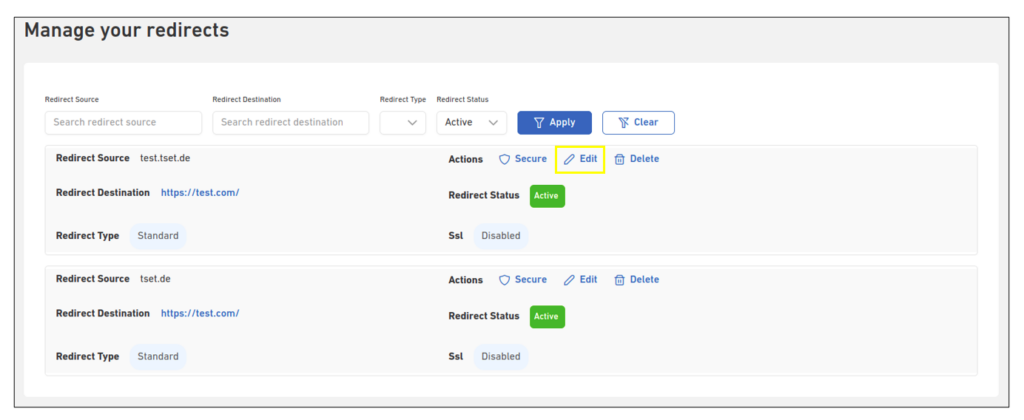
- The Edit redirect page displays as below
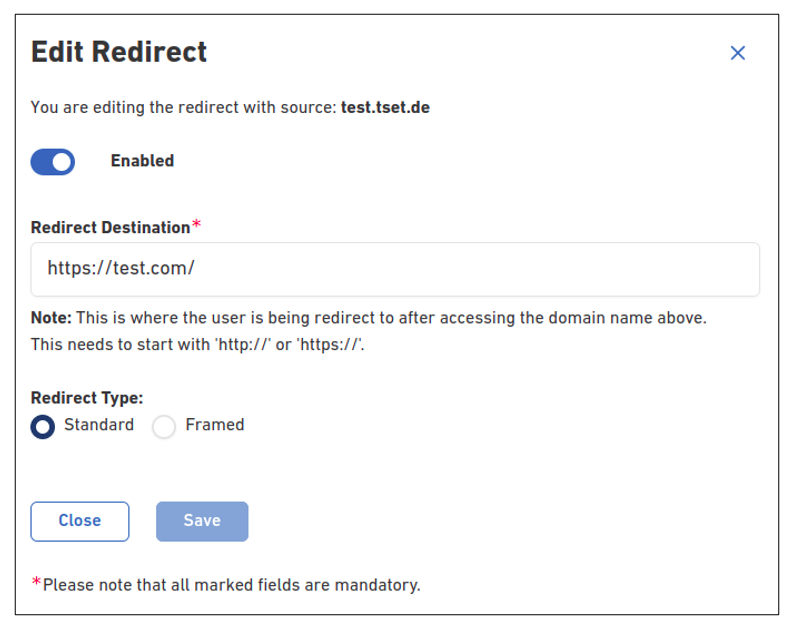
- Go to the Enabled field and toggle the option to enable or disable your redirect
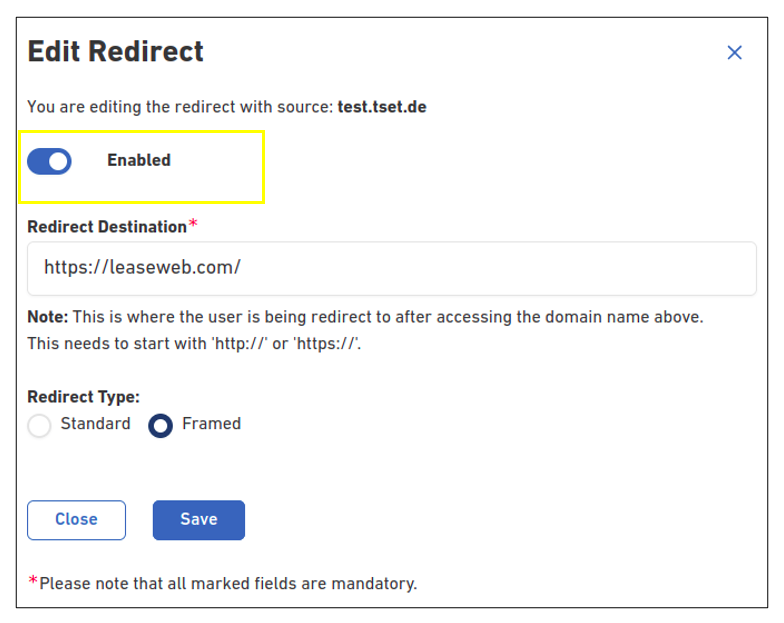
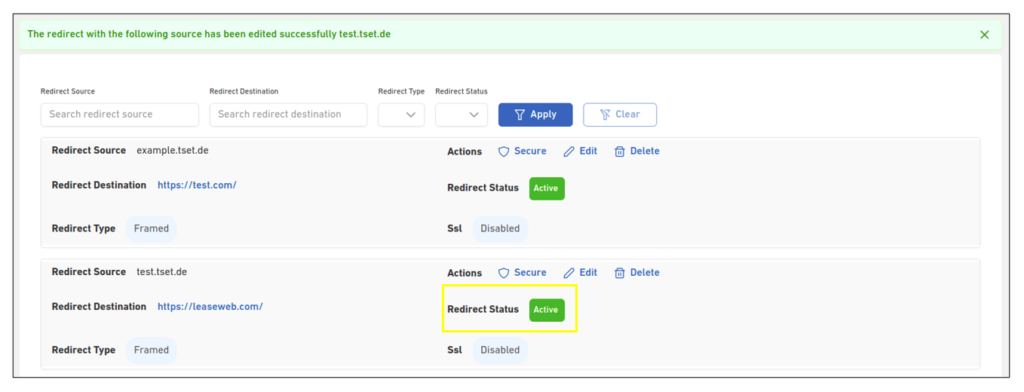
- Click Save. A message will display confirming that your redirect is updated
- The Redirect will also be listed in the overview with the updated redirect status
Deleting your Redirect
Perform the following steps to delete your redirect:
- Log in to your Customer Portal account and click Redirects under the Hosting drop-down menu
- The Redirects page displays a list of redirect belongs to your account

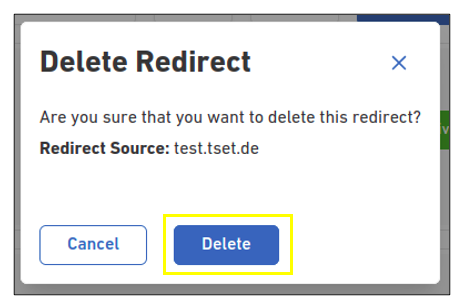
- Click on Actions -> Delete option for the redirect that you wish to delete
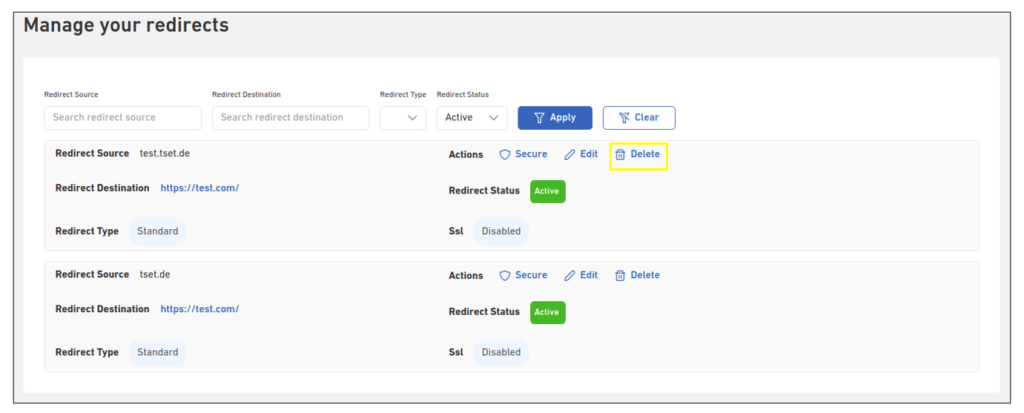
- Click the Delete button
- A message will display confirming that the redirect was deleted and the service will no longer be visible in the redirect(s) list page.
Enable SSL certificate for your redirect
You can secure your redirect by enabling an SSL certificate for your redirect.
Enable Let’s Encrypt certificate
- Log in to your Customer Portal account and click Redirects under the Hosting drop-down menu
- The Redirects page displays the list of redirect belongs to your account

- Choose from Actions the Secure option for the redirect that you wish to enable Let’s Encrypt

- Click on the Request Let’s Encrypt button
- A message will display confirming that the letsencrypt is enabled for the redirect
- The Redirect will also be listed with the SSL updated.


