Storage is a separate component in the resource pool. Your CloudStack domain receives primary and secondary storage pools, where certain type of data is stored.
- Primary storage is used to store instance volumes (root and data disks) and VM snapshots.
- Secondary storage is used to store OS templates, disk images and disk snapshots.
Volumes that can be attached to instances consist of two types: ROOT and DATA disks. To boot up an instance with an OS, most of the time the OS data comes from the ROOT disk. The DATA disks, that you can create additionally, can be assigned separately to an instance for the CloudStack panel or API.
Adding a Volume
When you add (create) a new volume, it is stored as a separate entity in CloudStack. To allocate the volume to an instance, you must attach the volume to that instance. You can attach multiple data volumes to an instance (up to the limits of your domain limit).
Information
A volume can only be associated to 1 instance at a time. For sharing a data volume, the operating system on the instance would have to be accordingly configured.
- From the left menu In the CloudStack panel choose Storage > Volumes, click Create Volume.
- Enter the following information and click OK.
Information
| Field Name | Description |
|---|---|
| Name | The name of the volume to easily identify the volume from the overview. |
| Availability Zone | The zone is pre-filled based on the location of the CloudStack platform. |
| Disk Offering | Select from the list of pre-configured disk offerings. Note: To set your own disk size, select Custom Disk |
Attaching a Volume to an Instance
After creating a volume, it will be listed in the Volumes overview page. To start using the volume you will need to attach it to an instance, so the file system can be accessed by a server. Once attached, this volume will be available in the instance. Depending on your operating system you still need to configure and prepare the disk file system.
- From the left menu choose Storage > Volumes, click on the volume
- From the top right options, click Attach Disk.

- Choose the instance from the VM ID drop down menu and click OK.

Information
The Instance drop-down list will display only the instances associated to or created by you. If the state of your instance is Destroyed, it will not be display.
Once the volume is attached, the ID and status of the instance are displayed. To detach the volume, just click Detach Disk from the top right options.
Uploading a Volume from local device
Next to creating new volumes, you can upload existing data files from the local system and make it ready to attach to an instance. The volume that you upload should be within the available storage limit configured for you and should fit on the selected disk offering.
The CloudStack platform makes use of Qemu/ KVM, so it is possible to upload qcow2 format.
- From the left menu in the CloudStack panel choose Storage > Volumes and click Upload Volume from Local.

- Drag the local file into the screen, enter below information and click OK.
Information
| Field Name | Description |
|---|---|
| Local file | Browse and point to the local data file to be uploaded. |
| Name | The name of the volume to easily identify the volume from the overview. |
| Zone | The zone is pre-filled based on the location of the CloudStack platform. |
| Format | The CloudStack platform makes use of Qemu/ KVM, so it is possible to upload qcow2 format. |
| MD5 checksum | If available, enter the checksum number associated to the file. You may find it in the web server from where you are uploading the file. Note: This number is used to verify file integrity. |
Uploading a Volume from URL
Next to creating new volumes, you can upload existing data files via an URL and make it ready to attach to an instance. The volume that you upload should be within the available storage limit configured for you and should fit on the selected disk offering.
The CloudStack platform makes use of QEMU/ KVM, so it is possible to upload QCOW2 format.
- From the left menu in the CloudStack panel choose Storage > Volumes and click Upload Volume from URL.

- Enter below information and click OK.
Information
| Field Name | Description |
|---|---|
| URL | The URL where the data file is currently hosted. |
| Name | Enter a name using which you can identify the volume. |
| Zone | Select the zone where the volume should reside. Currently, Leaseweb provides only 1 pre-configured zone. |
| Format | Because Leaseweb uses KVM, the file must be of the QCOW2 format. |
| Disk Offering | Make sure to select Custom Disk Offering, because the file size is unknown to CloudStack prior to uploading. |
| Checksum | If available, enter the checksum number associated to the file. You may find it in the webserver from where you are uploading the file. Note: This number is used to verify file integrity. |
Downloading a Volume
You can download volumes displayed in the Volumes page to your local system.
Information
You cannot download a volume that is attached to a running instance.
- From the left menu choose Storage > Volumes, click on the volume.
- From the top right options, click Download Volume.

- Confirm the download by clicking OK, a download link will be generated and shown in the top right corner.
- Click on the download link to start downloading the QCOW2 image file of your volume.
Resizing a Volume
In case your volume get full and you need to increase the disk size, you can resize the volume and repartition the file system with the additional storage added.
Information
The Operating System does not automatically allocate the additional storage added to the volume in CloudStack. Therefore, you will need to increase the partitioning of the file system on your server to add the additional storage added to the volume. We have explained how to increase the partitioning on Linux and Windows here.
- From the left menu choose Compute > Storage, click on the volume.
- From the top right options click Resize Volume.
- Enter the new size for the volume and click OK.
- Verify on your instance if the disk space within the OS has been increased, else you will need to reboot and/or increase partition manually.
Using Linux LVM or Windows Disk Management for more storage
Data disks within our storage platform have a limited size of up to 1 terabyte (TB) per disk. Occasionally you will get to a point where more disk space for your database or web application is needed to keep operating. Using the Logical Volume Manager in Linux or Disk Management for Windows, you can increase the capacity by using logical volumes from multiple disks.
Linux
Creating volumes from a volume group with LVM
We will give you an example of how to create a logical volume of around 199 GB that is recognized by the Linux OS, using two 100 GB data disks from CloudStack and a CentOS or Ubuntu VM.
- To read how to create a data disk in the CloudStack panel click here.
After attaching the data disks to your instance, it takes some seconds for the instance to display the new disks as block devices.
To list all block devices on the instance, use the following command in a terminal:
$ sudo lsblk

You see the 2 new devices show up as: vdb and vdc.
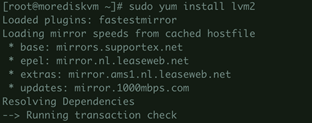
Now we will install Logical Volume Manager on the Virtual Machine:
For RHEL/ CentOS
$ sudo yum install lvm2

For Debian/ Ubuntu
$ sudo apt-get install lvm2Type y and press Enter.
LVM has been installed and we can continue adding the two data disks (vdb and vdc), seen by LVM as physical volumes.
$ sudo pvcreate /dev/vdb /dev/vdc

Now we create a volume group within this case the name ‘group1’ from the added data disks in LVM:
$ sudo vgcreate group1 /dev/vdb /dev/vdc

From the volume group ‘group1’ we can start creating logical volumes. We will create a volume of 199 gigabytes named volume1:
$ sudo lvcreate --size 199G --name volume1 group1

The only thing left to do is setting up a filesystem for the OS to read and write on and mount the volume to a directory. In this example we create an EXT4 filesystem and mount the volume to /mnt/appdata
$ sudo mkfs.ext4 /dev/group1/volume1


The volume has been formatted in EXT4 format.
To use the volume, we have to mount the volume to a mountpoint. In this example, we mount volume1 to /mnt/appdata.
$ sudo mount /dev/group1/volume1 /mnt/appdata$ df -h

Managing LVM
Use these tools to manage disks in LVM:
$ lvscan
list all logical volumes

$ vgscan
list all volume groups

$ vgextend [path to device]
Extend the volume group with an additional physical volume

$ vgdisplay
Display total amount of disk space in volume group
For more tools see: https://linux.die.net/man/8/lvm
Managing the disk space is done using tools in LVM. But keep in mind that your data is written to multiple disks, increasing the complexity of managing your infrastructure.
Next to that, adding an additional volume does not change the size of the root disk. You will have to move your database and/ or application data directory, to write to the new volume/file path instead.
Migrating the entire OS to a new root disk on an active machine is very tricky and that is not advisable. In any case be sure to make and keep backups of your data to always be save when any form of data corruption or loss present itself.
Microsoft Windows
Create volumes with multiple disks in Windows
In Windows you get the ability to easily setup striped or mirrored volumes using Disk Management utility. With a striped volume setup, data is written in stripes on two or more disks which increases performance. A mirrored volume lets you create a setup where the same data is written to two or more disks. This creates a live copy of your data on multiple disks.
In this example we will create a volume of 200 gigabytes using two 100 gigabyte disks created in CloudStack. Please see the following link on how to create data disks in the CloudStack dashboard.
After logging in on the Windows machine via the console or Remote Desktop, you need to start the program Computer Management and go to Disk Management.
The added disks are visible here, but still Offline and not yet initialized.
- Right-click on a disk and click Online to bring the disk online.

- Now initialize the disk by clicking on Initialize and Ok.
- Do the same for your second disk.
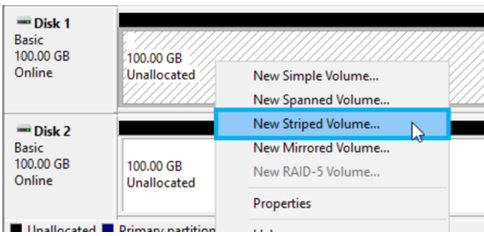
- Now right-click on the unallocated space of one of the two disks and click New Striped Volume

- The wizard starts, click Next.
- Add the second available disk to the Selected overview by selecting the disk under Available and clicking Add >. Now click Next.

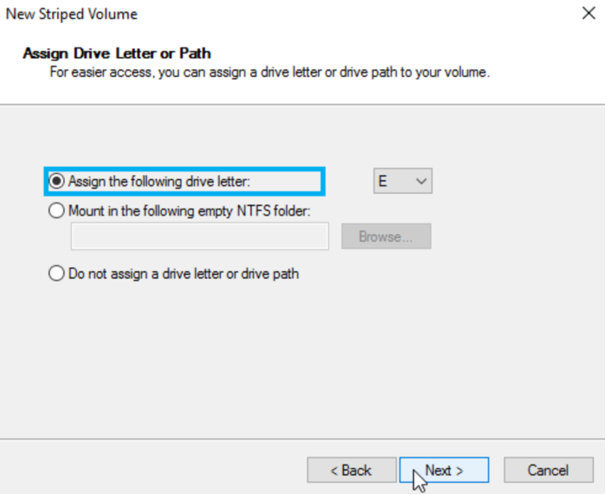
- Assign a drive letter as desired and click Next.

- Format the volume according to your need (NTFS is most of the times the way to go) and click Next.

- Now you will see an overview of the setup, click Finish.
- The disks will now format and setup as a single volume of 200 gigabytes disk space.

