Cluster Scaling Options
Upon configuring a new cluster, two scaling options are available: manual scaling or autoscaling. Scaling is configured at the node pool level, allowing for more granular control over your cluster’s scaling behaviour.
Once a Kubernetes cluster has been configured, Leaseweb allows you to:
- Adjust the number of nodes within each node pool
- Switch between manual and autoscaling modes for individual node pools as needed
This setup gives you the flexibility to manage workloads per node pool. For example, you can use larger nodes in one pool for resource-critical applications, and smaller nodes in another for lightweight services.
This allows you to optimise performance and cost based on the specific requirements of each workload within the same cluster.
Information
Please consider the pricing on our website for evaluating the impact of this process.
Manual scaling
Enabling Manual Scaling for Node Pools in a Kubernetes Cluster from the Customer Portal
Manual scaling enables you to adjust the number of nodes within each node pool manually, tailored to your specific needs. You have full control over scaling decisions, ensuring each node pool’s size matches the workload requirements at any given time.
The following steps will guide you through scaling your cluster by adjusting node pools as needed:
- On the Kubernetes Section of the Customer Portal, a list of clusters is visible.
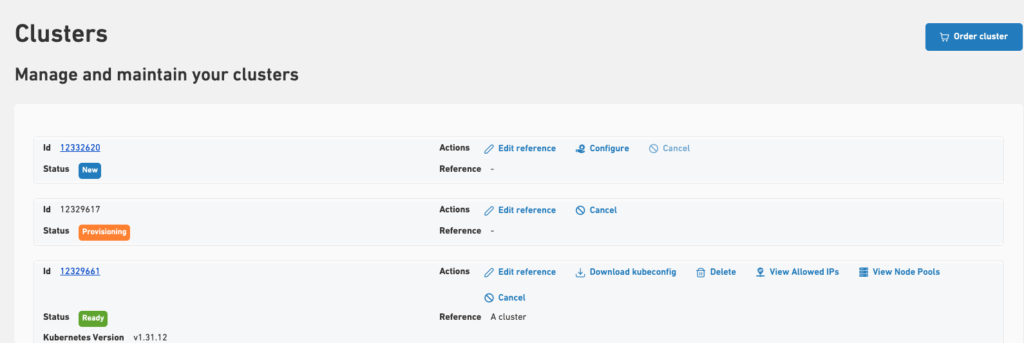
- To configure autoscaling for a node pool, click the Configure action or the cluster’s ID to open the Configure Cluster page.
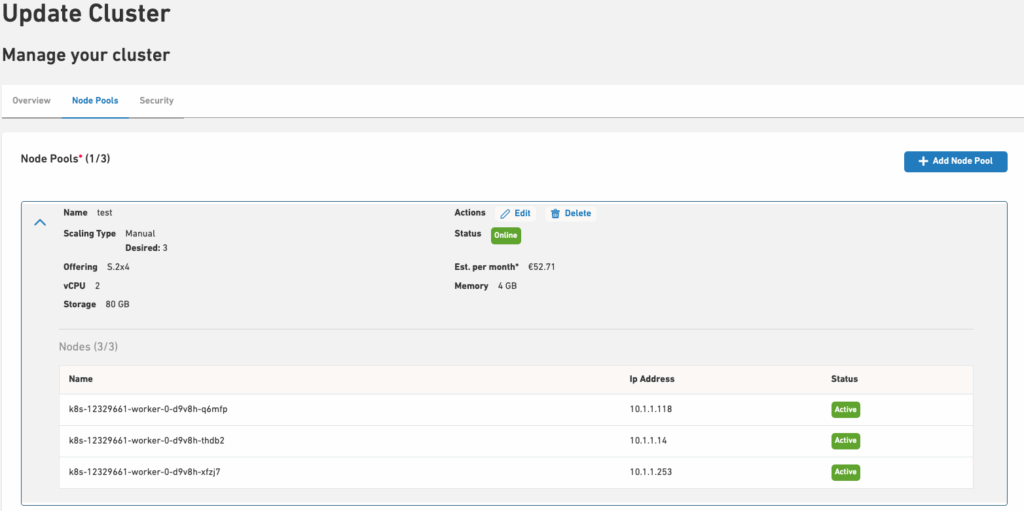
- Then, navigate to the Node Pools tab and click edit on the desired node pool.
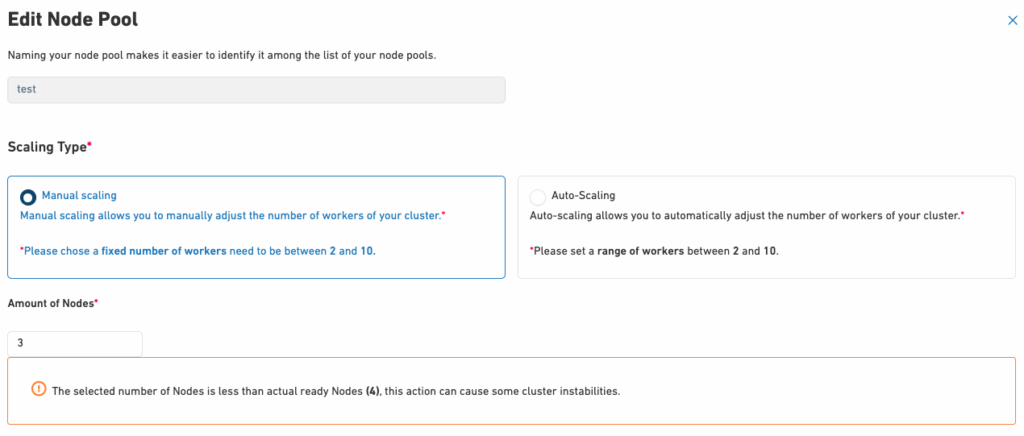
- In the edit view, navigate to the Scaling Type option and select Manual Scaling.
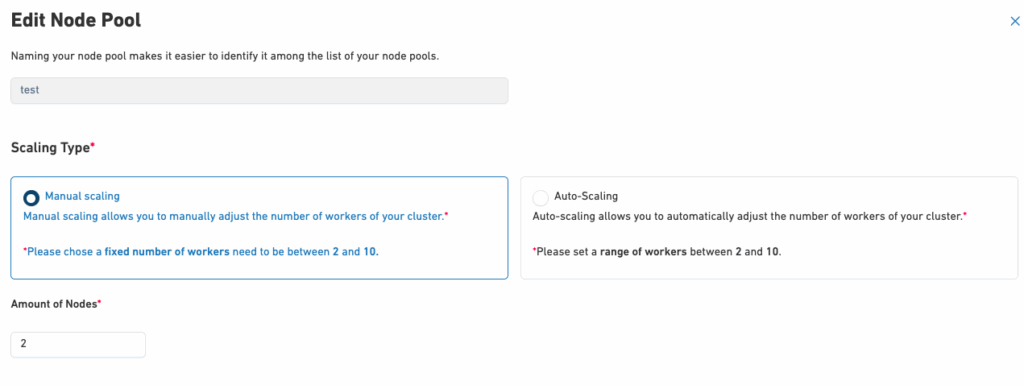
- The desired number of nodes can be chosen in the Amount of Nodes section.
- If the cluster is scaled to fewer nodes, a warning might be emitted.

- Upon re-confirmation, automation will start scaling the cluster and the node pool accordingly.
- You can view the selected scaling type and the desired number of worker nodes within each node pool on the corresponding Node Pools tab.
Warning
The maximum number of worker nodes must be greater than or equal to the minimum number of worker nodes. Please contact us if you require more than 10 nodes.
Autoscaling
Cluster autoscaling automatically adjusts the number of nodes in your cluster based on resource demand. With the introduction of node pools, autoscaling is now configured and managed at the node pool level.
When workloads increase, the system adds nodes to accommodate the load. When demand decreases, it removes unnecessary nodes, ensuring optimal resource usage and cost efficiency.
For more information about cluster autoscaling, refer to the official Kubernetes documentation here.
Enabling Autoscaling for Node Pools in a Kubernetes Cluster from the Customer Portal
You can enable autoscaling by setting minimum and maximum sizes for each node pool.
The following steps will guide you through configuring autoscaling for individual node pools within your cluster as needed:
- On the Kubernetes Section of the Customer Portal, a list of clusters is visible.

- To configure autoscaling for a node pool, click the Configure action or the cluster’s ID to open the Configure Cluster page.
- Then, navigate to the Node Pools tab and click edit on the desired node pool.
- In the edit view, navigate to the Scaling Type option and select Autoscaling.
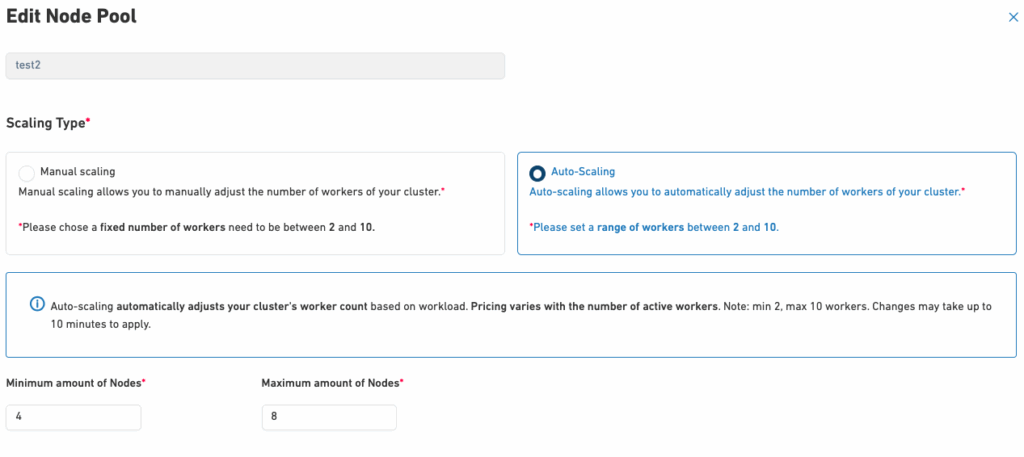
- Minimum amount of Nodes:
- Defines the smallest size the node pool can scale down to. It must be at least 2 and cannot exceed the Maximum amount of Nodes.
- Maximum amount of Nodes:
- Specifies the maximum size the node pool can scale up to. Please note that the maximum amount of workers must be equal to or greater than the currently ready worker nodes. A relevant message will be displayed to inform you of this potential issue.
- Minimum amount of Nodes:
- Once satisfied with the new number, click the Update button, then click Confirm to apply the changes.
- Upon re-confirmation, automation will start scaling the cluster accordingly.
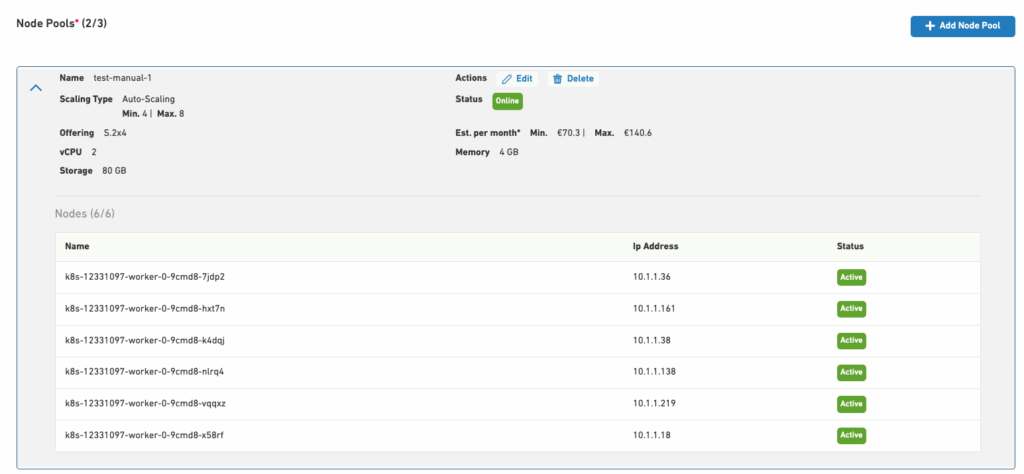
- You can view the selected scaling type and the desired number of worker nodes within each node pool on the corresponding Node Pools tab.
Warning
The maximum number of worker nodes must be greater than or equal to the minimum number of worker nodes. Please contact us if you require more than 10 nodes.
View the Cluster Autoscaling status
To monitor the status of the Autoscaling, you can check the relevant details from the configmap.
Run the following command to retrieve the status of the Autoscaling in the kube-system namespace:
kubectl get configmap cluster-autoscaler-status -o yaml -n kube-systemThis command will return an output similar to the example below:
apiVersion: v1
data:
  status: |
    time: 2025-01-09 12:02:54.818691507 +0000 UTC
    autoscalerStatus: Running
    clusterWide:
      health:
        status: Healthy
        nodeCounts:
          registered:
            total: 3
            ready: 3
            notStarted: 0
          longUnregistered: 0
          unregistered: 0
        lastProbeTime: "2025-01-09T12:02:54.818691507Z"
        lastTransitionTime: "2025-01-07T09:29:00.390169767Z"
      scaleUp:
        status: NoActivity
        lastProbeTime: "2025-01-09T12:02:54.818691507Z"
        lastTransitionTime: "2025-01-07T09:29:00.390169767Z"
      scaleDown:
        status: NoCandidates
        lastProbeTime: "2025-01-09T12:02:54.818691507Z"
        lastTransitionTime: "2025-01-07T09:29:00.390169767Z"
. . .Switching Between Scaling Modes
You can switch between manual and autoscaling modes for your cluster. To do so:
- To configure autoscaling for a node pool, click the Configure action or the cluster’s ID to open the Configure Cluster page.

- Navigate to the Node Pools tab and click edit on the desired node pool.
- In the edit view, navigate to the Scaling Type option.
Then, you change between the manual and automatic scaling options.
- Upon re-confirmation, automation will start scaling the cluster accordingly.
- You can view the selected scaling type and the desired number of worker nodes within each node pool on the corresponding Node Pools tab.
Information
- If the minimum value set exceeds the number of ready worker nodes, autoscaling will initiate a scale-up to meet the defined minimum.
- The maximum number of worker nodes must be defined as equal to or greater than the current number of ready worker nodes.
Specificity to consider during the scale-down/scale-up of a Kubernetes cluster
- During the BETA release, we currently allow for a minimum of 2 nodes per cluster and a maximum of 10 nodes per cluster.
- This limit can possibly be increased by opening a support ticket with us.
- We currently do not allow updating the Node offering once a cluster is provisioned.
- However, you can create a new node pool with your desired node offering, delete the original one, and workloads will be migrated to the new pool.
- If you have any questions or need additional clarification, please contact us.
Warning
An unstable / blocked draining process should be visible with the kubectl get nodes command, or by looking at the cluster’s events.
In order to fix this, the remaining pods/resources can be cleaned on the node before retrying the scale cluster action.
For more information regarding the best practices to scale your Kubernetes clusters, please refer here.
Further documentation on Scaling & Related API objects
| Name | Short description | Relevant documentation |
|---|---|---|
| Disruptions PodDisruptionBudget | Article explaining the PodDisruptionBudget and its use. | *https://kubernetes.io/docs/concepts/workloads/pods/disruptions/ *https://kubernetes.io/docs/tasks/run-application/configure-pdb/ |
| Node affinity | Allows to assign a pod to certain nodes. | *https://kubernetes.io/docs/tasks/configure-pod-container/assign-pods-nodes-using-node-affinity/ |
| NodeSelector | Allow to select on which node a pod can be scheduled | *https://kubernetes.io/docs/concepts/scheduling-eviction/assign-pod-node/ |
| Topology | Allow to select on which node a pod can be scheduled | Allows assigning a pod to certain nodes. |
 Please note that if the selected number of nodes is lower than the currently ready worker nodes, this may lead to instability in your cluster.